前言 插件上传地址
https://plugins.jetbrains.com/
JDK要求必须11以上,我这里使用的是17。
下载JDK17
https://www.oracle.com/cn/java/technologies/downloads/#jdk17-windows
安装后确认下版本
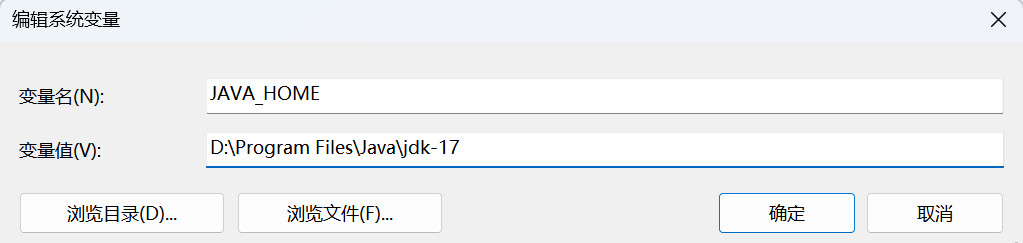
环境变量中的JAVA_HOME也要设置为JDK17的路径。
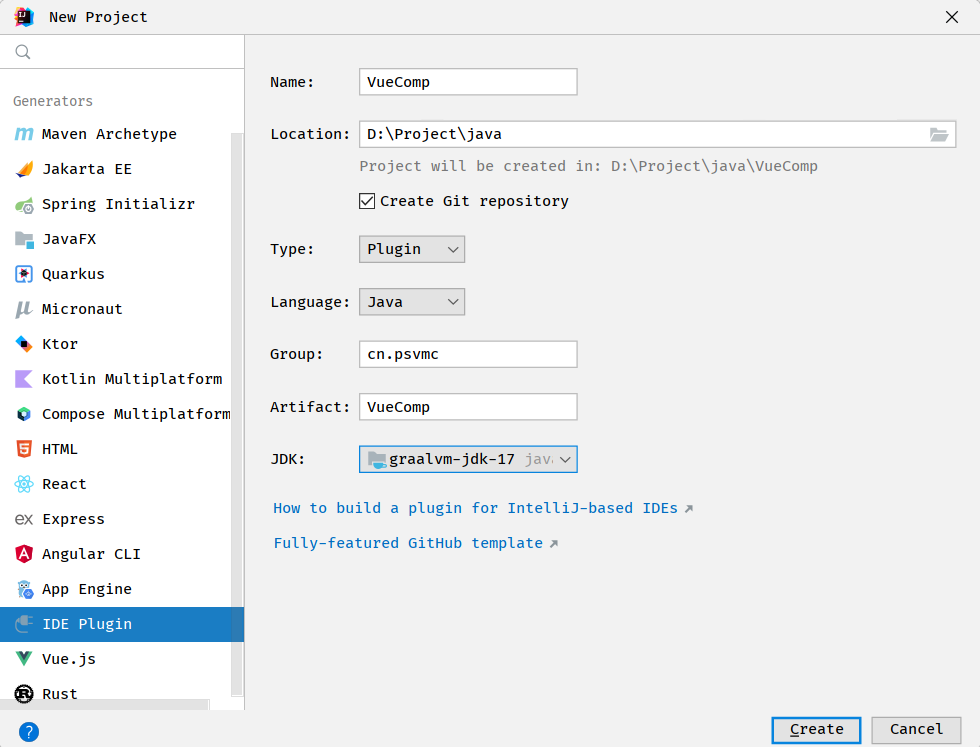
创建项目 创建项目
项目打开后点击plugin.xml配置插件的基本信息
如下
1 2 3 4 5 6 7 8 9 10 11 12 13 14 15 16 17 18 19 20 21 22 23 24 25 26 27 28 <idea-plugin > <id > cn.psvmc.VueComp</id > <name > VueComp</name > <vendor email ="183518918@qq.com" url ="https://www.psvmc.cn" > 码客说</vendor > <description > <![CDATA[ Convenient for generating Vue page templates and styles.<br><br> After adding a folder, right-click on the menu to generate a file with the same name as the folder.<br> Supports TS + Less + Composition API.<br> Templates and styles are separated.<br> TS is not separated because separation is not very useful with setup.<br> Templates are not separated because after separation, clicking on attributes in IDEA does not navigate properly. ]]> </description > <depends > com.intellij.modules.platform</depends > <extensions defaultExtensionNs ="com.intellij" > </extensions > <actions > <action id ="cn.psvmc.vuecomp.CreateVueCompAction" class ="cn.psvmc.vuecomp.CreateVueCompAction" icon ="/icons/vue.svg" text ="创建Vue组件/页面" > <add-to-group group-id ="NewGroup" anchor ="first" /> <keyboard-shortcut keymap ="$default" first-keystroke ="ctrl H" /> </action > </actions > </idea-plugin >
注意
插件如果要上传到IDEA上描述不能用中文,如果自己导入是可以中文的。
报错
Could not resolve org.jetbrains.intellij.plugins:gradle-intellij-plugin:1.8.0
环境变量中的JAVA_HOME也要设置为JDK17的路径。
我们安装这个插件方便插件的开发
这里我就手动创建了。
示例 简单提示 这里我们只是简单的在右下角弹出通知显示项目根目录
CreateVueCompAction.java
1
2
3
4
5
6
7
8
9
10
11
12
13
14
15
16
import com.intellij.notification.Notification;import com.intellij.notification.NotificationType;import com.intellij.notification.Notifications;import com.intellij.openapi.actionSystem.AnAction;import com.intellij.openapi.actionSystem.AnActionEvent;import com.intellij.openapi.project.Project;import com.intellij.openapi.ui.Messages;import com.intellij.openapi.vfs.VirtualFile;public class CreateVueCompAction extends AnAction { @Override public void actionPerformed (AnActionEvent e) { Notifications.Bus.notify(new Notification ("Print" , "" , e.getProject().getBasePath(), NotificationType.INFORMATION), e.getProject()); } }
当然也可以弹窗显示
1 Messages.showMessageDialog(e.getProject().getBasePath(), "Project BasePath", Messages.getInformationIcon());
在plugin.xml的根节点下添加
1 2 3 4 5 6 7 8 9 <actions > <action id ="cn.psvmc.vuecomp.CreateVueCompAction" class ="cn.psvmc.vuecomp.CreateVueCompAction" text ="创建Vue组件/页面" > <add-to-group group-id ="NewGroup" anchor ="first" /> <keyboard-shortcut keymap ="$default" first-keystroke ="ctrl H" /> </action > </actions >
也可以在代码文件夹上点击鼠标右键,选择 New => Plugin DevKit => Action
如果没有的话,那么可能需要在先在IDEA中装个 Plugin DevKit插件。
获取选中的文件夹 1 2 3 4 5 6 7 8 9 10 11 12 13 14 15 16 17 18 19 20 21 22 23 24 25 26 27 28 29 30 31 32 33 34 import com.intellij.openapi.actionSystem.AnAction;import com.intellij.openapi.actionSystem.AnActionEvent;import com.intellij.openapi.project.Project;import com.intellij.openapi.ui.Messages;import com.intellij.openapi.vfs.VirtualFile;import java.util.ArrayList;import java.util.List;public class CreateVueCompAction extends AnAction { @Override public void actionPerformed (AnActionEvent e) { Project project = e.getProject(); if (project == null ) { Messages.showMessageDialog("No project found" , "Error" , Messages.getErrorIcon()); return ; } VirtualFile[] files = e.getData(com.intellij.openapi.actionSystem.CommonDataKeys.VIRTUAL_FILE_ARRAY); if (files == null || files.length == 0 ) { Messages.showMessageDialog("No file selected" , "Error" , Messages.getErrorIcon()); return ; } List<String> folderPathList = new ArrayList <>(); for (VirtualFile file : files) { if (file.isDirectory()) { folderPathList.add(file.getPath()); } } String folderPaths= String.join("\n" , folderPathList); Messages.showMessageDialog(folderPaths, "选择的文件夹" , Messages.getInformationIcon()); } }
文件创建及写入 1 2 3 4 5 6 7 8 9 10 11 12 13 14 15 16 17 18 19 20 21 22 23 24 25 26 27 28 29 30 31 32 33 34 35 36 37 38 39 40 41 42 43 44 45 import com.intellij.openapi.actionSystem.AnAction;import com.intellij.openapi.actionSystem.AnActionEvent;import com.intellij.openapi.application.ApplicationManager;import com.intellij.openapi.application.WriteAction;import com.intellij.openapi.project.Project;import com.intellij.openapi.ui.Messages;import com.intellij.openapi.vfs.VirtualFile;import com.intellij.openapi.vfs.VirtualFileManager;import java.io.IOException;public class CreateVueCompAction extends AnAction { @Override public void actionPerformed (AnActionEvent e) { ApplicationManager.getApplication().runWriteAction(() -> { Project project = e.getProject(); if (project == null ) { return ; } VirtualFile[] files = e.getData(com.intellij.openapi.actionSystem.CommonDataKeys.VIRTUAL_FILE_ARRAY); if (files == null || files.length == 0 ) { Messages.showMessageDialog("未选择文件夹!" , "错误" , Messages.getErrorIcon()); return ; } for (VirtualFile file : files) { if (file.isDirectory()) { try { String fileName = "main.txt" ; VirtualFile newFile = file.findChild(fileName); if (newFile == null ) { newFile = file.createChildData(this , fileName); String content = "Hello, World!" ; VirtualFile finalNewFile = newFile; WriteAction.run(() -> { finalNewFile.setBinaryContent(content.getBytes()); }); } } catch (IOException ignored) { } } } VirtualFileManager.getInstance().refreshWithoutFileWatcher(true ); }); } }
生成Vue文件 1 2 3 4 5 6 7 8 9 10 11 12 13 14 15 16 17 18 19 20 21 22 23 24 25 26 27 28 29 30 31 32 33 34 35 36 37 38 39 40 41 42 43 44 45 46 47 48 49 50 51 52 53 54 55 56 57 58 59 60 61 62 63 64 65 66 67 68 69 70 71 72 73 import cn.psvmc.vuecomp.utils.ZFreeMarkerUtils;import com.intellij.notification.Notification;import com.intellij.notification.NotificationType;import com.intellij.notification.Notifications;import com.intellij.openapi.actionSystem.AnAction;import com.intellij.openapi.actionSystem.AnActionEvent;import com.intellij.openapi.application.ApplicationManager;import com.intellij.openapi.application.WriteAction;import com.intellij.openapi.project.Project;import com.intellij.openapi.ui.Messages;import com.intellij.openapi.vfs.VirtualFile;import com.intellij.openapi.vfs.VirtualFileManager;import java.io.IOException;import java.util.ArrayList;import java.util.HashMap;import java.util.List;import java.util.Map;public class CreateVueCompAction extends AnAction { @Override public void actionPerformed (AnActionEvent e) { ApplicationManager.getApplication().runWriteAction(() -> { Project project = e.getProject(); if (project == null ) { return ; } VirtualFile[] files = e.getData(com.intellij.openapi.actionSystem.CommonDataKeys.VIRTUAL_FILE_ARRAY); if (files == null || files.length == 0 ) { Messages.showMessageDialog("未选择文件夹!" , "错误" , Messages.getErrorIcon()); return ; } for (VirtualFile file : files) { if (file.isDirectory()) { String fileName = file.getName(); Map<String, Object> dataModel = new HashMap <>(); dataModel.put("fileName" , fileName); List<Map<String, String>> templateList = new ArrayList <>(); Map<String, String> templateMap = new HashMap <>(); templateMap.put("templateName" , "ts_vue.ftl" ); templateMap.put("fileNameAll" , fileName + ".vue" ); templateList.add(templateMap); Map<String, String> styleMap = new HashMap <>(); styleMap.put("templateName" , "style.ftl" ); styleMap.put("fileNameAll" , fileName + ".less" ); templateList.add(styleMap); for (Map<String, String> item : templateList) { try { String fileNameAll = item.get("fileNameAll" ); String templateName = item.get("templateName" ); VirtualFile newFile = file.findChild(fileNameAll); if (newFile == null ) { newFile = file.createChildData(this , fileNameAll); String content = ZFreeMarkerUtils.getStrByFtl(templateName, dataModel); VirtualFile finalNewFile = newFile; WriteAction.run(() -> { finalNewFile.setBinaryContent(content.getBytes()); }); } else { Notification notice = new Notification ("Print" , "" , "文件已存在" , NotificationType.INFORMATION); Notifications.Bus.notify(notice, e.getProject()); } } catch (IOException ignored) { } } } } VirtualFileManager.getInstance().refreshWithoutFileWatcher(true ); }); } }
对应的模板文件
ts_vue.ftl
1 2 3 4 5 6 7 8 9 10 11 12 13 <template > <div class ="${fileName}" > {{ fileName }} </div > </template > <script lang ="ts" setup > import {ref} from "vue" ; const fileName = ref ("${fileName}" ) </script > <style src ="./${fileName}.less" lang ="less" scoped > </style >
style.ftl
使用的时候,先创建我们的组件文件夹,比如MainView,右键点击创建Vue组件/页面,就会在这个文件夹中创建跟文件夹同名的两个文件。
设置图标 在 IDEA 插件开发中,设置 action 的图标主要涉及到以下几个步骤:
准备图标文件 :
确保你有一个图标文件,通常是 PNG 格式,SVG也可以。尺寸为 16x16 像素,不要太大,会把菜单撑变形。
将图标文件放入资源目录 :
将图标文件放在插件项目的 resources 目录下,通常路径为 src/main/resources/icons/。
修改 plugin.xml 文件 :
打开 plugin.xml 文件,找到或添加 actions 节点,并在其中定义你的 action。要指定图标,使用 icon 属性。下面是一个示例配置:
1 2 3 4 5 6 7 8 9 <actions > <action id ="com.example.MyAction" class ="com.example.MyAction" text ="My Action" description ="Description of my action" icon ="/icons/my_icon.png" > </action > </actions >
在这个例子中,icon 属性的值是图标文件的路径,相对于 resources 目录。
插件本身的图标可以替换resources/META-INF/pluginIcon.svg文件,大小为40x40。
配置存储和读取 工具类 1 2 3 4 5 6 7 8 9 10 11 12 13 14 15 16 17 18 19 20 21 22 23 24 25 26 27 28 29 30 31 32 33 34 35 36 37 38 39 40 41 42 43 44 45 46 47 48 49 50 51 import com.intellij.openapi.application.ApplicationManager;import com.intellij.openapi.components.Service;import com.intellij.openapi.components.PersistentStateComponent;import com.intellij.openapi.components.State;import com.intellij.openapi.components.Storage;import org.jetbrains.annotations.NotNull;import org.jetbrains.annotations.Nullable;@State(name = "PluginSettings", storages = @Storage("PluginSettings.xml")) @Service(Service.Level.APP) public final class PluginSettings implements PersistentStateComponent <PluginSettings.State> { private State state = new State (); public static class State { public String vueVersion = "vue3" ; public String cssVersion = "less" ; } @Nullable @Override public State getState () { return state; } @Override public void loadState (@NotNull State state) { this .state = state; } public String getVueVersion () { return state.vueVersion; } public void setVueVersion (String str) { state.vueVersion = str; } public String getCssVersion () { return state.cssVersion; } public void setCssVersion (String str) { state.cssVersion = str; } public static PluginSettings getInstance () { return ApplicationManager.getApplication().getService(PluginSettings.class); } }
plugin.xml中根节点内添加
1 2 3 <extensions defaultExtensionNs ="com.intellij" > <applicationService serviceImplementation ="cn.psvmc.vuecomp.settings.PluginSettings" /> </extensions >
你可以这样使用 PluginSettings 工具类来读取或保存配置:
读取配置 1 2 PluginSettings settings = PluginSettings.getInstance();String vueVersion = settings.getVueVersion();
修改配置 1 2 PluginSettings settings = PluginSettings.getInstance();settings.setVueVersion("vue3" );
说明
@State 注解PluginSettings.xml),可以根据需要调整。PersistentStateComponent 接口getState 和 loadState,这些方法会由 IntelliJ IDEA 自动调用。工具类方法 getInstance :使用 ServiceManager.getService 获取 PluginSettings 实例,这是获取配置信息的一种标准方法。
环境配置 构建配置 gradle\wrapper\gradle-wrapper.properties
1 2 3 4 5 6 distributionBase=GRADLE_USER_HOME distributionPath=wrapper/dists distributionUrl=https\://mirrors.cloud.tencent.com/gradle/gradle-7 .6 -all.zip zipStoreBase=GRADLE_USER_HOME zipStorePath=wrapper/dists
settings.gradle.kts
1 2 3 4 5 6 7 8 9 10 11 12 rootProject.name = "VueComp" pluginManagement { repositories { maven("https://maven.aliyun.com/repository/central" ) maven("https://maven.aliyun.com/repository/public" ) maven ("https://maven.aliyun.com/repository/gradle-plugin" ) maven ("https://maven.aliyun.com/repository/apache-snapshots" ) mavenCentral() gradlePluginPortal() } }
build.gradle.kts
1 2 3 4 5 6 7 8 9 10 11 12 13 14 15 16 17 18 19 20 21 22 23 24 25 26 27 28 29 30 31 32 33 34 35 36 37 38 39 40 41 plugins { id("java" ) id("org.jetbrains.intellij" ) version "1.8.0" } group = "cn.psvmc" version = "1.0.3" repositories { maven("https://maven.aliyun.com/repository/central" ) maven("https://maven.aliyun.com/repository/public" ) maven ("https://maven.aliyun.com/repository/gradle-plugin" ) maven ("https://maven.aliyun.com/repository/apache-snapshots" ) mavenCentral() gradlePluginPortal() } dependencies { implementation("org.freemarker:freemarker:2.3.31" ) } intellij { version.set ("2021.3.3" ) type.set ("IC" ) plugins.set (listOf()) } tasks { withType<JavaCompile> { options.encoding = "UTF-8" sourceCompatibility = "11" targetCompatibility = "11" } patchPluginXml { sinceBuild.set ("213" ) untilBuild.set ("223.*" ) } }
注意相比于自动生成项目的配置,这里更改了如下几点:
镜像库 1 2 3 4 5 6 7 8 repositories { maven("https://maven.aliyun.com/repository/central" ) maven("https://maven.aliyun.com/repository/public" ) maven ("https://maven.aliyun.com/repository/gradle-plugin" ) maven ("https://maven.aliyun.com/repository/apache-snapshots" ) mavenCentral() gradlePluginPortal() }
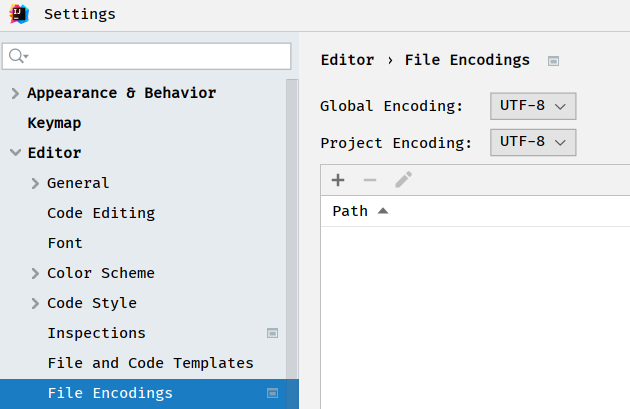
编码 要设置编码,否则中文会乱码。
1 2 3 4 5 withType<JavaCompile> { options.encoding = "UTF-8" sourceCompatibility = "11" targetCompatibility = "11" }
项目本身也设置为UTF-8
插件版本设置 调试IDEA版本 intellij中版本设置的时调试时使用的IDEA版本,他会自动下载
1 2 3 4 5 6 intellij { version.set ("2021.3.3" ) type.set ("IC" ) plugins.set (listOf()) }
运行的时候会自动下载该版本的IDEA来运行我们的插件。
我们平常使用的是IU版本。
IC版本是社区版本,是不用激活的,方便我们测试。
过程中有三个文件都不小,比较费时:
注意
如果下载太慢可以本地下载
https://download.jetbrains.com.cn/idea/ideaIC-2021.3.3.exe
下载后修改配置
1 2 3 4 intellij { plugins.set (listOf()) localPath.set ("D:\\Program Files\\JetBrains\\IntelliJ IDEA Community Edition 2021.3.3" ) }
注意
调试的版本要和依赖版本匹配,不能随意更改。
插件支持IDEA版本 这个版本是我们插件支持的最低和最高版本
1 2 3 4 patchPluginXml { sinceBuild.set ("213" ) untilBuild.set ("241.*" ) }
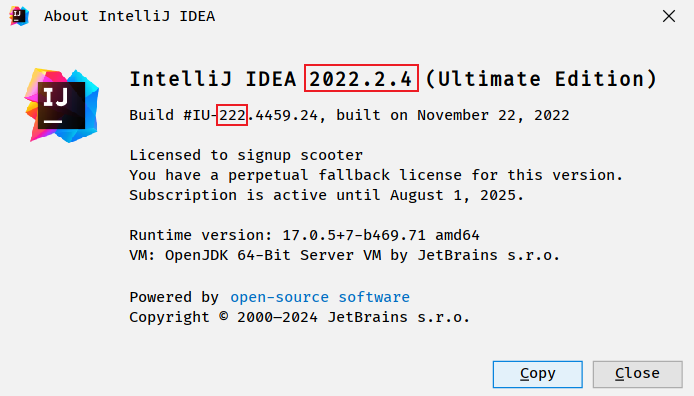
这个版本可以在IDEA的 Help => About 查看
Java版本设置 还有这个版本要和对应IDEA依赖的Java版本一致,可以和我们插件项目依赖的Java版本不一致,我就是用的JDK17,而这里配置的11,可以正常编译运行。
1 2 3 4 withType<JavaCompile> { sourceCompatibility = "11" targetCompatibility = "11" }
更换gradle版本 默认的7.5我在构建的时候报错,所以就更换为7.6版本了。
gradle-wrapper.properties
1 2 3 4 5 6 distributionBase =GRADLE_USER_HOME distributionPath =wrapper/dists distributionUrl =https\://mirrors.cloud.tencent.com/gradle/gradle-7.6-all.zip zipStoreBase =GRADLE_USER_HOME zipStorePath =wrapper/dists
镜像地址
https://mirrors.cloud.tencent.com/gradle/
构建报错
Caused by: java.lang.NullPointerException: getHeaderField(“Location”) must not be null
这个错误不影响。
FreeMarker使用 build.gradle.kts中添加
1 2 3 dependencies { implementation("org.freemarker:freemarker:2.3.31" ) }
resources/templates/template.ftl
1 2 # This is an example template Hello, ${name}!
工具类
1 2 3 4 5 6 7 8 9 10 11 12 13 14 15 16 17 18 19 20 21 22 23 24 25 26 27 28 29 30 31 32 33 34 35 import freemarker.template.Configuration;import freemarker.template.Template;import freemarker.template.TemplateException;import java.io.*;import java.util.HashMap;import java.util.Map;public class ZFreeMarkerUtils { public static String getStrByFtl (String templateName,Map<String, Object> dataModel) { try { Configuration cfg = new Configuration (Configuration.VERSION_2_3_31); cfg.setClassForTemplateLoading(ZFreeMarkerUtils.class, "/templates" ); Template template = cfg.getTemplate(templateName); try (StringWriter out = new StringWriter ()) { template.process(dataModel, out); String result = out.toString(); System.out.println(result); return result; } catch (TemplateException e) { return "" ; } } catch (IOException ex) { return "" ; } } public static void test () { Map<String, Object> dataModel = new HashMap <>(); dataModel.put("name" , "World" ); getStrByFtl("template.ftl" ,dataModel); } }
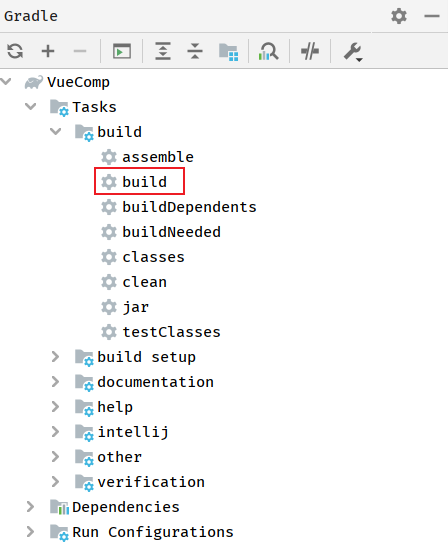
打包 Gradle中通过Tasks/build/build来打包我们的插件。
构建好后我们可以在build/distributions目录下面找到我们的zip包,拿到后直接在idea上面进行离线安装即可。
注意
网上有说用intellij/buildPlugin打包,这是不对的,这样打的是Jar包,我们代码中引用的模板文件不会打进去,就不能正常使用。
插件上传 插件上传地址
https://plugins.jetbrains.com/
上传后需要两日进行审核。
我的插件的地址:
https://plugins.jetbrains.com/plugin/25038-vuecomp?noRedirect=true
下载地址