桌面端程序开发-Tauri入门(Rust语言)
前言
官方文档
https://tauri.app/zh-cn/v1/guides/
Vite文档
环境安装
https://tauri.app/zh-cn/v1/guides/getting-started/prerequisites/
Microsoft Visual Studio C++ 生成工具
您需要安装 Microsoft C++ 生成工具。
最简单的方法是下载 Visual Studio 2022 生成工具。 进行安装选择时,请勾选 “C++ 生成工具” 和 Windows 10 SDK。

WebView2
备注
Windows 11 已预装了 WebView2。
Tauri 需要 WebView2 才能在 Windows 上呈现网页内容,所以您必须先安装 WebView2。 最简单的方法是从微软网站下载和运行常青版引导程序。
Rust
Tauri 需要 WebView2 才能在 Windows 上呈现网页内容,所以您必须先安装 WebView2。 最简单的方法是从微软网站下载和运行常青版引导程序。
最后,请前往 https://www.rust-lang.org/zh-CN/tools/install 来安装 rustup (Rust 安装程序)。 请注意,为了使更改生效,您必须重新启动终端,在某些情况下需要重新启动 Windows 本身。
或者,您可以在 PowerShell 中使用 winget 命令安装程序:
1 | winget install --id Rustlang.Rustup |
查看版本
1 | rustc --version |
镜像
crates.io index失败
解决方法
使用Rust crates.io 索引镜像
编辑 ~/.cargo/config 文件,添加以下内容:
Windows下路径类似于
1 | C:\Users\Administrator\.cargo\config |
config文件默认没有新建即可。
1 | [source.crates-io] |
该镜像可加快 cargo 读取软件包索引的速度。
NodeJS
Vite 需要 Node.js 版本 14.18+,16+
https://vitejs.cn/vite3-cn/guide/
NodeJS版本切换
https://www.psvmc.cn/article/2022-03-02-nodejs-nvm.html
1 | nvm list |
创建项目
进入我们要创建项目的目录
执行创建的命令
1 | npm create tauri-app |
设置项目初始化配置
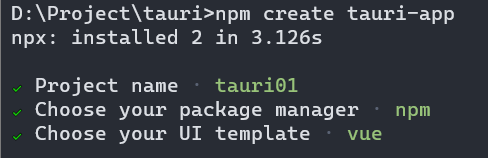
运行
1 | cd tauri01 |
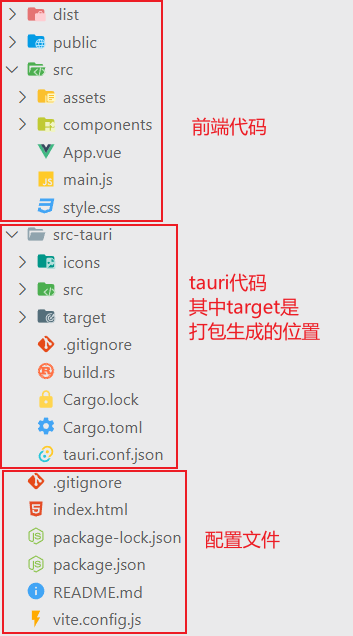
目录结构
打包
修改 tauri.config.json 中 tauri.bundle.identifier ,这是一个唯一标识,可以为软件的名称。
控制台执行命令:
1 | npm run tauri build |
这个命令会先编译前端项目,相当于先执行 npm run build 编译出前端静态文件到 dist
然后回编译 rust 组件,最后生成一个 msi 安装文件
问题
打包时wix311-binaries.zip无法下载
https://github.com/wixtoolset/wix3/releases/download/wix3112rtm/wix311-binaries.zip
将这个文件单独下载来,再放到下面目录:
1 | C:\Users\Administrator\AppData\Local\tauri\WixTools |
没有 tauri 的话创建一个,再创建一个 WixTools 文件夹。
将 wix311-binaries 解压到 WixTools 下即可。
注意WixTools下直接是文件,不要再有文件夹
比如解压后其中的一个文件路径:
1 | C:\Users\Administrator\AppData\Local\tauri\WixTools\candle.exe |
多窗口
https://tauri.app/zh-cn/v1/guides/features/multiwindow
静态窗口
1 | { |
注意
label是一定要设置的,它是窗口的唯一标识,不能重复。
JS中创建窗口
使用 Tauri API,可以通过导入 WebviewWindow 类轻松地在运行时创建一个窗口。
1 | import { WebviewWindow } from '@tauri-apps/api/window' |
在 Rust 中创建窗口
窗口可以在运行时使用 WindowBuilder 结构体创建。
要创建一个窗口,必须有一个正在运行的 App 的实例或一个 AppHandle。
使用App实例创建
App 实例可以在安装钩子中获取,也可以在调用 Builder::build 之后获取。
1 | tauri::Builder::default() |
使用设置钩子确保静态窗口和 Tauri 插件已初始化。 或
者,可以在构建 App 后创建一个窗口:
1 | let app = tauri::Builder::default() |
当无法将值的所有权移动到设置闭包时,此方法非常有用。
使用AppHandle实例创建
AppHandle 实例可以使用 [App::handle] 函数获得,也可以直接注入 Tauri 命令。
1 | tauri::Builder::default() |
方法中创建
1 |
|
注意
当在 Tauri 命令中创建窗口时,确保命令函数是
async,以避免导致的 windows 死锁。
添加HTML页面
如果使用的Vite,可以参考下面的网址进行配置。
https://cn.vitejs.dev/guide/build.html#multi-page-app
运行时访问窗口
可以使用它的标签和 Rust 上的 get_window 方法或。
1 | use tauri::Manager; |
注意,必须导入 tauri::Manager 才能在 App 或 AppHandle 实例上使用 get_window 方法。
JavaScript 上的 WebviewWindow.getByLabel 查询窗口实例。
1 | import { WebviewWindow } from '@tauri-apps/api/window' |
页面调用Rust方法
在 src-tauri/src/main.rs 中加入前端要调用的方法:
1 |
|
前端调用,可以写在前端的某个事件调用方法里:
1 | // When using the Tauri API npm package: |
传参数和返回参数:
1 |
|
注意:
rust定义参数的时候使用下划线,js调用的时候使用驼峰命名。
示例
1 | invoke('my_custom_command', { invokeMessage: 'Hello!' }).then((message) => console.log(message)) |
invoke返回的是Promise ,可以使用 async/await 用同步的方式写。
事件系统
前端触发并监听方法:
1 | import { invoke } from "@tauri-apps/api/tauri"; |
rust 发送事件方法:
1 | use tauri::Window; |
HTTP请求
使用 tauri 访问HTTP请求需要在tauri.conf.json设置白名单:
1 | { |
但是这样写不安全,建议仅将您使用的 API 列入白名单,以获得最佳的安装包大小和安全性。
1 | { |
前端使用:
1 | import { fetch } from '@tauri-apps/api/http'; |
文件系统
1 | { |
此作用域配置仅允许访问 $APPDATA 目录的数据库文件夹中的文件,注意 $APPDATA 变量的使用。
该值在运行时注入,解析为应用程序数据目录。
可用的变量是:
- $APPCONFIG => C:\Users\psvmc\AppData\Roaming\cn.psvmc.tauri01\
- $APPDATA => C:\Users\psvmc\AppData\Roaming\cn.psvmc.tauri01\
- $APPLOCALDATA => C:\Users\psvmc\AppData\Local\cn.psvmc.tauri01\
- $APPCACHE => C:\Users\psvmc\AppData\Local\cn.psvmc.tauri01\
- $APPLOG => C:\Users\psvmc\AppData\Roaming\cn.psvmc.tauri01\logs\
- $AUDIO => C:\Users\psvmc\Music\
- $CACHE => C:\Users\psvmc\AppData\Local\
- $CONFIG => C:\Users\psvmc\AppData\Roaming\
- $DATA => C:\Users\psvmc\AppData\Roaming\
- $LOCALDATA => C:\Users\psvmc\AppData\Local\
- $DESKTOP => C:\Users\psvmc\Desktop\
- $DOCUMENT => C:\Users\psvmc\Documents\
- $DOWNLOAD => C:\Users\psvmc\Downloads\
- $EXE,
- $HOME => C:\Users\psvmc\
- $PICTURE => C:\Users\psvmc\Pictures\
- $PUBLIC => C:\Users\Public\
- $RUNTIME,
- $TEMPLATE => C:\Users\psvmc\AppData\Roaming\Microsoft\Windows\Templates\
- $VIDEO => C:\Users\psvmc\Videos\
- $RESOURCE => D:\Project\tauri\tauri01\src-tauri\target\debug\
- $TEMP
1 | import { copyFile,createDir, BaseDirectory } from '@tauri-apps/api/fs'; |
对话框
添加 tauri.allowlist.dialog 到 tauri.conf.json
1 | { |
窗口配置
可用配置项
https://tauri.app/v1/api/config#windowconfig
基本配置
tauri.config.json 中关于窗口的主要配置:
1 | { |
窗口透明
Tauri 应用的背景分三层:
- 第一层是
window - 第二层是
webview - 第三层是
html
tauri.conf.json 配置
在官方文档 tauri.conf.json 窗口配置中有 transparent 字段,设置为 true 启用透明度。(默认为 false,不启用)
注意:在 macOS 上,需要从 tauri.conf.json > tauri > macOSPrivateApi 启用 macos-private-api ,默认为 false,不启用。
(警告:在 macOS 上使用私有 API 的应用程序会被 App Store 拒绝)
macOSPrivateApi 设置为 true 时:
- 启用透明背景 API
- 将
fullScreenEnabled首选项设置为true
1 | { |
html 配置
窗口配置中的 transparent 是开启第一层(window)和第二层(webview)的透明度。
如果透明度未生效,请检查 html 是否设置了不透明背景色,将其修改为 RGBA 或 transparent。也可以通过 css 文件设置 body 样式。
1 |
|
鼠标穿透
依赖
在 cargo.toml 中添加
1 | windows = { version = "0.43.0", features = [ |
代码
初始化窗口时通过 setup 传闭包拿到 window 进行操作。只支持 Windows。
1 | tauri::Builder::default() |
官方的实现目前还没有进入 tauri,只能先凑合用用。