Windows上使用Ubuntu部署大数据环境
前言
本文所有的大数据软件都放在了下面的文件夹中
D:\Tools\BigData
使用Windows中的Ubuntu进行启动
对应Ubuntu中的路径为
/mnt/d/Tools/BigData
Ubuntu的本地IP为
192.168.3.80
Taier
文档:https://dtstack.github.io/Taier/docs/guides/introduction/
视频:https://www.bilibili.com/video/BV13L4y1L71w/
源码:https://github.com/DTStack/Taier
JDK
官方下载JDK 网址
链接: https://pan.baidu.com/s/1COHU0dKhBb9x_wWxIwuibw 提取码: psvm
安装
1 | sudo tar -zxvf jdk-8u341-linux-x64.tar.gz -C /usr/local |
安装后的路径为/usr/local/jdk1.8.0_341
1 | cd /etc/profile.d/ |
创建配置文件
1 | sudo vi /etc/profile.d/jdk.sh |
加入:
1 | export JAVA_HOME=/usr/local/jdk1.8.0_341 |
配置立即生效
1 | source /etc/profile |
查询java版本
1 | java -version |
查看java-home
1 | echo $JAVA_HOME |
环境设置
host
hostname
1 | vi /etc/hostname |
设置为
1 | master |
修改hosts文件
1 | vi /etc/hosts |
配置为
1 | 192.168.3.80 master |
测试
1 | ping master |
Windows下
修改hosts文件
C:\Windows\System32\drivers\etc
添加
1 | 192.168.3.80 master |
免密登陆
生成密钥对
1 | mkdir ~/.ssh |
Hadoop
下载
https://archive.apache.org/dist/hadoop/common/hadoop-2.7.7/
解压
1 | tar -zxvf hadoop-2.7.7.tar.gz |
配置环境变量
1 | cd /etc/profile.d/ |
创建配置文件
1 | vi /etc/profile.d/hadoop.sh |
内容设置为
1 | #HADOOP_HOME |
配置生效
1 | source /etc/profile |
查看是否生效
1 | echo $HADOOP_HOME |
修改配置文件
注意
本文是伪分布式部署
进入配置文件目录
1 | cd $HADOOP_HOME/etc/hadoop |
hadoop-env.sh
将原本的JAVA_HOME 替换为绝对路径就可以了
1 | export JAVA_HOME=/usr/local/jdk1.8.0_341 |
注意
虽然系统已经设置
JAVA_HOME,但是运行时依旧无法找到,所以配置的绝对路径
core-site.xml
1 |
|
hdfs-site.xml
1 |
|
mapred-site.xml
1 |
|
yarn-site.xml
1 |
|
剔除警告(可选):
log4j.properties
添加
1 | log4j.logger.org.apache.hadoop.util.NativeCodeLoader=ERROR |
启动/停止
1 | sudo chmod -R 755 $HADOOP_HOME |
这个操作主要是创建fsimage和edits文件。
只要看到信息中有一句关键:
INFO common.Storage: Storage directory /mnt/d/Tools/BigData/zdata/dfs/name has been successfully formatted.
则格式化成功.
运行
1 | bash $HADOOP_HOME/sbin/start-all.sh |
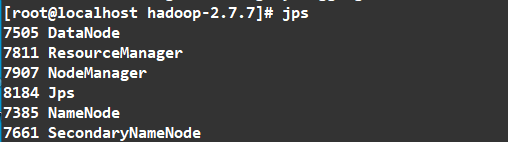
输入
1 | jps |
如图
访问
我的服务器的IP为 192.168.3.80
HDFS监控页面查询:
查看文件可以访问这个地址
http://192.168.3.80:50070/explorer.html#/
Yarn监控页面查询:
http://192.168.3.80:8088/cluster
停止
1 | bash $HADOOP_HOME/sbin/stop-all.sh |
报错解决
ssh: connect to host localhost port 22: Connection refused
解决方法:
确定安装ssh:
包含了SSH服务 sudo apt-get install openssh-server 和客户端 sudo apt-get install openssh-client
1 | sudo apt-get install ssh |
启动sshd:
1 | sudo service ssh start |
检验方法:
1 | ssh localhost |
又报错
Permission denied (publickey).
允许ssh密码登录权限
登录目标机器,打开
1 | vi /etc/ssh/sshd_config |
修改PasswordAuthentication no为:PasswordAuthentication yes。
允许root登录
1 | PermitRootLogin yes |
然后重启服务。
1 | service ssh restart |
Flink
下载
下载地址
https://archive.apache.org/dist/flink/
这里下载1.12.7版本
https://archive.apache.org/dist/flink/flink-1.12.7/
https://archive.apache.org/dist/flink/flink-1.12.7/flink-1.12.7-bin-scala_2.12.tgz
解压
1 | tar zxvf flink-1.12.7-bin-scala_2.12.gz |
配置环境变量
1 | cd /etc/profile.d/ |
创建配置文件
1 | vi /etc/profile.d/flink.sh |
内容设置为
1 | #FLINK_HOME |
配置生效
1 | source /etc/profile |
查看是否生效
1 | echo $FLINK_HOME |
修改配置
修改flink/conf/masters,slaves,flink-conf.yaml
1 | [admin@node21 conf]$ sudo vi masters |
访问 Flink UI
运行
1 | bash $FLINK_HOME/bin/start-cluster.sh |
Flink有个UI界面,可以用于监控Flilnk的job运行状态
http://localhost:8081/
停止
1 | bash $FLINK_HOME/bin/stop-cluster.sh |
Docker
Windows下的Ubuntu中不能安装Docker
需要Windows中安装Docker Desktop后进行如下配置
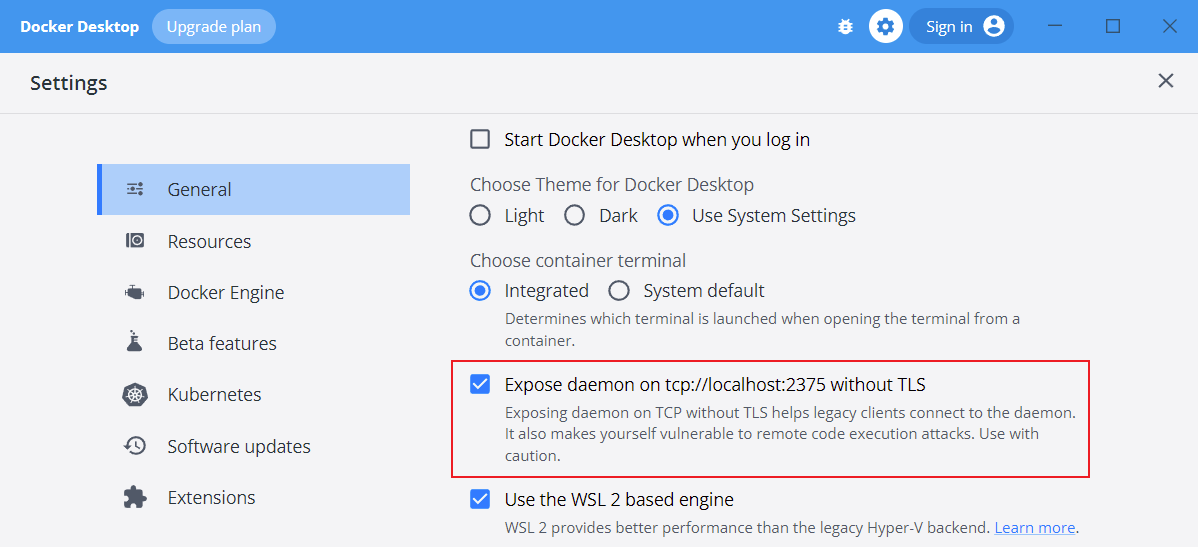
Ubuntu中配置
1 | echo "export DOCKER_HOST='tcp://0.0.0.0:2375'" >> ~/.bashrc |
这样就可以正常访问Docker了
1 | docker ps |
下面Ubuntu中安装Docker的方法在Windows下的Ubuntu中并不生效
安装
1 | curl -sSL https://get.daocloud.io/docker | sh |
启动
1 | service docker start |
但是发现并不能启动
数据同步
Mysql
1 | jdbc:mysql://master:3306/ztest?characterEncoding=utf8&zeroDateTimeBehavior=convertToNull&rewriteBatchedStatements=true&allowMultiQueries=true |
允许远程登录
1 | GRANT ALL PRIVILEGES ON *.* TO 'root'@'%' IDENTIFIED BY 'psvmc123' WITH GRANT OPTION; |
设置密码永不过期
1 | ALTER USER 'root'@'%' PASSWORD EXPIRE NEVER; |