Ubuntu常用环境配置及常用软件安装
前言
开发使用 Linux 强烈建议使用 Ubuntu 不建议使用 CentOS
下载软件的时候推荐使用 deb 和 snap 格式的文件
应用中心
https://ubuntukylin.com/applications/
基本环境
安装显卡驱动
打开系统的软件和更新 找到附加驱动找到对应的驱动更新即可。

Edge 插件无法下载
1 | sudo gedit /etc/hosts |
修改为如下
1 | 131.253.33.219 edge.microsoft.com |
缩放调整
1 | cd /usr/share/glib-2.0/schemas |
常用软件
微信
有两个版本可用
原生版 功能比较少。
Wine版 功能比较全 截图不能用。
目前两个版本都不能截图和上传图片。
Wine版
推荐使用Wine版的。
下载Wine环境包:
Wine环境包下载地址:
http://archive.ubuntukylin.com/software/pool/partner/ukylin-wine_70.6.3.25_amd64.deb
下载微信(wine)包:
微信(wine)包下载地址:
http://archive.ubuntukylin.com/software/pool/partner/ukylin-wechat_3.0.0_amd64.deb
终端输入:
1 | chmod 777 *.deb |
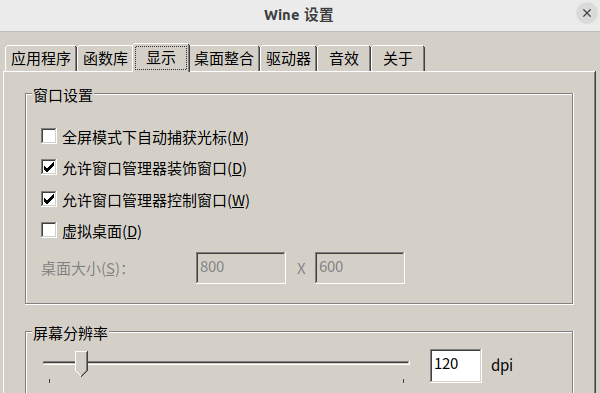
修改DPI(修改前要推出微信)
1 | WINEPREFIX=~/.ukylin-wine/wechat /usr/bin/ukylin-wine winecfg |
显示=>屏幕分辨率=>设置为120
中文乱码
下载字体
链接: https://pan.baidu.com/s/1XsYVhD-YMnvBpatwtLgLGA 提取码: psvm
解压该压缩包
1 | unzip Fonts.zip |
把Fonts文件夹内所有字体复制到wine的映射目录内
1 | mkdir -p ~/.ukylin-wine/wechat/drive_c/windows/Fonts/ |
查看是否不再乱码
1 | WINEPREFIX=~/.ukylin-wine/wechat /usr/bin/ukylin-wine winecfg |
Typora
链接: https://pan.baidu.com/s/1rUKnYzI-yatqN7IDJs6kVA?pwd=kvjk 提取码: kvjk
主题
http://theme.typora.io/theme/Vue/
禁止升级
1 | sudo apt-mark hold typora |
图片插件
图片上传插件 picGo
PicGo-Core
我这里上传方式选择 app 的始终不行就使用PicGo-Core的方式了
安装PicGo-core
PicGo的图形界面在ubuntu上对typora支持不是很好,因此使用 PicGo-core,采用命令行方式自动上传图片。
安装nodejs
ubuntu默认不带有nodejs,若已经安装请运行命令node -v检查版本是否大于8.0
若版本小于8.0请先执行以下命令卸载旧版本nodejs
1 | sudo aot install curl |
测试是否安装成功,执行下面命令,显示版本号就表示安装成功
1 | node -v |
测试npm是否可以使用
1 | npm -v |
若出现版本号表示可用 跳过下面这条命令;若提示命令不存在则执行下列命令
1 | sudo apt install npm |
再次测试。
1 | npm config set registry https://registry.npmmirror.com |
安装PicGo-core
1 | sudo npm install picgo@1.4.26 -g |
修改配置文件
1 | mkdir ~/.picgo |
以下是配置 其中qiniu中改成自己的配置。
1 | { |
配置
- 插入图片时改为
上传图片 - 勾选图中3个附加选项
- 上传服务设定改为
custom Command - 命令改为
/usr/bin/node /usr/local/bin/picgo upload
PicGo-App
图片上传插件 picGo
官网:
https://molunerfinn.com/PicGo/
https://github.com/Molunerfinn/picgo/releases
镜像地址
https://mirrors.sdu.edu.cn/github-release/Molunerfinn_PicGo/v2.3.1/
下载后进行安装
1 | sudo snap install picgo_2.3.1_amd64.snap --dangerous |
报错
error: cannot find signatures with metadata for snap
不进行签名验证
1 | --dangerous |
截图
系统截图
按下 Shift + Print Screen 键,鼠标指针会变成十字形,拖动鼠标选择需要截取的区域,截图会自动保存到 ~/Pictures/Screenshots 目录中。
这种方式不能进行图片标记。
三方软件
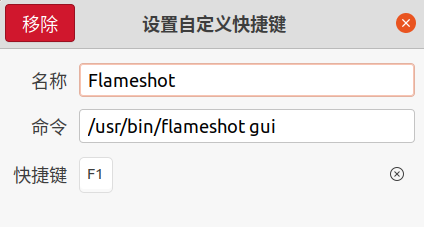
使用命令行安装Flameshot软件;
1 | sudo apt-get install flameshot |
然后打开系统设置 => 键盘快捷键拉到最下方,此处有个+添加自定义快捷键,自定义完成后就可以进行截图
截图命令
1 | /usr/bin/flameshot gui |
如图
百度云
https://pan.baidu.com/download
WPS
卸载
1 | sudo apt remove wps-officesud |
解决在 ubuntu 22.04 上安装 wps 打不开问题
添加权限即可
1 | sudo chmod 0777 -R /opt/kingsoft/wps-office |
开发环境
Python
系统自带的有Python
1 | python3 --version |
我这里的版本是3.8.10
1 | sudo apt install -y python3-pip |
设置镜像
1 | mkdir ~/.pip |
内容如下
1 | [global] |
验证是否生效
1 | pip config list |
添加环境变量
1 | gedit ~/.bashrc |
内容如下
1 | export PATH="$HOME/.local/bin:$PATH" |
生效
1 | source ~/.bashrc |
安装pipenv
1 | pip install pipenv |
虚拟环境路径
1 | cd ~/.local/share/virtualenvs/ |
项目下.env文件中添加
1 | PIPENV_VENV_IN_PROJECT=1 |
进入虚拟环境
1 | pipenv shell |
查看生效的环境
1 | which python3 |
远程连接
使用自带软件Remmina
使用rdesktop
安装
1 | sudo apt install rdesktop |
使用举例
1 | rdesktop 110.110.110.110:3389 -g 1024x768 -a 16 -u administrator -p '123456' |
共享磁盘和剪贴板
1 | rdesktop -0 110.110.110.110:3389 -g 1024x768 -a 16 -u administrator -p '123456' -r clipboard:PRIMARYCLIPBOARD -r disk:share_home=/home |
注意
密码中有特殊符号要使用单引号。
常用使用参数
1 | -f 全屏 |
连接失败,提示如下:
Connecting to server using NLA…
Core(warning): Certificate received from server is NOT trusted by this system, an exception has been added by the user to trust this specific certificate.
TLS Session info: (TLS1.2)-(RSA)-(AES-256-GCM)Failed to initialize NLA, do you have correct Kerberos TGT initialized ?
Failed to connect using NLA, trying with SSL
Failed to connect, CredSSP required by server (check if server has disabled old TLS versions, if yes use -V option).
解决方法是:
- 先通过其他方式远程连接服务器。
- 右键我的电脑–>属性–>远程设置–>远程
- 取消勾选 仅允许运行使用网络界别身份验证的远程桌面的计算机连接(建议)(N)
FinalShell
SSH登录脚本
1 | sudo vi /usr/local/bin/login.exp |
内容
1 |
|
把配置文件命名为login.exp 放在/usr/local/bin目录下
设置访问权限
1 | sudo chmod 777 /usr/local/bin/login.exp |
连接服务器
1 | login.exp root 192.168.7.101 22 zhangjian |
报错:
当 Linux 服务器没有安装 expect 时,执行 expect 文件时,就会报如下错误:
/usr/bin/expect: No such file or directory
解决方法比较简单,安装 expect 命令即可。
在服务器上执行如下命令
1 | sudo apt-get install expect |
JDK
官方下载JDK 网址
链接: https://pan.baidu.com/s/1COHU0dKhBb9x_wWxIwuibw 提取码: psvm
安装
1 | sudo tar -zxvf jdk-8u341-linux-x64.tar.gz -C /usr/local |
安装后的路径为/usr/local/jdk1.8.0_341
为空的话要配置java-home 否则无法配置Tomcat为服务
1 | cd /etc/profile.d/ |
创建配置文件
1 | sudo vi /etc/profile.d/jdk.sh |
加入:
1 | export JAVA_HOME=/usr/local/jdk1.8.0_341 |
配置立即生效
1 | sudo source /etc/profile |
查询java版本
1 | java -version |
查看java-home
1 | echo $JAVA_HOME |
GIT
1 | sudo apt install git |
配置
换行符
git bash命令行也可以修改,最终也是修改.gitconfig配置文件:
1 | git config --global core.autocrlf false |
设置全局用户名和邮箱
1 | git config --global user.email "183518918@qq.com" |
自动记录密码
打开Git 配置文件,该文件中保存着所有的配置信息
1 | gedit ~/.gitconfig |
修改配置文件,添加下面这一行。
用来保存密码,提交一次会自动记住 :
1 | [credential] |
客户端软件
SmartGit
https://www.syntevo.com/smartgit/download/
NodeJS
npm 镜像
1 | npm config set registry https://registry.npmmirror.com |
配置 npm 全局目录
1 | # 创建全局安装目录 |
IDEA
下载
链接: https://pan.baidu.com/s/1tGZVIMn__Srlpy7dxm-J_g 提取码: psvm
解压
1 | sudo tar -zxvf ideaIU-2021.3.3.tar.gz -C /opt/ |
设置图标
1 | sudo gedit /usr/share/applications/idea.desktop |
内容如下
1 | [Desktop Entry] |
无法输入中文
在IDEA打开页面
点击 help => Edit Custom VM options
在末行添加:
1 | -Drecreate.x11.input.method=true |
激活
运行激活脚本
1 | chmod +x ./install.sh |
出现
done. you’d better log off first!
重启电脑后再输入激活码。
博客更新
1 | npm install hexo-cli -g |
生成上传
1 | hexo g |
VSCode
下载地址
https://code.visualstudio.com/Download
无法同步配置
中访问
vscode.dev
查看可用 IP 修改 hosts
1 | sudo gedit /etc/hosts |
修改为如下
1 | 13.107.213.51 vscode.dev |
卸载
卸载的三种方式
1 | apt list |
卸载libreoffice
首先卸载libreoffice表格。
1 | sudo apt remove libreoffice-calc |
3.接着我们卸载libreoffice绘图。
1 | sudo apt remove libreoffice-draw |
然后是卸载幻灯片工具。
1 | sudo apt remove libreoffice-impress |
接着卸载word文档工具。
1 | sudo apt remove libreoffice-writer |
最后我们把其它libreoffice相关的都卸载了。
1 | sudo apt remove libreoffice* |
清除libreoffice配置文件。
1 | sudo apt purge libreoffice* |
现在我们发现ubuntu桌面上的libreoffice软件图标都没有了,卸载工作完成。