前言
有的依赖是区分不通的架构的,在不同的架构下要引用不同的依赖。
这样打包的时候就要注释不同的依赖再打包,Maven本身就提供了多环境打包的方式。
多环境配置
1
2
3
4
5
6
7
8
9
10
11
12
13
14
15
16
17
18
19
20
21
22
23
24
25
26
27
28
29
30
31
32
33
34
35
36
37
38
39
40
41
42
| <?xml version="1.0" encoding="UTF-8"?>
<project xmlns="http://maven.apache.org/POM/4.0.0" xmlns:xsi="http://www.w3.org/2001/XMLSchema-instance"
xsi:schemaLocation="http://maven.apache.org/POM/4.0.0 https://maven.apache.org/xsd/maven-4.0.0.xsd">
<dependencies>
<dependency>
<groupId>net.sf.sevenzipjbinding</groupId>
<artifactId>sevenzipjbinding</artifactId>
<version>16.02-2.01</version>
</dependency>
</dependencies>
<profiles>
<profile>
<id>x86</id>
<activation>
<activeByDefault>true</activeByDefault>
</activation>
<dependencies>
<dependency>
<groupId>net.sf.sevenzipjbinding</groupId>
<artifactId>sevenzipjbinding-all-platforms</artifactId>
<version>16.02-2.01</version>
</dependency>
</dependencies>
</profile>
<profile>
<id>arm</id>
<dependencies>
<dependency>
<groupId>net.sf.sevenzipjbinding</groupId>
<artifactId>sevenzipjbinding-linux-arm64</artifactId>
<version>16.02-2.01</version>
</dependency>
</dependencies>
</profile>
</profiles>
</project>
|
上述配置中:
<profiles> 标签内定义了多个环境配置,每个 <profile> 对应一个环境。<id> 是环境的唯一标识。<activation> 里的 <activeByDefault> 可设置默认激活的环境。<dependencies> 为各环境配置特定依赖。
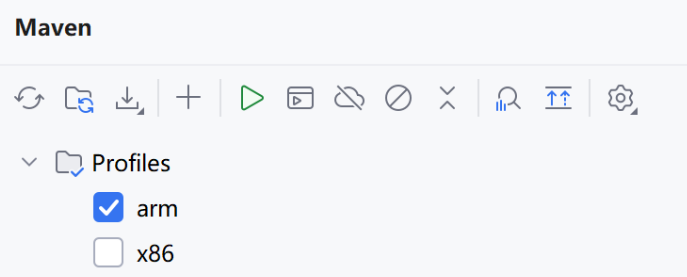
这样打包的时候IDEA右侧就会显示对应的环境
打包
使用 Maven 工具
- 打开 IDEA 右侧的
Maven 工具窗口(若未显示,可通过 View -> Tool Windows -> Maven 打开)。
- 展开项目的
Profiles 节点。
- 根据需要勾选相应的 Profile(如
arm、x86),取消勾选其他不需要的 Profile。
- 若要打包项目,在
Lifecycle 节点下双击 package 目标,IDEA 会使用所选 Profile 进行打包。
如图:
通过运行配置
- 点击 IDEA 右上角的
Add Configuration 按钮。
- 在弹出的窗口中,点击
+ 号,选择 Maven。
- 在
Command line输入框中输入打包命令,例如:
- 开发环境:
clean package -Pdev
- 测试环境:
clean package -Ptest
- 生产环境:
clean package -Pprod
- 点击
OK 保存配置。
- 点击运行按钮,IDEA 会按照指定的 Profile 进行打包。