Spring Boot连接Mysql及Druid连接池

前言

这里主要说两种方式来连接MySQL。

小型项目可以直接用JdbcTemplate。

大型项目可以考虑集成Mybatis。

还有一个JPA的方式

https://www.psvmc.cn/article/2024-01-16-spring-jpa.html

Spring Data JPA 是基于 Hibernate 的,所有优缺点也很明显。

优点

  • 可以不用写SQL。
  • 可以自动建表。

缺点

  • 性能会差一点。
  • 灵活性相对较低。

JdbcTemplate

添加依赖

1
2
3
4
5
6
7
8
<dependency>
<groupId>mysql</groupId>
<artifactId>mysql-connector-java</artifactId>
</dependency>
<dependency>
<groupId>org.springframework.boot</groupId>
<artifactId>spring-boot-starter-jdbc</artifactId>
</dependency>

配置

application.properties配置文件中增加数据库参数,信息内容如下:

1
2
3
4
5
6
7
8
9
10
spring.datasource.url=jdbc:mysql://127.0.0.1:3306/zbi_source?useUnicode=true&characterEncoding=utf8
spring.datasource.username=root
spring.datasource.password=123456
spring.datasource.driver-class-name=com.mysql.cj.jdbc.Driver
spring.datasource.hikari.minimum-idle=10
spring.datasource.hikari.maximum-pool-size=20
spring.datasource.hikari.idle-timeout=500000
spring.datasource.hikari.max-lifetime=540000
spring.datasource.hikari.connection-timeout=60000
spring.datasource.hikari.connection-test-query=SELECT 1

Service

1
2
3
4
5
6
7
8
9
10
11
12
13
14
15
16
17
18
19
20
21
22
23
24
25
26
27
28
29
30
31
32
33
34
35
36
37
package cn.psvmc.zapicall.service;

import cn.psvmc.zapicall.bean.UserModel;
import org.springframework.beans.factory.annotation.Autowired;
import org.springframework.jdbc.core.BeanPropertyRowMapper;
import org.springframework.jdbc.core.JdbcTemplate;
import org.springframework.stereotype.Service;

import java.util.List;
import java.util.Map;
import java.util.Set;
@Service
public class UserServiceJt {
@Autowired
private JdbcTemplate jdbcTemplate;
public List<Map<String, Object>> getUserList(){
String sql = "select * from t_user";
List<Map<String, Object>> list = jdbcTemplate.queryForList(sql);
for (Map<String, Object> map : list) {
Set<String> keySet = map.keySet();
for (String key : keySet) {
System.out.println(key+":"+map.get(key));
}
}
return list;
}

public List<UserModel> getUserList2(){
String sql = "select * from t_user";
return jdbcTemplate.query(sql, new BeanPropertyRowMapper<>(UserModel.class));
}

public UserModel getUserModel(){
String sql = "select * from t_user where id=6";
return jdbcTemplate.queryForObject(sql, new BeanPropertyRowMapper<>(UserModel.class));
}
}

添加

1
2
3
4
public void addUser(UserModel user) {
String sql = "INSERT INTO t_user (name, age) VALUES (?, ?)";
jdbcTemplate.update(sql, user.getName(), user.getAge());
}

Controller

1
2
3
4
5
6
7
8
9
10
11
12
13
14
15
16
17
18
19
20
21
22
23
24
25
26
27
28
29
30
31
32
import cn.psvmc.zapicall.bean.UserModel;
import cn.psvmc.zapicall.service.UserService;
import cn.psvmc.zapicall.service.UserServiceJt;
import org.springframework.beans.factory.annotation.Autowired;
import org.springframework.web.bind.annotation.RequestMapping;
import org.springframework.web.bind.annotation.RequestParam;
import org.springframework.web.bind.annotation.RestController;

import java.util.List;
import java.util.Map;

@RestController
@RequestMapping("/user")
public class UserController {
@Autowired
private UserServiceJt serviceJt;

@RequestMapping("/user_list")
public List<Map<String, Object>> getUserList() {
return serviceJt.getUserList();
}

@RequestMapping("/user_list2")
public List<UserModel> getUserList2() {
return serviceJt.getUserList2();
}

@RequestMapping("/user_by_id")
public UserModel getUser() {
return serviceJt.getUserModel();
}
}

访问

启动项目,通过浏览器访问:

http://localhost:8080/user/user_list

http://localhost:8080/user/user_list2

http://localhost:8080/user/user_by_id

集成Mybatis

添加依赖

1
2
3
4
5
6
7
8
9
<dependency>
<groupId>mysql</groupId>
<artifactId>mysql-connector-java</artifactId>
</dependency>
<dependency>
<groupId>org.mybatis.spring.boot</groupId>
<artifactId>mybatis-spring-boot-starter</artifactId>
<version>2.1.2</version>
</dependency>

配置

application.properties配置文件中增加数据库参数,信息内容如下:

1
2
3
4
spring.datasource.url=jdbc:mysql://127.0.0.1:3306/zbi_source
spring.datasource.username=root
spring.datasource.password=HNxhkjedu!@#07
spring.datasource.driver-class-name=com.mysql.cj.jdbc.Driver

Mapper

如果你的项目需求相对简单,对代码的可读性和维护性要求较高,可以选择注解方式;

如果你的项目需求比较复杂,对动态SQL的需求较多,或者你更倾向于将数据访问逻辑与Java代码分离的方式,可以选择XML配置方式。

注解方式

两种方式任选其一即可。

方式1

添加@Mapper@Repository注解,这样就不用在Application中配置扫描的包了。

UserMapper.java

1
2
3
4
5
6
7
8
9
10
11
12
13
14
15
16
17
18
package cn.psvmc.zapicall.mapper;

import cn.psvmc.zapicall.bean.UserModel;
import org.apache.ibatis.annotations.Mapper;
import org.apache.ibatis.annotations.Param;
import org.apache.ibatis.annotations.Select;
import org.springframework.stereotype.Repository;

import java.util.List;
@Mapper
@Repository
public interface UserMapper {
@Select("SELECT id, name, age, sex FROM t_user")
List<UserModel> selectAll();

@Select("SELECT id, name, age, sex FROM t_user WHERE id = #{id}")
UserModel findById(@Param("id") String id);
}

方式2

不配置注解,在Application中添加扫描的包。

UserMapper.java

1
2
3
4
5
6
7
8
9
10
11
12
13
14
15
package cn.psvmc.zapicall.mapper;

import cn.psvmc.zapicall.bean.UserModel;
import org.apache.ibatis.annotations.Param;
import org.apache.ibatis.annotations.Select;

import java.util.List;

public interface UserMapper {
@Select("SELECT id, name, age, sex FROM t_user")
List<UserModel> selectAll();

@Select("SELECT id, name, age, sex FROM t_user WHERE id = #{id}")
UserModel findById(@Param("id") String id);
}

Application上要添加注解

1
@MapperScan("cn.psvmc.zapicall.mapper")

简单的语句只需要使用@Insert、@Update、@Delete、@Select这4个注解即可,动态SQL语句需要使用@InsertProvider、@UpdateProvider、@DeleteProvider、@SelectProvider等注解。

具体可参考MyBatis官方文档:https://mybatis.org/mybatis-3/zh_CN/java-api.html。

映射字段

1
2
3
4
5
6
7
@Select("select * from t_user where id=#{id}")
@Results(id = "student",value= {
@Result(property = "id", column = "id", javaType = Integer.class),
@Result(property = "name", column = "name", javaType = String.class),
@Result(property = "sex", column = "sex", javaType = Integer.class)
})
Student queryStudentById(String id);

添加判断条件

在 MyBatis 中使用注解的方式编写 Mapper ,您可以通过使用 @SelectProvider 注解来添加判断条件。

@SelectProvider 注解允许您指定一个 Provider 类,该类包含根据不同条件生成 SQL 语句的方法。

首先,创建一个 Provider 类,它包含生成 SQL 语句的方法。方法的参数可以接受不同的参数,根据这些参数生成不同的 SQL 语句。

这里以生成一个包含条件判断的查询语句为例:

1
2
3
4
5
public class UserProvider {
public static String getQueryWithCondition(String condition) {
return "SELECT * FROM my_table WHERE " + condition;
}
}

然后,在 Mapper 接口的方法上使用 @SelectProvider 注解,并指定 Provider 类和方法:

1
2
3
4
public interface UserMapper {
@SelectProvider(type = UserProvider.class, method = "getQueryWithCondition")
List<MyEntity> findDataWithCondition(@Param("condition") String condition);
}

在上面的例子中,@Param("condition") 注解将方法参数 condition 映射到 SQL 语句中的 #{condition}

现在,您可以在调用 Mapper 方法时传入不同的条件,以根据条件生成不同的 SQL 语句:

1
List<MyEntity> result = myMapper.findDataWithCondition("id = #{id}");

注意

在编写动态 SQL 语句时,使用XML方式的时候可以使用 MyBatis 提供的条件判断标签,如 <if><choose> 等,以动态生成不同的查询条件。

但在注解方式下,无法直接使用这些标签,需要通过自定义 Provider 方法来实现判断条件的拼装。

XML方式

添加扫描配置

application.properties中添加配置

1
2
mybatis.mapper-locations=classpath*:mapper/*.xml
mybatis.type-aliases-package=cn.psvmc.zapicall.bean

映射类

UserMapper.java

1
2
3
4
5
6
7
8
9
10
11
12
13
14
package cn.psvmc.zapicall.mapper;

import cn.psvmc.zapicall.bean.UserModel;
import org.apache.ibatis.annotations.Mapper;
import org.apache.ibatis.annotations.Param;
import org.springframework.stereotype.Repository;

import java.util.List;
@Mapper
@Repository
public interface UserMapper {
List<UserModel> selectAll();
UserModel findById(@Param("id") String id);
}

XML

UserMapper.xml

1
2
3
4
5
6
7
8
9
10
11
12
13
14
15
16
17
18
19
20
21
22
<?xml version="1.0" encoding="UTF-8" ?>
<!DOCTYPE mapper PUBLIC "-//mybatis.org//DTD Mapper 3.0//EN" "http://mybatis.org/dtd/mybatis-3-mapper.dtd" >
<mapper namespace="cn.psvmc.zapicall.mapper.UserMapper">
<resultMap id="UserMap" type="cn.psvmc.zapicall.bean.UserModel">
<id column="id" property="id" jdbcType="INTEGER"/>
<result column="name" property="name" jdbcType="VARCHAR"/>
<result column="age" property="age" jdbcType="INTEGER"/>
<result column="sex" property="sex" jdbcType="INTEGER"/>
</resultMap>
<select id="selectAll" resultMap="UserMap">
select id,
name,
age,
sex
from t_user
order by id asc
</select>

<select id="findById" resultMap="UserMap" parameterType="java.lang.String">
SELECT id, name, age, sex FROM t_user WHERE id = #{id}
</select>
</mapper>

mybatis.type-aliases-package配置后我们的实体类的包名就可以省略了

上面的可以简写为:

1
2
3
4
5
6
7
8
9
10
11
12
13
14
15
16
17
18
19
20
21
22
<?xml version="1.0" encoding="UTF-8" ?>
<!DOCTYPE mapper PUBLIC "-//mybatis.org//DTD Mapper 3.0//EN" "http://mybatis.org/dtd/mybatis-3-mapper.dtd" >
<mapper namespace="cn.psvmc.zapicall.mapper.UserMapper">
<resultMap id="UserMap" type="UserModel">
<id column="id" property="id" jdbcType="INTEGER"/>
<result column="name" property="name" jdbcType="VARCHAR"/>
<result column="age" property="age" jdbcType="INTEGER"/>
<result column="sex" property="sex" jdbcType="INTEGER"/>
</resultMap>
<select id="selectAll" resultMap="UserMap">
select id,
name,
age,
sex
from t_user
order by id asc
</select>

<select id="findById" resultMap="UserMap" parameterType="java.lang.String">
SELECT id, name, age, sex FROM t_user WHERE id = #{id}
</select>
</mapper>

其它示例

1
2
3
4
5
6
7
8
9
10
11
12
13
14
15
16
17
18
19
20
21
22
23
24
<?xml version="1.0" encoding="UTF-8" ?>
<!DOCTYPE mapper PUBLIC "-//mybatis.org//DTD Mapper 3.0//EN" "http://mybatis.org/dtd/mybatis-3-mapper.dtd">
<mapper namespace="cn.psvmc.zapicall.mapper.UserMapper">

<select id="getUserById" parameterType="long" resultType="cn.psvmc.zapicall.bean.UserModel">
SELECT * FROM user WHERE id = #{id}
</select>

<select id="getAllUsers" resultType="cn.psvmc.zapicall.bean.UserModel">
SELECT * FROM user
</select>

<insert id="addUser" parameterType="cn.psvmc.zapicall.bean.UserModel">
INSERT INTO user (username, password) VALUES (#{username}, #{password})
</insert>

<update id="updateUser" parameterType="cn.psvmc.zapicall.bean.UserModel">
UPDATE user SET username = #{username}, password = #{password} WHERE id = #{id}
</update>

<delete id="deleteUser" parameterType="long">
DELETE FROM user WHERE id = #{id}
</delete>
</mapper>

jdbcType

在MyBatis中,jdbcType用于定义数据库和Java类型之间的映射关系。

它是通过XML映射文件或注解来配置的。

jdbcType的值可以是以下之一:

  • VARCHAR:对应于Java中的String类型。
  • CHAR:对应于Java中的String类型。
  • LONGVARCHAR:对应于Java中的String类型。
  • NCHAR:对应于Java中的String类型。
  • NVARCHAR:对应于Java中的String类型。
  • CLOB:对应于Java中的String类型。
  • NUMERIC:对应于Java中的BigDecimal类型。
  • DECIMAL:对应于Java中的BigDecimal类型。
  • BIT:对应于Java中的Boolean类型。
  • BOOLEAN:对应于Java中的Boolean类型。
  • TINYINT:对应于Java中的Byte类型。
  • SMALLINT:对应于Java中的Short类型。
  • INTEGER:对应于Java中的Integer类型。
  • BIGINT:对应于Java中的Long类型。
  • REAL:对应于Java中的Float类型。
  • FLOAT:对应于Java中的Double类型。
  • DOUBLE:对应于Java中的Double类型。
  • BINARY:对应于Java中的byte array类型。
  • VARBINARY:对应于Java中的byte array类型。
  • LONGVARBINARY:对应于Java中的byte array类型。
  • DATE:对应于Java中的java.sql.Date类型。
  • TIME:对应于Java中的java.sql.Time类型。
  • TIMESTAMP:对应于Java中的java.sql.Timestamp类型。

其他示例

1
2
3
4
5
6
7
8
9
10
11
12
13
14
15
16
17
18
19
20
21
22
23
24
25
26
27
28
29
30
31
32
33
34
35
36
37
38
39
40
41
42
43
44
45
46
47
48
49
50
51
52
53
54
55
56
57
58
59
60
61
62
63
64
65
66
67
68
69
70
<?xml version="1.0" encoding="UTF-8"?>
<!DOCTYPE mapper PUBLIC "-//mybatis.org//DTD Mapper 3.0//EN" "http://mybatis.org/dtd/mybatis-3-mapper.dtd">
<mapper namespace="cn.psvmc.zapicall.mapper.UserMapper">
<resultMap type="cn.psvmc.zapicall.bean.UserModel" id="UserMap">
<result property="id" column="id" jdbcType="INTEGER"/>
<result property="name" column="name" jdbcType="VARCHAR"/>
<result property="age" column="age" jdbcType="INTEGER"/>
<result column="sex" property="sex" jdbcType="INTEGER"/>
</resultMap>

<!--查询单个-->
<select id="queryById" resultMap="UserMap">
select
id, name, age
from t_user
where id = #{id}
</select>

<!--查询指定行数据-->
<select id="queryAllByLimit" resultMap="UserMap">
select
id, name, age
from t_user
limit #{offset}, #{limit}
</select>

<!--通过实体作为筛选条件查询-->
<select id="queryAll" resultMap="UserMap">
select
id, name, age
from t_user
<where>
<if test="id != null">
and id = #{id}
</if>
<if test="name != null and name != ''">
and name = #{name}
</if>
<if test="age != null">
and age = #{age}
</if>
</where>
</select>

<!--新增所有列-->
<insert id="insert" keyProperty="id" useGeneratedKeys="true">
insert into t_user(name, age)
values (#{name}, #{age})
</insert>

<!--通过主键修改数据-->
<update id="update">
update t_user
<set>
<if test="name != null and name != ''">
name = #{name},
</if>
<if test="age != null">
age = #{age},
</if>
</set>
where id = #{id}
</update>

<!--通过主键删除-->
<delete id="deleteById">
delete from t_user where id = #{id}
</delete>

</mapper>

插件

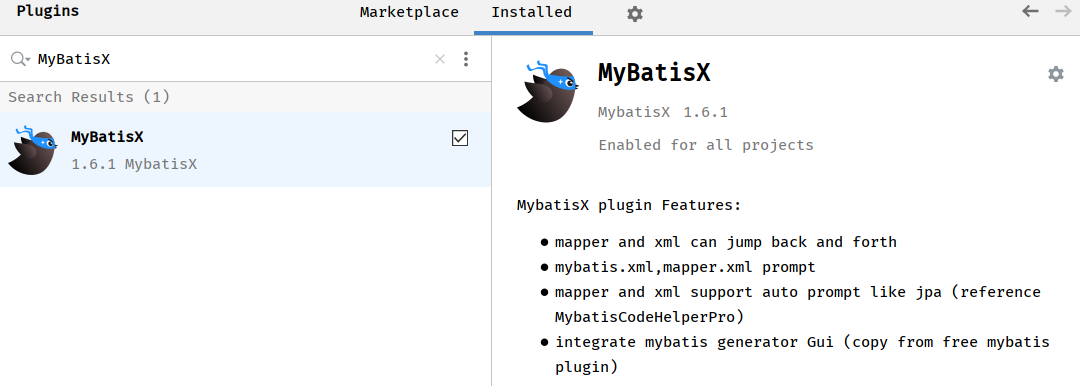
为了方便开发我们可以安装插件MyBatisX

image-20240116004015321

实体类

1
2
3
4
5
6
7
8
9
10
11
12
13
14
15
16
17
18
19
20
21
22
23
24
25
26
27
28
29
30
31
32
33
34
35
36
37
38
39
40
package cn.psvmc.zapicall.bean;

public class UserModel {
private int id;
private String name;
private int age;
private int sex;

public int getId() {
return id;
}

public void setId(int id) {
this.id = id;
}

public String getName() {
return name;
}

public void setName(String name) {
this.name = name;
}

public int getAge() {
return age;
}

public void setAge(int age) {
this.age = age;
}

public int getSex() {
return sex;
}

public void setSex(int sex) {
this.sex = sex;
}
}

Service

UserService.java

1
2
3
4
5
6
7
8
9
10
11
12
13
14
15
16
17
18
19
20
21
package cn.psvmc.zapicall.service;

import cn.psvmc.zapicall.bean.UserModel;
import cn.psvmc.zapicall.mapper.UserMapper;
import org.springframework.beans.factory.annotation.Autowired;
import org.springframework.stereotype.Service;

import java.util.List;

@Service
public class UserService {
@Autowired(required = false)
private UserMapper userMapper;
public List<UserModel> getUsers(){
return userMapper.selectAll();
}

public UserModel findById(String id){
return userMapper.findById(id);
}
}

Controller

1
2
3
4
5
6
7
8
9
10
11
12
13
14
15
16
17
18
19
20
21
22
23
24
25
26
27
package cn.psvmc.zapicall.controller;

import cn.psvmc.zapicall.bean.UserModel;
import cn.psvmc.zapicall.service.UserService;
import org.springframework.beans.factory.annotation.Autowired;
import org.springframework.web.bind.annotation.RequestMapping;
import org.springframework.web.bind.annotation.RequestParam;
import org.springframework.web.bind.annotation.RestController;

import java.util.List;

@RestController
@RequestMapping("/user")
public class UserController {
@Autowired
private UserService service;
@RequestMapping("/list")
public List<UserModel> getUsers() {
List<UserModel> list = service.getUsers();
return list;
}

@RequestMapping("/userById")
public UserModel userById(@RequestParam("id")String id) {
return service.findById(id);
}
}

访问

启动项目,通过浏览器访问:

http://localhost:8080/user/list

http://localhost:8080/user/userById?id=6

Druid连接池

Druid不但提供连接池的功能,还提供监控功能,可以实时查看数据库连接池和SQL查询的工作情况。

1
2
3
4
5
6
<!-- druid数据源驱动 -->
<dependency>
<groupId>com.alibaba</groupId>
<artifactId>druid-spring-boot-starter</artifactId>
<version>1.1.10</version>
</dependency>

配置从

1
2
3
4
spring.datasource.url=jdbc:mysql://127.0.0.1:3306/zbi_source?useUnicode=true&characterEncoding=utf8
spring.datasource.username=root
spring.datasource.password=123456
spring.datasource.driver-class-name=com.mysql.cj.jdbc.Driver

改为

1
2
3
4
5
6
7
8
9
10
11
12
13
14
15
16
17
18
19
20
21
22
23
24
25
26
27
28
29
30
31
32
33
34
35
36
37
38
39
spring.datasource.type=com.alibaba.druid.pool.DruidDataSource
spring.datasource.druid.driver-class-name=com.mysql.cj.jdbc.Driver
spring.datasource.druid.url=jdbc:mysql://127.0.0.1:3306/zbi_source?useUnicode=true&characterEncoding=utf8
spring.datasource.druid.username=root
spring.datasource.druid.password=123456
# 连接池配置
spring.datasource.druid.initial-size=5
spring.datasource.druid.min-idle=5
spring.datasource.druid.max-active=20
# 连接等待超时时间
spring.datasource.druid.max-wait=30000
# 配置检测可以关闭的空闲连接间隔时间
spring.datasource.druid.time-between-eviction-runs-millis=60000
# 配置连接在池中的最小生存时间
spring.datasource.druid.min-evictable-idle-time-millis=300000
spring.datasource.druid.validation-query=select '1' from dual
spring.datasource.druid.test-while-idle=true
spring.datasource.druid.test-on-borrow=false
spring.datasource.druid.test-on-return=false
spring.datasource.druid.pool-prepared-statements=true
spring.datasource.druid.max-open-prepared-statements=20
spring.datasource.druid.max-pool-prepared-statement-per-connection-size=20
# 配置监控统计拦截的filters, 去掉后监控界面sql无法统计, 'wall'用于防火墙
spring.datasource.druid.filters=stat,wall
# Spring监控AOP切入点,如cn.psvmc.service.*,配置多个英文逗号分隔
#spring.datasource.druid.aop-patterns:
spring.datasource.druid.web-stat-filter.enabled=true
spring.datasource.druid.web-stat-filter.url-pattern=/*
spring.datasource.druid.web-stat-filter.exclusions=*.js,*.gif,*.jpg,*.png,*.css,*.ico,/druid/*
spring.datasource.druid.stat-view-servlet.enabled=true
spring.datasource.druid.stat-view-servlet.url-pattern=/druid/*
spring.datasource.druid.stat-view-servlet.reset-enable=false
spring.datasource.druid.stat-view-servlet.login-username=druid
spring.datasource.druid.stat-view-servlet.login-password=druid
spring.datasource.druid.filter.stat.log-slow-sql=true
#白名单(如果allow没有配置或者为空,则允许所有访问)
spring.datasource.druid.stat-view-servlet.allow=127.0.0.1
#黑名单(deny优先于allow,如果在deny列表中,就算在allow列表中,也会被拒绝)
spring.datasource.druid.stat-view-servlet.deny=

访问

http://localhost:8080/druid/login.html

输入上面配置的账号密码druid即可。

SpringBoot连接池规则

  1. 由于 HikariCP 的性能和并发性。如果有 HikariCP,SpringBoot 会选择它。
  2. 否则,如果 Tomcat数据源连接池 可用,也可以使用它。
  3. 如果 HikariCPTomcat数据源连接池 都不可用,并且如果 Commons DBCP2 可用,就使用它。

可以使用 spring.datasource.type 属性来指定要使用的连接池。
如果使用 spring-boot-starter-jdbcspring-boot-starter-data-jpa,将自动获得对 HikariCP 的依赖。