前言 部署的各个服务及版本
服务
版本
说明
Hbase
2.1.10
查询高效的数据库
Phonenix
5.1.2
SQL方式操作Hbase
Phoenix分为胖客户端和瘦客户端
瘦客户端通过Phoenix Query Server 来解析SQL语言。
胖客户端对SQL解析=>Hbase读写原理API=>直接作用于Zookeeper
注意
胖客户端不用启动Phoenix Query Server
代码连接 Thin Client(瘦客户端) 1)启动query server
1
2
3
queryserver.py start lsof -i:8765
2)创建项目并导入依赖
1 2 3 4 5 <dependency > <groupId > org.apache.phoenix</groupId > <artifactId > phoenix-queryserver-client</artifactId > <version > 6.0.0</version > </dependency >
3)编写代码
1
2
3
4
5
6
7
8
9
10
11
12
13
14
15
16
17
18
import java.sql.*;public class PhoenixTest { public static void main (String[] args) throws SQLException, ClassNotFoundException { Class.forName("org.apache.phoenix.queryserver.client.Driver" ); String url = "jdbc:phoenix:thin:url=http://192.168.7.101:8765;serialization=PROTOBUF" ; Connection conn = DriverManager.getConnection(url); Statement st = conn.createStatement(); String sql = "select * from \"zdb\".\"tuser\"" ; ResultSet rs = st.executeQuery(sql); while (rs.next()) { System.out.println("id=" + rs.getString("id" ) + ";name=" + rs.getString("name" )); } rs.close(); st.close(); conn.close(); } }
添加数据
1
2
3
4
5
6
7
8
9
10
11
12
13
14
15
16
import java.sql.*;public class PhoenixTest { public static void main (String[] args) throws SQLException { Class.forName("org.apache.phoenix.jdbc.PhoenixDriver" ); Connection conn = DriverManager.getConnection("jdbc:phoenix:thin:url=http://192.168.7.101:8765;serialization=PROTOBUF" ); Statement st = conn.createStatement(); String sql = "upsert into MDB.TUSER(ID,NAME) VALUES ('" + 1005 + "','" + "wangwu" + "')" ; System.out.println("Running: " + sql); int i = st.executeUpdate(sql); System.out.println(i); conn.commit(); st.close(); conn.close(); } }
Thick Client(胖客户端) 1)在pom中加入依赖
1 2 3 4 5 6 7 8 9 10 11 <dependency > <groupId > org.apache.phoenix</groupId > <artifactId > phoenix-core</artifactId > <version > 5.1.2</version > </dependency > <dependency > <groupId > org.apache.phoenix</groupId > <artifactId > phoenix-hbase-compat-2.1.6</artifactId > <version > 5.1.2</version > </dependency >
2)编写代码
1
2
3
4
5
6
7
8
9
10
11
12
13
14
15
16
17
18
19
20
21
22
23
24
25
26
27
28
29
30
31
32
33
34
35
import org.apache.phoenix.jdbc.PhoenixDriver;import java.sql.*;import java.util.Properties;public class PhoenixTest { public static void main (String[] args) throws Exception { Properties properties = getProp(); PhoenixDriver instance = PhoenixDriver.INSTANCE; Connection conn; try { conn = instance.connect("jdbc:phoenix:hadoop01,hadoop02,hadoop03:2181" , properties); PreparedStatement ps = conn.prepareStatement("select * from \"zdb\".\"tuser\"" ); ResultSet rs = ps.executeQuery(); while (rs.next()) { System.out.println(rs.getString(1 ) + ":" + rs.getString(2 )); } } catch (SQLException e) { e.printStackTrace(); } } public static Properties getProp () { Properties prop = new Properties (); prop.put(QueryServices.IS_NAMESPACE_MAPPING_ENABLED, "true" ); prop.put(QueryServices.GLOBAL_METRICS_ENABLED, "false" ); prop.put("username" , "" ); prop.put("password" , "" ); prop.put("initialSize" , 20 ); prop.put("maxActive" , 0 ); prop.put("defaultAutoCommit" , true ); return prop; } }
Kerberos环境下连接 Kerberos环境下使用胖客户端连接
1
2
3
4
5
6
7
8
9
10
11
12
13
14
15
16
public static void loginPhoenix (String principal, String keytabPath) throws IOException, ClassNotFoundException, SQLException { Class.forName("org.apache.phoenix.jdbc.PhoenixDriver" ); String url = "jdbc:phoenix:hadoop01,hadoop02,hadoop03:/hbase:" + principal + ":" + keytabPath; PhoenixConnection con = DriverManager.getConnection(url, getProp()).unwrap(PhoenixConnection.class); Statement stmt = con.createStatement(); ResultSet rs = stmt.executeQuery("SELECT * FROM SYSTEM.CATALOG" ); int n = rs.getMetaData().getColumnCount(); for (int i = 0 ; i < n; i++) { String cn = rs.getMetaData().getColumnName(n); System.out.println(cn); } rs.close(); stmt.close(); con.close(); }
获取配置
1
2
3
4
5
6
7
8
9
10
11
12
13
14
15
16
17
private static Properties getProp () { Configuration conf = ZLoadConfig.loadHbase(); Properties prop = new Properties (); conf.getValByRegex(".*?" ).forEach(prop::setProperty); return prop; } public static Configuration loadHbase () { String hadoopConfPath = getHadoopConfigRootPath(); String hbaseConfPath = getHbaseConfigRootPath(); Configuration config = HBaseConfiguration.create(); config.addResource(new Path (hadoopConfPath + "/core-site.xml" )); config.addResource(new Path (hadoopConfPath + "/hdfs-site.xml" )); config.addResource(new Path (hadoopConfPath + "/yarn-site.xml" )); config.addResource(new Path (hbaseConfPath += "/hbase-site.xml" )); return config; }
连接的两种方式
1 PhoenixConnection conn = DriverManager.getConnection(jdbcUrl, getProp()).unwrap(PhoenixConnection.class);
或者
1 PhoenixConnection conn = PhoenixDriver.INSTANCE.connect(jdbcUrl, PhoenixSqlUtil.getProp());
驱动名
1 Class.forName(PhoenixDriver.class.getName());
或者
1 Class.forName("org.apache.phoenix.jdbc.PhoenixDriver" );
DBeaver连接 DBeaver中搜索phoenix
修改DBeaver配置 修改dbeaver.ini文件,增加如下内容
1
2
-vm D:/Tools/Java/jdk1.8.0 _102/bin
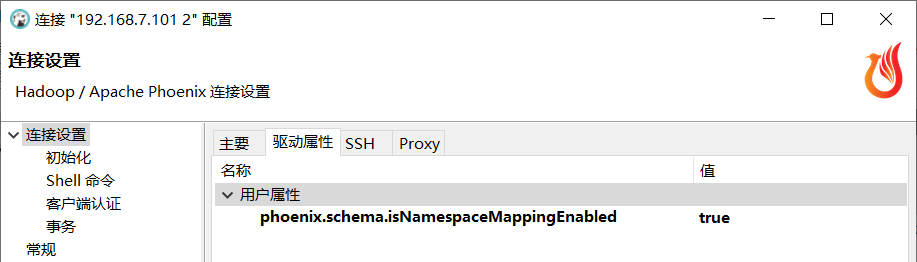
连接配置 连接属性
驱动属性中也添加
属性
1 phoenix.schema.isNamespaceMappingEnabled
值
自动下载的Jar版本较老
我们要引用对应版本的Jar
1 phoenix-client-hbase-2.1-5.1.2.jar
服务配置 如果报错
CATALOG is found but client does not have phoenix.schema.isNamespaceMappingEnabled enabled
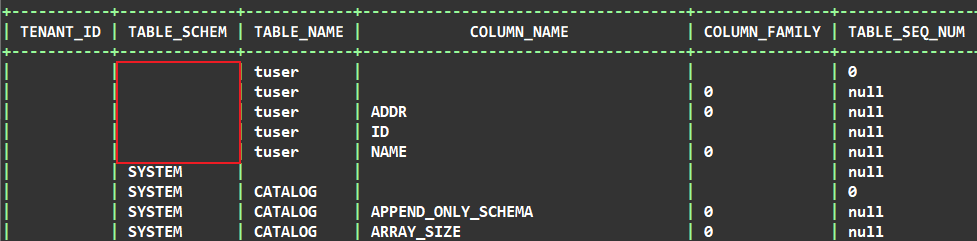
查询
1 select * from SYSTEM."CATALOG";
查看表的 TABLE_SCHEM 发现有些表这个属性为空。 那么如果你没有指定自动映射命名空间,就会报错。
在 hbase 的 conf 目录下 hbase-site.xml 文件加入下面的属性:
1 2 3 4 <property > <name > phoenix.schema.isNamespaceMappingEnabled</name > <value > true</value > </property >
然后,重启 hbase。
服务器上连接 连接Phoenix Shell 启动 Zookeeper => HDFS => Yarn => HBase 后
1 sqlline.py hadoop01,hadoop02,hadoop03:2181
第一次启动比较慢,请耐心等待。
查询
Kerberos环境下连接 需要把服务端生成的密钥文件psvmc.keytab复制过来。
1 kinit -kt /data/tools/bigdata/kerberos/hdfs.keytab hdfs/hadoop01@HADOOP.COM
查看认证状态
再连接
1 sqlline.py hadoop01,hadoop02,hadoop03:2181
第一次启动比较慢,请耐心等待。
查询
报错 配置版本报错
java.lang.RuntimeException: hbase-default.xml file seems to be for an older
解决
在hbase-site.xml文件中添加如下内容
跳过版本检查
1 2 3 4 <property > <name > hbase.defaults.for.version.skip</name > <value > true</value > </property >
Jar冲突
查找jar
1 2 3 find /data -name "phoenix*.jar" find /data -name "metrics*.jar" find /data -type f -name "metrics-core*.jar"
1 2 find /root/zjhome -name "phoenix*.jar" find /root/zjhome -type f -name "metrics*.jar"
Metrics名称冲突 在Flink中使用胖客户端运行Phoenix的时候会自动启动全局的metrics,并且名称为Phoenix
1 2 3 4 2023-08-23 14:51:43,215 INFO org.apache.hadoop.hbase.metrics.MetricRegistries [] - Loaded MetricRegistries class org.apache.hadoop.hbase.metrics.impl.MetricRegistriesImpl 2023-08-23 14:51:43,254 INFO org.apache.hadoop.metrics2.impl.MetricsConfig [] - loaded properties from hadoop-metrics2.properties 2023-08-23 14:51:43,272 INFO org.apache.hadoop.metrics2.impl.MetricsSystemImpl [] - Scheduled snapshot period at 10 second(s). 2023-08-23 14:51:43,273 INFO org.apache.hadoop.metrics2.impl.MetricsSystemImpl [] - Phoenix metrics system started
但是一但Phoenix没释放的时候又执行了任务,就会报错,导致任务无法被提交
Metrics source phoenix already exists!
起初我想的解决办法是禁用指标
1 2 props.setProperty(QueryServices.GLOBAL_METRICS_ENABLED, "false" ); props.setProperty(QueryServices.COLLECT_REQUEST_LEVEL_METRICS, "false" );
官方是这样写的,但是实际并不生效。
通过排查源码发现GlobalMetricRegistriesAdapter类中注册了全局的名称
1 DefaultMetricsSystem.initialize("Phoenix" );
并且这个类还是单例,我就想我们重新设置这个名称
我们知道只要调用下面的代码就会注册指标
1 Connection con = DriverManager.getConnection(jdbcUrl, getProp()).unwrap(PhoenixConnection.class);
所以我想的是在这之前修改
1 2 3 4 5 6 7 8 9 10 11 12 13 public static Properties getProp () { DefaultMetricsSystem.initialize("phoenix-" + UUID.randomUUID()); Properties props = new Properties (); props.setProperty(QueryServices.IS_NAMESPACE_MAPPING_ENABLED, "true" ); props.setProperty(QueryServices.GLOBAL_METRICS_ENABLED, "false" ); props.setProperty(QueryServices.COLLECT_REQUEST_LEVEL_METRICS, "false" ); props.put("username" , "" ); props.put("password" , "" ); props.put("initialSize" , 20 ); props.put("maxActive" , 0 ); props.put("defaultAutoCommit" , true ); return props; }
这时运行时虽然打印的时新的指标名称但是实际注册的还是Phoenix。
因为全局会再次修改这个单例的值。
我们继续看源码发现
1 2 3 4 5 6 7 8 9 10 synchronized String newSourceName (String name, boolean dupOK) { if (sourceNames.map.containsKey(name)) { if (dupOK) { return name; } else if (!miniClusterMode) { throw new MetricsException ("Metrics source " + name +" already exists!" ); } } return sourceNames.uniqueName(name); }
我们只要修改miniClusterMode就行了
1 DefaultMetricsSystem.setMiniClusterMode(true );
所以最终的解决办法是
1 2 3 4 5 6 7 8 9 10 11 public static Properties getProp () { DefaultMetricsSystem.setMiniClusterMode(true ); Properties props = new Properties (); props.setProperty(QueryServices.IS_NAMESPACE_MAPPING_ENABLED, "true" ); props.put("username" , "" ); props.put("password" , "" ); props.put("initialSize" , 20 ); props.put("maxActive" , 0 ); props.put("defaultAutoCommit" , true ); return props; }