概述
本文Spring Boot使用的2.6.3版本
官方文档:https://spring.io/projects/spring-cloud
本文代码示例:https://gitee.com/psvmc/soa-demo
SpringCloud是微服务的集大成者,里面包含了很多技术,而现在SpringCloud进行了一次大更新,很多技术现在已经不再使用,有了别的替代方案。
最后的一行是推荐的方案。
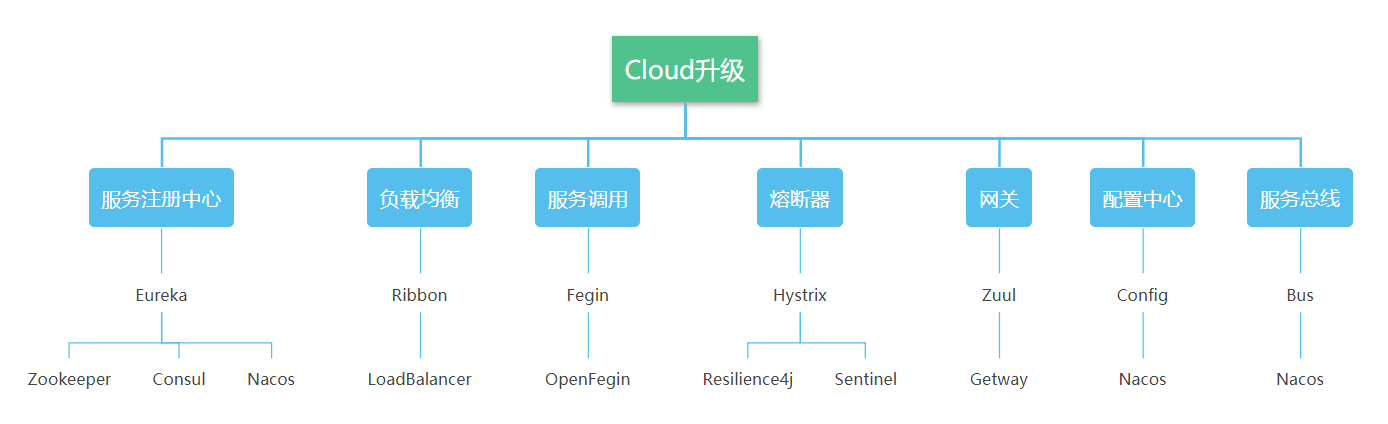
目前我的选择的组合为
- 注册中心 Eureka
- 网关 Getway
- 熔断器 Resilience4j
- 配置中心 Config
配置中心之所以不用Nacos是因为不支持SpringBoot2.6.3。
项目的基本结构
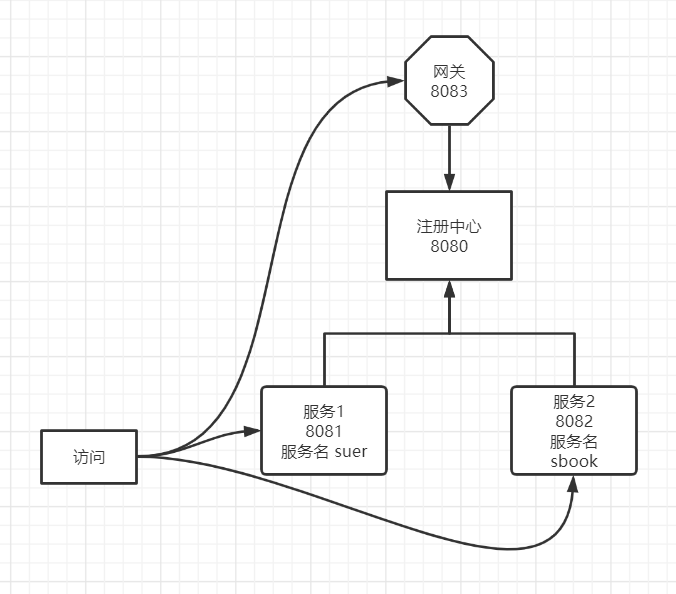
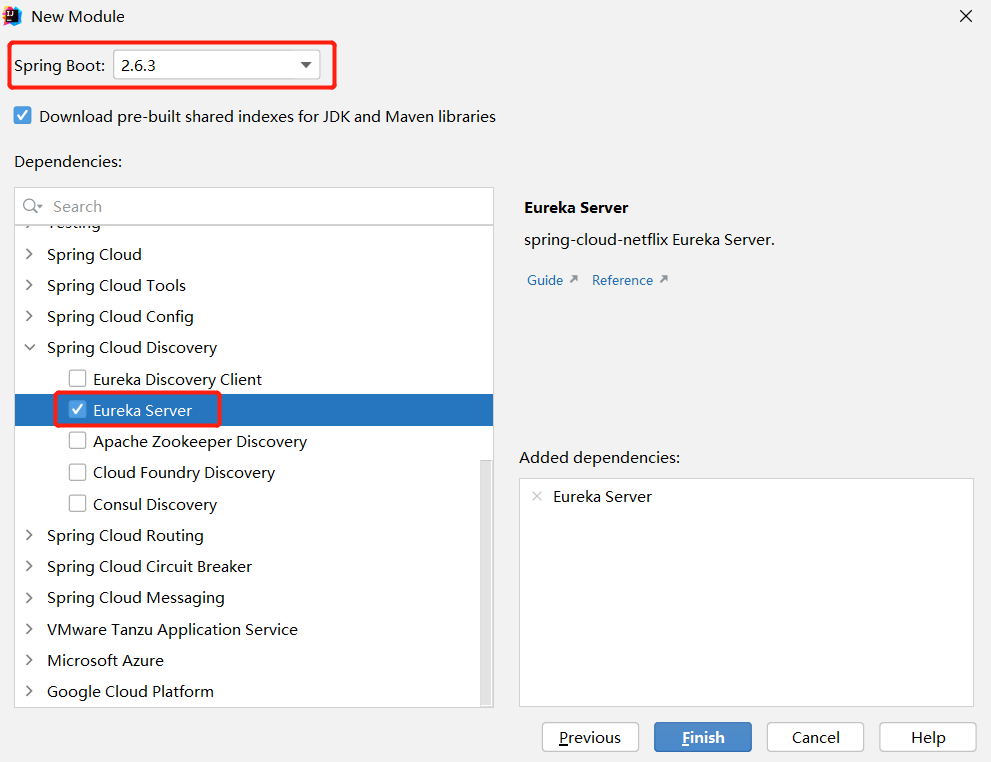
创建项目
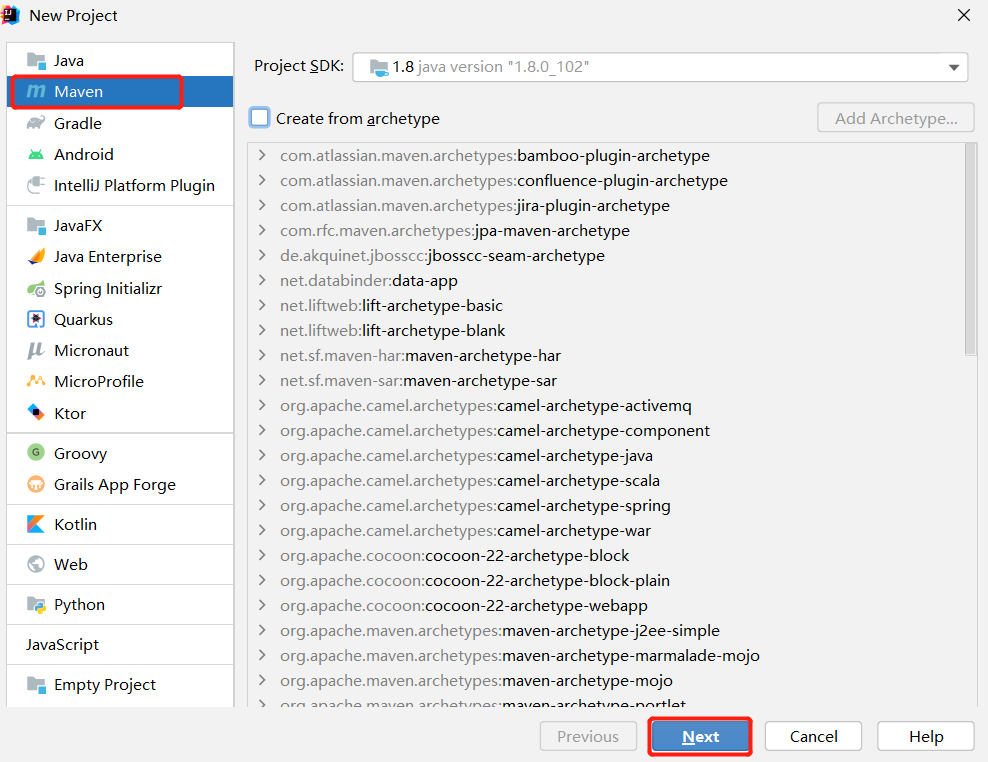
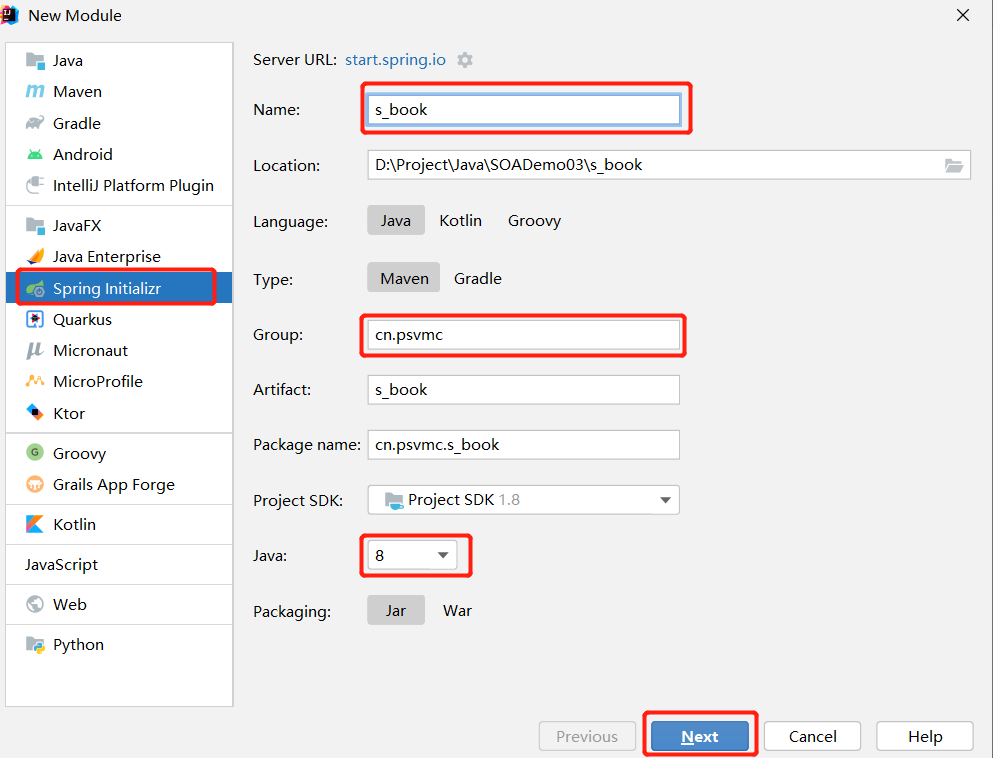
接下来我们的注册中心,服务和网关都添加Module即可

选择
注册中心
注册中心添加以下组件
配置文件
1
2
3
4
| server.port=8080
eureka.client.register-with-eureka=false
eureka.client.fetch-registry=false
eureka.client.service-url.defaultZone=http://127.0.0.1:8080/eureka/
|
注册中心
http://127.0.0.1:8080/
服务
注意
服务名中支持中划线,如s-uer
服务名称中不支持下划线,也就是s_user这样是不行的
考虑到我们最终通过网关访问是要加上服务名的,所以也不建议使用中划线,如suer
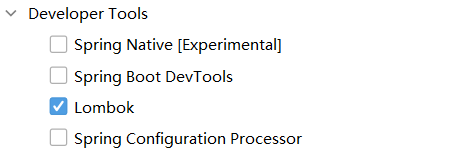
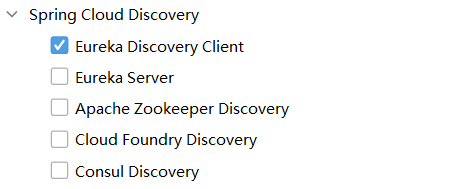
添加依赖


服务1
实体
1
2
3
4
5
6
7
8
9
| import lombok.Data;
@Data
public class UserModel {
private String name;
private int age;
}
|
控制器
1
2
3
4
5
6
7
8
9
10
11
12
13
14
15
16
17
18
19
20
| import cn.psvmc.s_user.model.UserModel;
import org.springframework.web.bind.annotation.GetMapping;
import org.springframework.web.bind.annotation.RequestMapping;
import org.springframework.web.bind.annotation.RestController;
@RestController
@RequestMapping(value = "/user")
public class UserController {
@GetMapping(value = "/detail")
public Object getUser() {
UserModel user = new UserModel();
user.setName("张三");
user.setAge(18);
return user;
}
}
|
Application中添加@EnableEurekaClient
1
2
3
4
5
6
7
8
9
10
11
| import org.springframework.boot.SpringApplication;
import org.springframework.boot.autoconfigure.SpringBootApplication;
import org.springframework.cloud.netflix.eureka.EnableEurekaClient;
@SpringBootApplication
@EnableEurekaClient
public class SUserApplication {
public static void main(String[] args) {
SpringApplication.run(SUserApplication.class, args);
}
}
|
配置文件application.properties
1
2
3
| erver.port=8081
spring.application.name=suser
eureka.client.service-url.defaultZone=http://127.0.0.1:8080/eureka/
|
访问地址
http://127.0.0.1:8081/user/detail
服务2
实体
1
2
3
4
5
6
| import lombok.Data;
@Data
public class BookModel {
private String name;
}
|
控制器
1
2
3
4
5
6
7
8
9
10
11
12
13
14
15
16
17
18
19
| import cn.psvmc.s_book.BookModel;
import org.springframework.web.bind.annotation.GetMapping;
import org.springframework.web.bind.annotation.PathVariable;
import org.springframework.web.bind.annotation.RequestMapping;
import org.springframework.web.bind.annotation.RestController;
@RestController
@RequestMapping(value = "/book")
public class BookController {
@GetMapping(value = "/detail/{id}")
public Object getBook(@PathVariable("id") int id) throws InterruptedException {
if (id == 0) {
Thread.sleep(500);
}
BookModel book = new BookModel();
book.setName("三毛流浪记");
return book;
}
}
|
Application中添加@EnableEurekaClient
1
2
3
4
5
6
7
8
9
10
11
| import org.springframework.boot.SpringApplication;
import org.springframework.boot.autoconfigure.SpringBootApplication;
import org.springframework.cloud.netflix.eureka.EnableEurekaClient;
@SpringBootApplication
@EnableEurekaClient
public class SBookApplication {
public static void main(String[] args) {
SpringApplication.run(SBookApplication.class, args);
}
}
|
配置文件application.properties
1
2
3
| server.port=8082
spring.application.name=sbook
eureka.client.service-url.defaultZone=http://127.0.0.1:8080/eureka/
|
访问地址
http://localhost:8082/book/detail/0
http://localhost:8082/book/detail/1
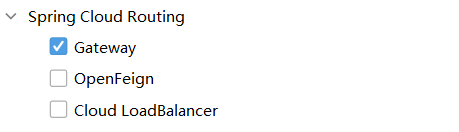
网关

配置文件application.yml
1
2
3
4
5
6
7
8
9
10
11
12
13
14
15
16
| server:
port: 8083
spring:
application:
name: gateway
cloud:
gateway:
discovery:
locator:
enabled: true
lower-case-service-id: true
eureka:
client:
service-url:
defaultZone: http://127.0.0.1:8080/eureka/
|
Application中添加@EnableEurekaClient
1
2
3
4
5
6
7
8
9
10
11
| import org.springframework.boot.SpringApplication;
import org.springframework.boot.autoconfigure.SpringBootApplication;
import org.springframework.cloud.netflix.eureka.EnableEurekaClient;
@SpringBootApplication
@EnableEurekaClient
public class GatewayApplication {
public static void main(String[] args) {
SpringApplication.run(GatewayApplication.class, args);
}
}
|
允许跨域
1
2
3
4
5
6
7
8
9
10
11
12
13
| @Configuration
public class CorsConfig {
@Bean
public CorsWebFilter corsFilter() {
CorsConfiguration config = new CorsConfiguration();
config.addAllowedMethod("*");
config.addAllowedOrigin("*");
config.addAllowedHeader("*");
UrlBasedCorsConfigurationSource source = new UrlBasedCorsConfigurationSource(new PathPatternParser());
source.registerCorsConfiguration("/**", config);
return new CorsWebFilter(source);
}
}
|
注意:
不配置会出现访问跨域问题。
后端的跨域配置可以去掉也可以不去。
网关访问报错
错误如下
java.net.UnknownHostException: Failed to resolve ‘izhp377icw6ku0oh6tzh27z’
这是因为注册中心中保存的是hostname而不是对应的IP
查看
返回的就是izhp377icw6ku0oh6tzh27z,所以说网关不能根据hostname找到对应IP了。
解决方法,在网关所在计算机上添加映射
添加
1
| 127.0.0.1 izhp377icw6ku0oh6tzh27z
|
注意我这里是本机,所以用的127.0.0.1。
熔断器
造成灾难性雪崩效应的原因,可以简单归结为下述三种:
- 服务提供者不可用。如:硬件故障、程序BUG、缓存击穿、并发请求量过大等。
- 重试加大流量。如:用户重试、代码重试逻辑等。
- 服务调用者不可用。如:同步请求阻塞造成的资源耗尽等。
雪崩效应最终的结果就是:服务链条中的某一个服务不可用,导致一系列的服务不可用,最终造成服务逻辑崩溃。这种问题造成的后果,往往是无法预料的。
解决灾难性雪崩效应的方式通常有:降级、隔离、熔断、请求缓存、请求合并。
下图来自resilience4j官方文档,介绍了什么是断路器:
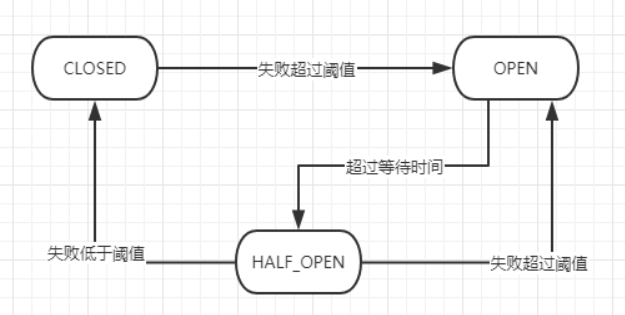
- CLOSED状态时,请求正常放行
- 请求失败率达到设定阈值时,变为OPEN状态,此时请求全部不放行
- OPEN状态持续设定时间后,进入半开状态(HALE_OPEN),放过部分请求
- 半开状态下,失败率低于设定阈值,就进入CLOSE状态,即全部放行
- 半开状态下,失败率高于设定阈值,就进入OPEN状态,即全部不放行
添加熔断器参数设置类
1
2
3
4
5
6
7
8
9
10
11
12
13
14
15
16
17
18
19
20
21
22
23
24
25
26
27
28
29
30
31
32
33
34
35
36
37
38
39
40
41
42
43
44
| import io.github.resilience4j.circuitbreaker.CircuitBreakerConfig;
import io.github.resilience4j.timelimiter.TimeLimiterConfig;
import org.springframework.cloud.circuitbreaker.resilience4j.ReactiveResilience4JCircuitBreakerFactory;
import org.springframework.cloud.circuitbreaker.resilience4j.Resilience4JConfigBuilder;
import org.springframework.context.annotation.Bean;
import org.springframework.context.annotation.Configuration;
import java.time.Duration;
@Configuration
public class CustomizeCircuitBreakerConfig {
@Bean
public ReactiveResilience4JCircuitBreakerFactory defaultCustomizer() {
CircuitBreakerConfig circuitBreakerConfig = CircuitBreakerConfig.custom()
.slidingWindowType(CircuitBreakerConfig.SlidingWindowType.TIME_BASED)
.slidingWindowSize(60)
.minimumNumberOfCalls(5)
.failureRateThreshold(50)
.enableAutomaticTransitionFromOpenToHalfOpen()
.permittedNumberOfCallsInHalfOpenState(5)
.waitDurationInOpenState(Duration.ofSeconds(60))
.recordExceptions(Throwable.class)
.build();
ReactiveResilience4JCircuitBreakerFactory factory = new ReactiveResilience4JCircuitBreakerFactory();
factory.configureDefault(id -> new Resilience4JConfigBuilder(id)
.timeLimiterConfig(TimeLimiterConfig.custom().timeoutDuration(Duration.ofMillis(300)).build())
.circuitBreakerConfig(circuitBreakerConfig)
.build());
return factory;
}
}
|
添加降级响应
1
2
3
4
5
6
7
8
9
10
11
12
13
14
15
16
17
| import org.springframework.web.bind.annotation.GetMapping;
import org.springframework.web.bind.annotation.RestController;
import java.text.SimpleDateFormat;
import java.util.Date;
@RestController
public class Fallback {
@GetMapping("/myfallback")
public String myfallback() {
return "Fallback:" + new SimpleDateFormat("yyyy-MM-dd hh:mm:ss").format(new Date());
}
}
|
项目的配置更改如下:
application.yaml
1
2
3
4
5
6
7
8
9
10
11
12
13
14
15
16
17
18
19
20
21
22
23
24
25
26
27
28
29
30
31
32
33
34
| server:
port: 8083
spring:
application:
name: gateway
cloud:
gateway:
routes:
- id: sbook
predicates:
- Path=/sbook/**
uri: lb://sbook
name: sbook
filters:
- RewritePath=/sbook/book/(?<segment>.*), /book/$\{segment}
- name: CircuitBreaker
args:
name: myCircuitBreaker
fallbackUri: forward:/myfallback
- id: suser
predicates:
- Path=/suser/**
uri: lb://suser
name: suser
filters:
- RewritePath=/suser/user/(?<segment>.*), /user/$\{segment}
- name: CircuitBreaker
args:
name: myCircuitBreaker
fallbackUri: forward:/myfallback
eureka:
client:
service-url:
defaultZone: http://127.0.0.1:8080/eureka/
|
或者使用application.properties
1
2
3
4
5
6
7
8
9
10
11
12
13
14
15
16
17
18
19
20
21
22
| server.port=8083
spring.application.name=gateway
spring.cloud.gateway.routes[0].id=sbook
spring.cloud.gateway.routes[0].predicates[0]=Path=/sbook/**
spring.cloud.gateway.routes[0].uri=lb://sbook
spring.cloud.gateway.routes[0].name=sbook
spring.cloud.gateway.routes[0].filters[0]=RewritePath=/sbook/book/(?<segment>.*), /book/$\{segment}
spring.cloud.gateway.routes[0].filters[1].name=CircuitBreaker
spring.cloud.gateway.routes[0].filters[1].args.name=myCircuitBreaker
spring.cloud.gateway.routes[0].filters[1].args.fallbackUri=forward:/myfallback
spring.cloud.gateway.routes[1].id=suser
spring.cloud.gateway.routes[1].predicates[0]=Path=/suser/**
spring.cloud.gateway.routes[1].uri=lb://suser
spring.cloud.gateway.routes[1].name=suser
spring.cloud.gateway.routes[1].filters[0]=RewritePath=/suser/user/(?<segment>.*), /user/$\{segment}
spring.cloud.gateway.routes[1].filters[1].name=CircuitBreaker
spring.cloud.gateway.routes[1].filters[1].args.name=myCircuitBreaker
spring.cloud.gateway.routes[1].filters[1].args.fallbackUri=forward:/myfallback
eureka.client.service-url.defaultZone=http://127.0.0.1:8080/eureka/
|
注意:
discovery和routes是不能并存的,discovery相当于自动生成routes配置。- 使用
application.properties的话配置中有些会显示为红色,不用在意,不影响使用。
lb:是从注册中心中取URI。- 注意重写路由规则,路由相当于把请求的URL替换成了我们服务的URL,这时就不再需要服务名了。
启动
启动顺序
注册中心=>服务=>网关
注册中心
http://127.0.0.1:8080/
结果如图

原服务访问地址
http://localhost:8081/user/detail
http://localhost:8082/book/detail/0
通过网关访问
http://localhost:8083/suser/user/detail
http://localhost:8083/sbook/book/detail/0
http://localhost:8083/sbook/book/detail/1
配置中心
服务端
添加依赖


application.properties
1
2
3
4
5
6
7
8
9
10
11
12
13
|
server.port=8087
spring.application.name=configServer
spring.cloud.config.server.git.uri=https://gitee.com/psvmc/config-center.git
spring.cloud.config.server.git.username=psvmc
spring.cloud.config.server.git.password=psvmc
spring.cloud.config.server.git.default-label=master
spring.cloud.config.server.git.search-paths=config
|
这里设置的目录为config,所以我们的配置文件要放在git仓库里的config目录下
创建文件psvmc-dev.properties
注意配置文件名称必须按照以下规则
1
| /{application}-{profile}.properties
|
访问时的路径为
1
2
3
| 域名/{application}/{profile}
域名/{application}/{profile}/label
|
注意
其中label为分支名
Application中添加@EnableConfigServer
1
2
3
4
5
6
7
8
9
10
11
12
13
| import org.springframework.boot.SpringApplication;
import org.springframework.boot.autoconfigure.SpringBootApplication;
import org.springframework.cloud.config.server.EnableConfigServer;
@EnableConfigServer
@SpringBootApplication
public class ConfigServerApplication {
public static void main(String[] args) {
SpringApplication.run(ConfigServerApplication.class, args);
}
}
|
访问地址
http://localhost:8087/psvmc/dev
或者
http://localhost:8087/psvmc/dev/master
注意访问地址和psvmc-dev.properties配置文件的对应关系。
客户端

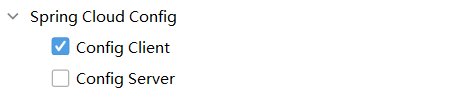
pom中添加依赖
1
2
3
4
| <dependency>
<groupId>org.springframework.cloud</groupId>
<artifactId>spring-cloud-starter-bootstrap</artifactId>
</dependency>
|
不添加会报错
No spring.config.import property has been defined
原因
由于bootstrap.properties是系统级的资源配置文件,是用在程序引导执行时更加早期配置信息读取;
而application.properties是用户级的资源配置文件,是用来后续的一些配置所需要的公共参数。
但是在SpringCloud 2020.* 版本把bootstrap禁用了,导致在读取文件的时候读取不到而报错,所以我们只要把bootstrap从新导入进来就会生效了。
添加bootstrap.properties
1
2
3
4
5
6
7
8
9
10
| server.port=8088
spring.profiles.active=dev
spring.application.name=configClient
spring.cloud.config.uri=http://localhost:8087
spring.cloud.config.label=master
spring.cloud.config.name=psvmc
spring.cloud.config.profile=dev
management.endpoints.web.exposure.include=refresh
|
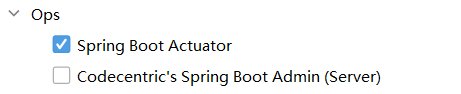
注意
management.endpoints.web.exposure.include=refresh这个配置是用来刷新项目配置的,添加后就会生成一个URL
http://localhost:8088/actuator/refresh,但是注意这个URL中要添加actuator,并且只能用POST请求。
bootstrap.properties的优先级比application.properties优先级高,这里可以只保留bootstrap.properties,application.properties可以删掉。
添加控制器
1
2
3
4
5
6
7
8
9
10
11
12
13
14
15
16
17
18
19
20
21
| import org.springframework.beans.factory.annotation.Value;
import org.springframework.cloud.context.config.annotation.RefreshScope;
import org.springframework.web.bind.annotation.GetMapping;
import org.springframework.web.bind.annotation.RequestMapping;
import org.springframework.web.bind.annotation.RestController;
@RefreshScope
@RestController
@RequestMapping(value = "/config")
public class ConfigController {
@Value("${name}")
String name;
@GetMapping(value = "/name")
public String getName() {
return name;
}
}
|
注意
@RefreshScope 所有加该注解的都会在调用刷新后自动更新注入的配置项,如上面示例中的name。
访问地址
http://localhost:8088/config/name
刷新配置
使用POST请求下面的URL
http://localhost:8088/actuator/refresh
或者在命令行中运行
1
| curl -X POST "http://localhost:8088/actuator/refresh"
|
打包
最外层的pom配置
1
2
3
4
5
6
7
8
9
10
11
12
13
14
15
16
17
18
19
20
21
22
23
24
25
26
27
28
29
30
31
32
33
34
35
36
37
38
39
40
41
42
43
44
45
46
47
48
49
50
51
52
53
54
55
56
57
58
59
60
61
62
63
64
65
66
| <?xml version="1.0" encoding="UTF-8"?>
<project xmlns="http://maven.apache.org/POM/4.0.0"
xmlns:xsi="http://www.w3.org/2001/XMLSchema-instance"
xsi:schemaLocation="http://maven.apache.org/POM/4.0.0 http://maven.apache.org/xsd/maven-4.0.0.xsd">
<modelVersion>4.0.0</modelVersion>
<groupId>org.example</groupId>
<artifactId>SOADemo03</artifactId>
<version>1.0-SNAPSHOT</version>
<packaging>pom</packaging>
<properties>
<maven.compiler.source>8</maven.compiler.source>
<maven.compiler.target>8</maven.compiler.target>
</properties>
<modules>
<module>register</module>
<module>s_user</module>
<module>s_book</module>
<module>gateway</module>
<module>config_server</module>
<module>config-client</module>
</modules>
<dependencyManagement>
<dependencies>
<dependency>
<groupId>cn.psvmc</groupId>
<artifactId>register</artifactId>
<version>0.0.1-SNAPSHOT</version>
</dependency>
<dependency>
<groupId>cn.psvmc</groupId>
<artifactId>s_user</artifactId>
<version>0.0.1-SNAPSHOT</version>
</dependency>
<dependency>
<groupId>cn.psvmc</groupId>
<artifactId>s_book</artifactId>
<version>0.0.1-SNAPSHOT</version>
</dependency>
<dependency>
<groupId>cn.psvmc</groupId>
<artifactId>gateway</artifactId>
<version>0.0.1-SNAPSHOT</version>
</dependency>
<dependency>
<groupId>cn.psvmc</groupId>
<artifactId>config_server</artifactId>
<version>0.0.1-SNAPSHOT</version>
</dependency>
<dependency>
<groupId>cn.psvmc</groupId>
<artifactId>config-client</artifactId>
<version>0.0.1-SNAPSHOT</version>
</dependency>
</dependencies>
</dependencyManagement>
</project>
|
注意其中添加的部分
模块的pom
1
2
3
4
5
6
7
8
|
<plugin>
<groupId>org.apache.maven.plugins</groupId>
<artifactId>maven-surefire-plugin</artifactId>
<configuration>
<skip>true</skip>
</configuration>
</plugin>
|
注意
模块中添加该配置会跳过依赖服务的检测,否则只能在服务都启动的前提下才能打包成功。
其它
公共依赖
在创建公用依赖的时候要选择Maven模块,不建议建SpringBoot模块
如果建的是SpringBoot项目,要修改配置
1
2
3
4
5
6
7
8
9
10
11
12
13
14
15
16
17
18
19
| <build>
<plugins>
<plugin>
<groupId>org.springframework.boot</groupId>
<artifactId>spring-boot-maven-plugin</artifactId>
<configuration>
<skip>true</skip>
<finalName>${project.name}</finalName>
<excludes>
<exclude>
<groupId>org.projectlombok</groupId>
<artifactId>lombok</artifactId>
</exclude>
</excludes>
</configuration>
</plugin>
</plugins>
</build>
|