从头创建基于NodeJS的WEB框架Koa的项目

前言

之前我们说过Koa框架的用法,现在我们就用它从头创建一个前后端在一块的项目,其实下面的方式还是前后端分离的,只是后端为前端提供了WEB服务器。

注意

正式项目还是建议前后端分开,分别建仓库,不建议合在一块。

示例仓库:https://gitee.com/psvmc/zdev-ops-node

创建项目

假如我的项目叫ZDevOpsNode

创建该目录并进入,初始化

1
npm init -y

注意

-y会跳过设置项目属性的过程,注意项目名称中如果包含大写会提示不符合要求,修改为小写即可

生成配置如下

1
2
3
4
5
6
7
8
9
10
11
{
"name": "zdevopsnode",
"version": "1.0.0",
"description": "",
"main": "index.js",
"scripts": {
"test": "echo \"Error: no test specified\" && exit 1"
},
"author": "",
"license": "ISC"
}

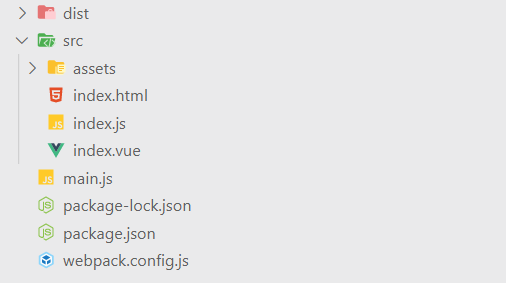
项目的目录结构

image-20210416181813072

目录及文件作用

  • dist 前端项目打包后保存的目录
  • src 前端项目所在目录
    • assets 资源文件
    • index.html 前端页面的入口 模板文件
    • index.jsindex.vue vue页面文件
  • main.js 后端的程序入口
  • package.json 主配置文件
  • webpack.config.js webpack的配置文件

前端

添加前端相关库

Webpack

1
2
npm install -D webpack@4
npm install -D webpack-cli

Vue

1
2
npm i vue --save
npm install -D vue-loader vue-template-compiler

JS(Babel)

1
npm i babel-core babel-loader@7 babel-preset-env --save-dev

CSS(Less)

1
2
npm install less --save-dev
npm install style-loader css-loader less-loader@5.0.0 --save-dev

文件

1
npm install file-loader --save-dev

HTML

1
2
npm uninstall html-webpack-plugin
npm i --save-dev html-webpack-plugin@4

注意插件的版本要和Webpack的版本对应,否则打包错误

项目根目录添加webpack.config.js

1
2
3
4
5
6
7
8
9
10
11
12
13
14
15
16
17
18
19
20
21
22
23
24
25
26
27
28
29
30
31
32
33
34
35
36
37
38
39
40
41
42
43
44
45
46
47
48
49
50
51
52
53
54
55
56
57
58
59
60
61
62
63
64
65
66
67
68
69
70
71
72
const path = require("path");
const {
VueLoaderPlugin
} = require('vue-loader')
var HtmlWebpackPlugin = require('html-webpack-plugin'); //打包html的插件

function resolve(dir) {
return path.join(__dirname, dir);
}

module.exports = {
entry: {
index: "./src/index.js",
},

output: {
path: __dirname + "/dist",
publicPath: "./",
filename: "[name].js",
},

plugins: [
new VueLoaderPlugin(),
new HtmlWebpackPlugin({
template: './src/index.html' //打包前端项目的模板页面
})
],
module: {
rules: [{
test: /\.(png|jpg|gif|svg)$/,
loader: "file-loader",
options: {
esModule: false,
query: {
name: "[name].[ext]?[hash]",
},
},
},
{
test: /\.vue$/,
loader: 'vue-loader'
},
// 它会应用到普通的 `.js` 文件
// 以及 `.vue` 文件中的 `<script>` 块
{
test: /\.js$/,
loader: 'babel-loader'
},
// 它会应用到普通的 `.css` 文件
// 以及 `.vue` 文件中的 `<style>` 块
{
test: /\.css$/,
use: [
'vue-style-loader',
'css-loader'
]
},
{
test: /\.less$/,
use: ['style-loader', 'css-loader', 'less-loader']
}
]
},

resolve: {
extensions: [".js", ".vue", ".json"],
alias: {
"@": resolve("src"),
images: resolve(path.join(__dirname, "src", "assets", "images")),
},
},
};

package.json

1
2
3
4
"scripts": {
"dev":"webpack && node main.js",
"webpack": "webpack --mode development"
},

说几个配置

1
2
3
4
5
6
7
8
9
10
11
{
entry: {
index: "./src/index.js",
},

output: {
path: __dirname + "/dist",
publicPath: "./",
filename: "[name].js",
},
}

这个配置相当于打包这个生产线的输入和输出,会把输入的每个JS加工后放到path定义的位置,文件的路径会在前面前面拼接上publicPath的值,这个配置不仅仅对JS生效,引用的css和图片也受publicPath的影响。

html-webpack-plugin 这个插件的作用很简单,他只是在模板的html里添加上了打包后生成的js文件。

而那堆file-loadervue-loaderbabel-loaderless-loader等则是我们需要引用什么格式就需要对应的loader

静态模板

index.html

1
2
3
4
5
6
7
8
9
10
11
12
13
14
15
16
17
18
<!DOCTYPE html>
<html lang="en">
<head>
<meta charset="UTF-8" />
<meta http-equiv="X-UA-Compatible" content="IE=edge" />
<meta name="viewport" content="width=device-width, initial-scale=1.0" />
<title>自动化运维</title>
</head>
<body>
<div id="app"></div>
</body>
<style>
body {
margin: 0;
padding: 0;
}
</style>
</html>

index.js

1
2
3
4
5
6
7
import Vue from 'vue'
import App from './index.vue'

new Vue({
el: '#app',
render: h => h(App)
})

index.vue

1
2
3
4
5
6
7
8
9
10
11
12
13
14
15
16
17
18
19
20
21
22
23
24
25
26
27
28
29
30
31
32
33
34
35
<template>
<div class="wrap">
<div class="loginInner">
<h1>欢迎,登录运维平台!</h1>
<div class="login"></div>
</div>
</div>
</template>

<script>
export default {
name: "login",
data() {
return {};
},
created() {},
methods: {}
};
</script>

<style lang="less" scoped>
.wrap {
height: 100%;
height: 100vh;
display: flex;
flex-direction: column;
justify-content: flex-start;
align-items: center;
background: url("./assets/images/login/login_bg.jpg") no-repeat;
background-size: cover;
.loginInner {
color: white;
}
}
</style>

后端

安装依赖

1
2
3
npm install koa --save-dev
npm install koa-router --save-dev
npm install koa-static --save-dev

main.js

1
2
3
4
5
6
7
8
9
10
11
12
13
14
15
16
const Koa = require('koa')
const app = new Koa()
const Router = require('koa-router');
const path = require('path');
const serve = require('koa-static');
const router = new Router()

const static_serve = serve(path.join(__dirname, "dist"));
app.use(static_serve);

app.use(router.routes()).use(router.allowedMethods());
router.get('/hello', (ctx, next) => {
ctx.body = 'Hello World';
})

app.listen(3000)

运行

1
node main.js

或者

1
npm run dev

注意

serve(path.join(__dirname, "dist"));在访问过程中不用添加dist,

为了保证访问URL不冲突,建议把静态访问的中间件写在前面,并且后端的接口都以固定的前缀开始,比如/api开始

这时候就可以通过以下地址访问了

http://localhost:3000/

这时如果dist 目录下添加新文件也是可以访问的,所有我们可以监听代码的改变,自动打包,重载页面,就可以实现开发中热重载了。

当然这些Vue Cli都已经实现了,所以这边文章主要有两个作用

  1. 使用Koa搭建后台服务并作为WEB服务器使前端页面可以访问
  2. 了解Vue CliWebpack都做了什么

总结

这里写了这么多,但是我并不建议平时我们这样搭建项目,用VueCli要比这方便多了,只是让大家知道Webpack和VueCli的机制以及前后端怎么结合在一块。