WPF桌面端开发5-常用技巧

更改语言版本

运行时报错,我们需要修改C#语言版本

“Using 声明”在 C# 7.3 中不可用。请使用 8.0 或更高的语言版本。

正常来说我们可以按照下述流程操作

属性=>生成=>高级=>语言版本
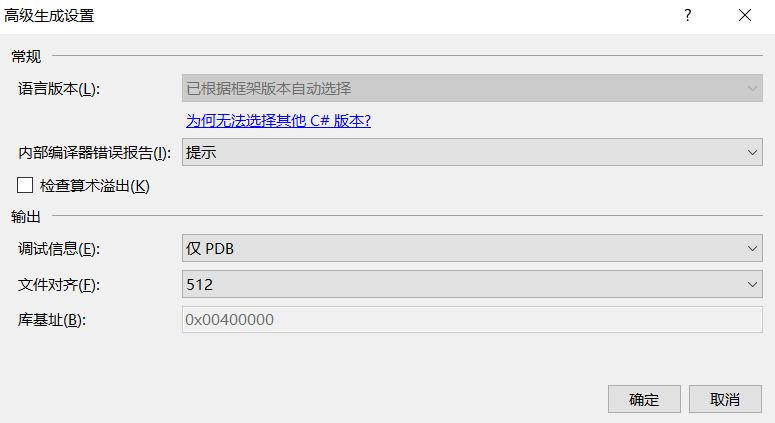
image-20210927102218293

但是有时我们无法选择其他版本,这时候就要手动修改

手动修改

打开项目下的*.csproj文件

搜索<LangVersion>修改对应的值即可。

宽高

设备无关单位尺寸

首先我们先了解一下,什么是设备无关单位尺寸,什么是像素。

DPI转换比例常量,DpiPercent = 96;

为何DpiPercent为96 ?有一个概念设备无关单位尺寸,其大小为1/96英寸。比如:

  • 【物理单位尺寸】=1/96英寸 * 96dpi = 1像素;

  • 【物理单位尺寸】=1/96英寸 * 120dpi = 1.25像素;

我们组件在赋值宽高的时候就是设备无关单位尺寸

而如果系统调成125%的缩放时,对应的的就是120dpi。

前提

在分辨率为1920x1080,缩放为125%的情况下

image-20210924181104897

主屏的宽高

获取宽高

1
2
3
4
5
6
7
8
9
10
11
12
13
14
15
16
17
18
19
20
// 方式1
int screeWidth1 = System.Windows.Forms.Screen.PrimaryScreen.Bounds.Width;
int screeHeight1 = System.Windows.Forms.Screen.PrimaryScreen.Bounds.Height;
Console.WriteLine("PrimaryScreen.Bounds.Width:" + screeWidth1);
Console.WriteLine("PrimaryScreen.Bounds.Height:" + screeHeight1);
// 方式2
double screeWidth2 = System.Windows.SystemParameters.PrimaryScreenWidth;
double screeHeight2 = System.Windows.SystemParameters.PrimaryScreenHeight;
Console.WriteLine("PrimaryScreenWidth:" + screeWidth2);
Console.WriteLine("PrimaryScreenHeight:" + screeHeight2);
// 方式3
double screeWidth3 = SystemParameters.WorkArea.Size.Width;
double screeHeight3 = SystemParameters.WorkArea.Size.Height;
Console.WriteLine("WorkArea.Size.Width:" + screeWidth3);
Console.WriteLine("WorkArea.Size.Height:" + screeHeight3);
// 方式4
double screeWidth4 = SystemParameters.FullPrimaryScreenWidth;
double screeHeight4 = SystemParameters.FullPrimaryScreenHeight;
Console.WriteLine("FullPrimaryScreenWidth:" + screeWidth4);
Console.WriteLine("FullPrimaryScreenHeight:" + screeHeight4);

结果

PrimaryScreen.Bounds.Width:1920
PrimaryScreen.Bounds.Height:1080
PrimaryScreenWidth:1536
PrimaryScreenHeight:864
WorkArea.Size.Width:1536
WorkArea.Size.Height:824
FullPrimaryScreenWidth:1536
FullPrimaryScreenHeight:800.8

注意

方式2和方式3的高度差就是任务栏的高度(设备无关单位尺寸)

方式4官方说的是获取主监视器上全屏窗口工作区的高度(以像素为单位),但是跟实际不符,不知道到底有什么用。

主屏的缩放倍数

我们在开发截屏的功能时如果设置了缩放与布局为200%,显示分辨率为2560x1600,

我们通过代码SystemParameters.PrimaryScreenWidth获取的屏幕宽度就是1280,

如果截图截取1280的话,截出的图片就宽高都只有一半,

所以我们就必须获取系统缩放的倍数

1
2
//100%的时候,DPI是96;这条语句的作用时获取缩放倍数
float factor = Graphics.FromHwnd(IntPtr.Zero).DpiX / 96;

组件所在屏幕的宽高

这里组件所在窗口依旧是主屏

1
2
3
4
5
6
7
Window window = Window.GetWindow(myimage);//获取当前窗口
IntPtr intPtr = new WindowInteropHelper(window).Handle;//获取当前窗口的句柄
Screen screen = Screen.FromHandle(intPtr);//获取当前屏幕
Console.WriteLine("screen.Bounds.Width:" + screen.Bounds.Width);
Console.WriteLine("screen.Bounds.Height:" + screen.Bounds.Height);
Console.WriteLine("screen.WorkingArea.Width:" + screen.WorkingArea.Width);
Console.WriteLine("screen.WorkingArea.Height:" + screen.WorkingArea.Height);

结果

screen.Bounds.Width:1920
screen.Bounds.Height:1080
screen.WorkingArea.Width:1920
screen.WorkingArea.Height:1030

我们会发现

这种方式获取的是实际的像素,结果正好是上面方式2和方式3的1.25倍。

组件所在屏幕的缩放倍数

转化为设备无关单位尺寸

1
2
3
4
5
6
7
8
9
using (Graphics currentGraphics = Graphics.FromHwnd(intPtr))
{
double dpiXRatio = currentGraphics.DpiX / DpiPercent;
double dpiYRatio = currentGraphics.DpiY / DpiPercent;
var width = screen.Bounds.Width / dpiXRatio;
var height = screen.Bounds.Height / dpiYRatio;
var left = screen.Bounds.Left / dpiXRatio;
var top = screen.Bounds.Top / dpiYRatio;
}

光标

自定义光标

1
2
StreamResourceInfo sri = Application.GetResourceStream(new Uri(@"cur\erase.cur", UriKind.Relative));
m_canvas.Cursor = new Cursor(sri.Stream);

其中cur\erase.cur位于项目根目录下

使用系统光标

1
m_canvas.Cursor = Cursors.Arrow;

Canvas设置层级

在做黑板的时候我们需要显示一个橡皮擦,它位于Canvas的最顶层

1
Canvas.SetZIndex(m_erase_img, int.MaxValue);

Bitmap/BitmapImage/BitmapSource

BitmapSource是Imagesource的子类

WPF的Image控件中设置ImageSource

1
image1.Source = new BitmapImage(new Uri(@"image file path", Urikind.RelativeOrAbsolute));

还可以使用:

1
2
3
4
5
6
7
8
9
10
11
System.IO.FileStream fs = new System.IO.FileStream(filepath, System.IO.FileMode.Open, System.IO.FileAccess.Read);

byte[] buffer = new byte[fs.Length]; fs.Read(buffer, 0, buffer.Length);
fs.Close(); fs.Dispose();
System.IO.MemoryStream ms = new System.IO.MemoryStream(buffer);
BitmapImage bitmapImage = new BitmapImage();
bitmapImage.BeginInit();
bitmapImage.StreamSource = ms;
bitmapImage.CacheOption = BitmapCacheOption.OnLoad; bitmapImage.EndInit();
ms.Dispose();
image1.Source = bitmapImage;

还可以使用:

1
2
3
4
5
6
7
BitmapImage bitmapImage = new BitmapImage();
bitmapImage.BeginInit();
bitmapImage.CacheOption = BitmapCacheOption.OnLoad;
bitmapImage.UriSource = new Uri(szPath);//szPath为图片的全路径
bitmapImage.EndInit();
bitmapImage.Freeze();
image1.Source = bitmapImage;

Bitmap => BitmapImage

先将Bitmap储存成memorystream,然后指定给BitmapImage

1
2
3
4
5
6
7
8
9
10
11
12
13
14
15
16
private BitmapImage BitmapToBitmapImage(System.Drawing.Bitmap bitmap)
{
BitmapImage bitmapImage = new BitmapImage();
using (System.IO.MemoryStream ms = new System.IO.MemoryStream())
{
bitmap.Save(ms, bitmap.RawFormat);
bitmapImage.BeginInit();
bitmapImage.StreamSource = ms;
bitmapImage.CacheOption = BitmapCacheOption.OnLoad;
bitmapImage.EndInit();
bitmapImage.Freeze();
}
return bitmapImage;
}

image1.Source = BitmapToBitmapImage(bitmap);

Bitmap => BitmapSource

1
BitmapSource bs = Imaging.CreateBitmapSourceFromHBitmap(bmp.GetHbitmap(), IntPtr.Zero, Int32Rect.Empty, BitmapSizeOptions.FromEmptyOptions());

BitmapSource => Bitmap

1
2
3
4
5
6
7
8
BitmapSource m = (BitmapSource)image1.Source;

System.Drawing.Bitmap bmp = new System.Drawing.Bitmap(m.PixelWidth, m.PixelHeight, System.Drawing.Imaging.PixelFormat.Format32bppPArgb);

System.Drawing.Imaging.BitmapData data = bmp.LockBits(
new System.Drawing.Rectangle(System.Drawing.Point.Empty, bmp.Size), System.Drawing.Imaging.ImageLockMode.WriteOnly, System.Drawing.Imaging.PixelFormat.Format32bppPArgb);

m.CopyPixels(Int32Rect.Empty, data.Scan0, data.Height * data.Stride, data.Stride); bmp.UnlockBits(data);

窗口

去除边框

WPF的默认样式是有边框的,为了去除窗体的边框,可以设置Window的以下属性

1
2
3
WindowStyle="None"   
AllowsTransparency="True"
Background="Transparent"

窗口初始化位置

一旦没了边框之后 默认情况下是无法进行拖拽的 因此初始化位置就比较重要了

WPF的窗体初始化位置属性WindowStartupLocation分为

  • Manual(默认值)
  • CenterScreen
  • CenterOwner 三种,

默认是Manual 因此要想设置到屏幕中央 使用CenterScreen即可

如果要自定义设置位置 使用Manual后再设置Left和Top属性即可

窗口置顶

1
this.Topmost = true;

窗体拖拽

无边框情况下默认是无法拖拽的,如果需要拖拽则为Window的MouseLeftButtonDown绑定事件,并调用默认DragMove方法即可。

XAML:

1
MouseLeftButtonDown="Window_MouseLeftButtonDown"

C#:

1
2
3
4
5
6
7
private void Window_MouseLeftButtonDown(object sender, MouseButtonEventArgs e)
{
if (e.LeftButton == MouseButtonState.Pressed)
{
DragMove();
}
}

注意

一定不要在外层和内层都添加该方法,会导致拖拽时崩溃。

窗口全屏

1
2
3
4
5
6
7
8
9
this.WindowState = System.Windows.WindowState.Normal;
this.WindowStyle = System.Windows.WindowStyle.None;
this.ResizeMode = System.Windows.ResizeMode.NoResize;
this.Topmost = true;

this.Left = 0.0;
this.Top = 0.0;
this.Width = System.Windows.SystemParameters.PrimaryScreenWidth;
this.Height = System.Windows.SystemParameters.PrimaryScreenHeight;

线程切换

1
2
3
this.Dispatcher.Invoke(() =>
{
});

官方说,WPF一般来说启动后会有两个线程,一个是责呈现,一个负责UI界面管理。

负责UI界面管理的线程,我们就简称为UI线程。UI线程内有个Dispatcher对象。

Dispatcher对象内则包含这个UI线程的众多工作内容(官方叫work item)的队列。UI线程就是靠Dispatcher负责控件相关的这些事件的处理。

只有创建了UI控件的UI Thread才有权限控制控件的访问和更新!!!

其他线程(非直接创建你要访问和控制UI控件的线程)要访问和更新某个控件,必须通过创建这个控件的线程(一般就是UI线程)所关联的Dispatcher来访问和更新这个控件。这也是为什么经常会有this.Dispatcher.Invoke()的原因

同一个类下的方法根据你调用的方式不同,并不一定都运行于同一个线程下。即使调用其他类的函数,也可能存在两种情况,要么运行在一个线程里,要么运行在不同的线程里。实际上是否是一个线程里完全跟如何调度相关,跟是否属于哪个类没有任何关系。

循环生成组件传值

1
2
3
<Button Click="BookItem_Click" Tag="{Binding}">

</Button>

C#

1
2
3
4
5
6
7
8
private void BookItem_Click(object sender, RoutedEventArgs e)
{
var itemData = ((FrameworkElement)sender).Tag;
if (itemData is BookItem)
{
var itemData2 = (BookItem)itemData;
}
}

获取组件

1
2
3
4
5
6
7
8
9
10
11
12
13
14
15
16
17
18
19
20
21
22
23
24
25
26
27
28
29
30
31
32
33
34
35
36
37
38
39
40
41
42
43
44
45
46
47
48
49
50
51
52
53
54
55
56
57
58
59
60
61
62
63
64
65
66
67
68
69
70
71
72
73
74
75
76
77
78
79
80
81
82
83
84
85
86
87
88
89
90
91
92
93
94
95
96
97
98
99
100
101
102
103
104
105
106
107
108
109
110
111
112
113
114
115
116
117
118
119
using System.Collections.Generic;
using System.Windows;
using System.Windows.Media;

namespace ZJClassTool.Utils
{
internal class ZJVTHelper
{
public static T FindChild<T>(DependencyObject parent, string childName)
where T : DependencyObject
{
if (parent == null) return null;

T foundChild = null;

int childrenCount = VisualTreeHelper.GetChildrenCount(parent);
for (int i = 0; i < childrenCount; i++)
{
var child = VisualTreeHelper.GetChild(parent, i);
// 如果子控件不是需查找的控件类型
T childType = child as T;
if (childType == null)
{
// 在下一级控件中递归查找
foundChild = FindChild<T>(child, childName);

// 找到控件就可以中断递归操作
if (foundChild != null) break;
}
else if (!string.IsNullOrEmpty(childName))
{
var frameworkElement = child as FrameworkElement;
// 如果控件名称符合参数条件
if (frameworkElement != null && frameworkElement.Name == childName)
{
foundChild = (T)child;
break;
}
}
else
{
// 查找到了控件
foundChild = (T)child;
break;
}
}

return foundChild;
}

public static List<T> FindChilds<T>(DependencyObject parent, string childName)
where T : DependencyObject
{
var list = new List<T>();
if (parent == null) return list;

int childrenCount = VisualTreeHelper.GetChildrenCount(parent);
for (int i = 0; i < childrenCount; i++)
{
var child = VisualTreeHelper.GetChild(parent, i);
// 如果子控件不是需查找的控件类型
T childType = child as T;
if (childType == null)
{
// 在下一级控件中递归查找
var findChildList = FindChilds<T>(child, childName);
for (int j = 0; j < findChildList.Count; j++)
{
}
list.AddRange(FindChilds<T>(child, childName));
}
else if (!string.IsNullOrEmpty(childName))
{
var frameworkElement = child as FrameworkElement;
// 如果控件名称符合参数条件
if (frameworkElement != null && frameworkElement.Name == childName)
{
list.Add((T)child);
}
}
else
{
// 查找到了控件
list.Add((T)child);
}
}

return list;
}

/// <summary>
/// 查找父元素
/// </summary>
/// <typeparam name="T"></typeparam>
/// <param name="obj"></param>
/// <param name="name"></param>
/// <returns></returns>
public static T FindParent<T>(DependencyObject i_dp) where T : DependencyObject
{
DependencyObject dobj = VisualTreeHelper.GetParent(i_dp);
if (dobj != null)
{
if (dobj is T)
{
return (T)dobj;
}
else
{
dobj = FindParent<T>(dobj);
if (dobj != null && dobj is T)
{
return (T)dobj;
}
}
}
return null;
}
}
}

程序关闭

推荐使用

1
Application.Current.Shutdown();

下面的方式系统监听不到退出事件

1
System.Environment.Exit(0);

打开文件

1
2
3
4
ProcessStartInfo psi = new ProcessStartInfo(filepath);
Process pro = new Process();
pro.StartInfo = psi;
pro.Start();