字体引用
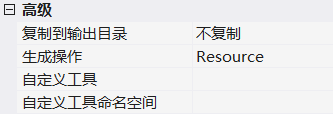
准备字体文件,以ttf或otf格式结尾;复制到项目下的Font文件夹中,
并设置Build Action(生成操作)为Resource(资源);
在App.xaml中或者你需要的地方添加字体资源的定义;
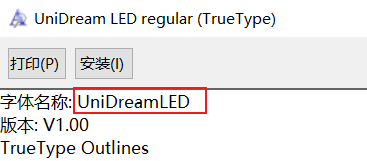
资源定义处引用的并不是字体文件的名称,而是字体名称。
字体的具体名称可以打开字体文件进行查看。
注意
引用字体的时候#后面的是`字体的名称不是文件名。
前面的文件名可写可不写,建议不写。
字体名称一定要写
1
2
3
| <Application.Resources>
<FontFamily x:Key="UnidreamLed">pack://application:,,,/Font/#UniDreamLED</FontFamily>
</Application.Resources>
|
当然写上文件名称也可以
1
2
3
| <Application.Resources>
<FontFamily x:Key="UnidreamLed">pack://application:,,,/Font/UnidreamLED.ttf#UniDreamLED</FontFamily>
</Application.Resources>
|
或者页面内引用
1
2
3
| <Window.Resources>
<FontFamily x:Key="UnidreamLed">pack://application:,,,/Font/#UniDreamLED</FontFamily>
</Window.Resources>
|
使用
1
| <TextBlock Text="10:30" FontFamily="{StaticResource UnidreamLed}" FontSize="16"/>
|
路径的写法
引用的时候可以这样写
1
2
3
| <FontFamily x:Key="SiYuanHeiTi">pack://application:,,,/Font/#思源黑体 CN</FontFamily>
<FontFamily x:Key="SiYuanHeiTi">/SchoolClient;Component/Font/#思源黑体 CN</FontFamily>
<FontFamily x:Key="SiYuanHeiTi">Font/#思源黑体 CN</FontFamily>
|
三种引用字体的方式:
第一种方式使用了一种资源标识符(pack URI),这是一种通用的WPF(Windows Presentation Foundation)资源引用方式,它可以访问打包在应用程序中的资源。
第二种方式看起来是在引用应用程序中的一个组件(Component),然后指定了字体文件的路径。
这个路径看起来更具体,可能是应用程序的内部组件路径。
第三种方式可能是相对路径,它直接指定了字体文件的路径。
这种方式可能需要相对于当前XAML文件的位置指定路径。
引用字体名规则
注意
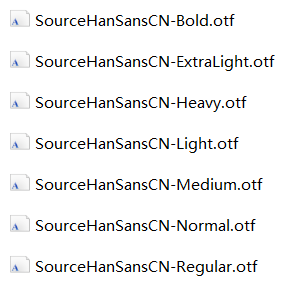
里面的字体类似于
1
2
3
| 思源黑体 CN Bold
思源黑体 CN Medium
思源黑体 CN Regular
|
引用的时候要这样写
1
2
3
| <FontFamily x:Key="SiYuanHeiTi">pack://application:,,,/Font/#思源黑体 CN</FontFamily>
<FontFamily x:Key="SiYuanHeiTi">/SchoolClient;Component/Font/#思源黑体 CN</FontFamily>
<FontFamily x:Key="SiYuanHeiTi">Font/#思源黑体 CN</FontFamily>
|
三种引用字体的方式:
第一种方式使用了一种资源标识符(pack URI),这是一种通用的WPF(Windows Presentation Foundation)资源引用方式,它可以访问打包在应用程序中的资源。
第二种方式看起来是在引用应用程序中的一个组件(Component),然后指定了字体文件的路径。
这个路径看起来更具体,可能是应用程序的内部组件路径。
第三种方式可能是相对路径,它直接指定了字体文件的路径。
这种方式可能需要相对于当前XAML文件的位置指定路径。
错误写法
1
| <FontFamily x:Key="SyRegular">pack://application:,,,/Font/#思源黑体 CN Regular</FontFamily>
|
这种写法会导致设置FontWeight="Medium"设置无效。
生效范围
全局生效
要在 WPF 应用程序中全局设置字体,你可以在应用程序的主题中定义全局字体。
你可以在 App.xaml 文件中定义一个主题,并在其中设置全局字体。
例如:
1
2
3
4
5
6
7
8
9
10
11
12
13
14
| <Application x:Class="YourAppName.App"
xmlns="http://schemas.microsoft.com/winfx/2006/xaml/presentation"
xmlns:x="http://schemas.microsoft.com/winfx/2006/xaml"
StartupUri="MainWindow.xaml">
<Application.Resources>
<FontFamily x:Key="SiYuanHeiTi">pack://application:,,,/Font/#思源黑体 CN</FontFamily>
<Style TargetType="TextBlock">
<Setter Property="FontFamily" Value="{StaticResource SiYuanHeiTi}" />
</Style>
<Style TargetType="TextBox">
<Setter Property="FontFamily" Value="{StaticResource SiYuanHeiTi}" />
</Style>
</Application.Resources>
</Application>
|
这将使应用程序中所有控件的字体都设置为指定的字体。
注意下面的写法是不生效的:
1
2
3
| <Style TargetType="Control">
<Setter Property="FontFamily" Value="{StaticResource SiYuanHeiTi}" />
</Style>
|
单个生效
1
| <TextBlock FontFamily="pack://application:,,,/Font/#思源黑体 CN"/>
|
或者
1
| <TextBlock FontFamily="{StaticResource SiYuanHeiTi}"/>
|
字体权重
在 WPF 中,FontWeight 的可选值按从细到粗的顺序排序为:
ThinExtraLightLightNormal 或 Regular(默认值)MediumSemiBoldBoldExtraBold
默认情况下,FontWeight 的值为 Normal,即正常字体。
如果引用的自定义字体只有 Regular 和 Medium 两种权重,而 FontWeight 属性没有显式指定,那么通常情况下,默认的字体权重会是 Regular。
这是因为 “Normal” 权重的别名通常是 “Regular”,而且 “Regular” 通常被视为默认的权重。
如果 WPF 中的字体加载器在字体文件中找不到 “Normal” 或者 “Regular” 这样的权重名称,它可能会尝试使用第一个合法的权重定义作为默认值。
在这种情况下,如果没有 “Regular”,它可能会选择 “Medium” 作为默认权重。
为了确保没有歧义,建议在定义字体权重时显式指定所需的权重值
例如:
1
| <TextBlock Text="Sample Text" FontWeight="Medium"/>
|
这样即使字体文件中没有 “Normal” 权重,你也可以保证使用了 “Medium” 权重。
设置字体失效
假如有如下两种自定义Button样式的方式:
第一个使用ContentPresenter
这种方式通过全局设置的字体是生效的,但是组件本身设置字体无效。
1
2
3
4
5
6
7
8
9
10
11
12
13
14
15
16
17
18
19
20
21
22
23
24
25
26
27
28
29
30
31
32
33
34
35
36
37
38
39
40
41
42
| <Style x:Key="ZImgTxtBtn" TargetType="{x:Type views:ZRoundButton}">
<Setter Property="Background" Value="#2D8CF0" />
<Setter Property="OverridesDefaultStyle" Value="True" />
<Setter Property="Cursor" Value="Hand" />
<Setter Property="FocusVisualStyle" Value="{x:Null}" />
<Setter Property="Width" Value="138" />
<Setter Property="HorizontalContentAlignment" Value="Center" />
<Setter Property="VerticalContentAlignment" Value="Center" />
<Setter Property="Height" Value="36" />
<Setter Property="BorderRadius" Value="4" />
<Setter Property="FontSize" Value="16" />
<Setter Property="Foreground" Value="White" />
<Setter Property="Template">
<Setter.Value>
<ControlTemplate TargetType="Button">
<Border
Name="border"
Padding="{TemplateBinding Padding}"
HorizontalAlignment="Stretch"
VerticalAlignment="Stretch"
Background="{TemplateBinding Background}"
BorderBrush="{TemplateBinding BorderBrush}"
BorderThickness="{TemplateBinding BorderThickness}"
CornerRadius="{Binding Path=BorderRadius, RelativeSource={RelativeSource TemplatedParent}}"
IsHitTestVisible="True">
<Grid>
<ContentPresenter
Margin="{TemplateBinding Padding}"
HorizontalAlignment="{TemplateBinding HorizontalContentAlignment}"
VerticalAlignment="{TemplateBinding VerticalContentAlignment}" />
</Grid>
</Border>
</ControlTemplate>
</Setter.Value>
</Setter>
<Style.Triggers>
<Trigger Property="IsMouseOver" Value="True">
<Setter Property="Opacity" Value="0.8" />
</Trigger>
</Style.Triggers>
</Style>
|
第二个使用TextBlock
这种方式通过全局设置的字体无效,但是组件本身设置字体生效。
1
2
3
4
5
6
7
8
9
10
11
12
13
14
15
16
17
18
19
20
21
22
23
24
25
26
27
28
29
30
31
32
| <Style x:Key="MyButton" TargetType="{x:Type Button}">
<Setter Property="OverridesDefaultStyle" Value="True" />
<Setter Property="Cursor" Value="Hand" />
<Setter Property="HorizontalContentAlignment" Value="Center" />
<Setter Property="VerticalContentAlignment" Value="Center" />
<Setter Property="Template">
<Setter.Value>
<ControlTemplate TargetType="Button">
<Border
Name="border"
Padding="{TemplateBinding Padding}"
Background="{TemplateBinding Background}"
BorderBrush="{TemplateBinding BorderBrush}"
BorderThickness="{TemplateBinding BorderThickness}"
CornerRadius="{TemplateBinding Height}">
<TextBlock
Margin="{TemplateBinding Padding}"
HorizontalAlignment="{TemplateBinding HorizontalContentAlignment}"
VerticalAlignment="{TemplateBinding VerticalContentAlignment}"
FontFamily="{TemplateBinding FontFamily}"
FontWeight="{TemplateBinding FontWeight}"
Text="{TemplateBinding Content}" />
</Border>
<ControlTemplate.Triggers>
<Trigger Property="IsMouseOver" Value="True">
<Setter Property="Opacity" Value="0.8" />
</Trigger>
</ControlTemplate.Triggers>
</ControlTemplate>
</Setter.Value>
</Setter>
</Style>
|
是因为ContentPresenter并不直接继承自Button的字体属性。
可以尝试在内部添加一个具有所需字体属性的文本元素,比如TextBlock,然后将ContentPresenter的内容设置为该TextBlock。
这样就能确保内容继承了Button的字体设置。
例如:
1
2
3
4
5
6
7
8
9
| <ControlTemplate TargetType="Button">
<Border Background="{TemplateBinding Background}" BorderBrush="{TemplateBinding BorderBrush}" BorderThickness="1">
<TextBlock Text="{TemplateBinding Content}"
FontFamily="{TemplateBinding FontFamily}"
FontSize="{TemplateBinding FontSize}"
HorizontalAlignment="Center"
VerticalAlignment="Center"/>
</Border>
</ControlTemplate>
|
通过内部嵌套TextBlock,并使用TemplateBinding绑定Button的字体属性,可以确保内容的字体设置与Button一致。