JS中Canvas绘图

宽高问题

Canvas有两个宽高一个是dom的宽高,一个是画布的宽高。

1
<canvas class="mycanvas" width="800" height="600"></canvas>

但是样式里面

1
2
3
4
.mycanvas{
width:400px;
height:300px;
}

我们绘制的时候就要按照 800 x 600来计算去绘制

在JS中这样设置

1
2
3
4
5
var oCanvas = document.querySelector(".mycanvas");
oCanvas.style.width = oWidth * zoom + "px";
oCanvas.style.height = oHeight * zoom + "px";
oCanvas.width = oWidth;
oCanvas.height = oHeight;

但是如果我们不定义画布的宽高,那么他就会使用默认的宽高

canvas默认宽是300px,默认高是150px

清晰度问题

但是我们把画布的宽高设置和DOM的宽高一样的话,在高像素比例的显示器上就会模糊,这里就要用到devicePixelRatio了。

devicePixelRatio属性

该 Window 属性 devicePixelRatio 能够返回当前显示设备的物理像素分辨率与 CSS 像素分辨率的比率。此值也可以解释为像素大小的比率:一个 CSS 像素的大小与一个物理像素的大小的比值。简单地说,这告诉浏览器应该使用多少个屏幕的实际像素来绘制单个 CSS 像素。

1
let devicePixelRatio = window.devicePixelRatio;

要保证绘制的图形高清就要

DOM的宽高 * devicePixelRatio

这里注意了在VUE项目中一定要在$nextTick()的回调中获取DOM的宽高否则获取到的都是0。

1
2
3
4
5
6
7
8
9
10
11
12
13
14
15
16
17
18
19
20
21
22
23
let canvas = this.$refs["audio_canvas"];
let devicePixelRatio = window.devicePixelRatio;
this.$nextTick(() => {
let domwidth = canvas.offsetWidth;
let domheight = canvas.offsetHeight;
canvas.width = domwidth * devicePixelRatio;
canvas.height = domheight * devicePixelRatio;
let width = canvas.width,
height = canvas.height,
g = canvas.getContext("2d");
let num = 18;
let space = 8;
let barwidth = (width - (num - 1) * space) / num;
let shounum = 10;
for (let i = 0; i < num; i++) {
let x = space * i + i * barwidth;
let colorstr = "#DDDDDD";
if (i < shounum) {
colorstr = "#960200"
}
fillRoundRect(g, x, 0, barwidth, height, barwidth / 2, colorstr);
}
})

Canvas画图

绘制圆角的方向

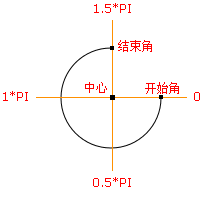
弧/曲线

JavaScript 语法:

1
context.arc(x,y,r,sAngle,eAngle,counterclockwise);

参数值

参数 描述
x 圆的中心的 x 坐标。
y 圆的中心的 y 坐标。
r 圆的半径。
sAngle 起始角,以弧度计。(弧的圆形的三点钟位置是 0 度)。
eAngle 结束角,以弧度计。
counterclockwise 可选。规定应该逆时针还是顺时针绘图。False = 顺时针,true = 逆时针。

绘制圆角矩形

1
2
3
4
5
6
7
8
9
10
11
12
13
14
15
16
17
18
19
20
21
22
23
24
25
26
27
28
29
30
31
32
33
34
35
36
37
38
39
40
41
42
43
44
45
46
47
48
49
50
51
52
53
54
55
56
57
58
59
60
61
62
63
64
65
66
67
68
69
70
71
72
73
/**该方法用来绘制一个有填充色的圆角矩形 
*@param cxt:canvas的上下文环境
*@param x:左上角x轴坐标
*@param y:左上角y轴坐标
*@param width:矩形的宽度
*@param height:矩形的高度
*@param radius:圆的半径
*@param fillColor:填充颜色
**/
function fillRoundRect(cxt, x, y, width, height, radius, /*optional*/ fillColor) {
//圆的直径必然要小于矩形的宽高
radius = Math.min(width / 2, height / 2, radius);

cxt.save();
cxt.translate(x, y);
//绘制圆角矩形的各个边
drawRoundRectPath(cxt, width, height, radius);
cxt.fillStyle = fillColor || "#000"; //若是给定了值就用给定的值否则给予默认值
cxt.fill();
cxt.restore();
}

/**该方法用来绘制圆角矩形
*@param cxt:canvas的上下文环境
*@param x:左上角x轴坐标
*@param y:左上角y轴坐标
*@param width:矩形的宽度
*@param height:矩形的高度
*@param radius:圆的半径
*@param lineWidth:线条粗细
*@param strokeColor:线条颜色
**/
function strokeRoundRect(cxt, x, y, width, height, radius, /*optional*/ lineWidth, /*optional*/ strokeColor) {
//圆的直径必然要小于矩形的宽高
radius = Math.min(width / 2, height / 2, radius);

cxt.save();
cxt.translate(x, y);
//绘制圆角矩形的各个边
drawRoundRectPath(cxt, width, height, radius);
cxt.lineWidth = lineWidth || 2; //若是给定了值就用给定的值否则给予默认值2
cxt.strokeStyle = strokeColor || "#000";
cxt.stroke();
cxt.restore();
}

function drawRoundRectPath(cxt, width, height, radius) {
cxt.beginPath(0);
//从右下角顺时针绘制,弧度从0到1/2PI
cxt.arc(width - radius, height - radius, radius, 0, Math.PI / 2);

//矩形下边线
cxt.lineTo(radius, height);

//左下角圆弧,弧度从1/2PI到PI
cxt.arc(radius, height - radius, radius, Math.PI / 2, Math.PI);

//矩形左边线
cxt.lineTo(0, radius);

//左上角圆弧,弧度从PI到3/2PI
cxt.arc(radius, radius, radius, Math.PI, Math.PI * 3 / 2);

//上边线
cxt.lineTo(width - radius, 0);

//右上角圆弧
cxt.arc(width - radius, radius, radius, Math.PI * 3 / 2, Math.PI * 2);

//右边线
cxt.lineTo(width, height - radius);
cxt.closePath();
}

根据声音绘制声音图

HTML

1
<canvas class="mycanvas" id="mycanvas"></canvas>

CSS

1
2
3
4
5
.mycanvas {
width: 300px;
height: 60px;
background-color: #f3f3f3;
}

JS

1
2
3
4
5
6
7
8
9
10
11
12
13
14
15
16
17
18
19
20
21
let mycanvas = document.getElementById("mycanvas");
let devicePixelRatio = window.devicePixelRatio;
let domwidth = mycanvas.offsetWidth;
let domheight = mycanvas.offsetHeight;
mycanvas.width = domwidth * devicePixelRatio;
mycanvas.height = domheight * devicePixelRatio;
let width = mycanvas.width,
height = mycanvas.height,
g = mycanvas.getContext("2d");
let num = 18;
let space = 12;
let barwidth = (width - (num - 1) * space) / num;
let shounum = 10;
for (let i = 0; i < num; i++) {
let x = space * i + i * barwidth;
let colorstr = "#DDDDDD";
if (i < shounum) {
colorstr = "#960200"
}
fillRoundRect(g, x, 0, barwidth, height, barwidth / 2, colorstr);
}

注意

window.devicePixelRatio能够获取系统的缩放比率,画布的宽高乘以该值能够显著提升图片的清晰度。

Canvas转图片地址

语法

1
canvas.toDataURL(type, encoderOptions);

参数

  • type 可选

    图片格式,默认为 image/png 另外可选 image/jpegimage/webp

  • encoderOptions 可选

    在指定图片格式为 image/jpegimage/webp的情况下,可以从 0 到 1 的区间内选择图片的质量。如果超出取值范围,将会使用默认值 0.92。其他参数会被忽略。

    image/png时该参数无效,可以不传。

返回值

包含 data URIDOMString

示例

1
2
3
4
5
6
let img = new Image();
img.src = this.m_canvas.toDataURL();
img.onload = function () {
//图片加载完成后,执行此方法
//其中this就是加载后的图片
};

绘制另一个canvas图片

1
2
3
4
5
6
7
8
9
this.preview_ctx.clearRect(0, 0, this.preview_canvas.width, this.preview_canvas.height);

this.preview_ctx.drawImage(
this.m_canvas,
0,
0,
this.preview_canvas.width,
this.preview_canvas.height
);

但是显示效果不好

推荐下面的这种方式

1
2
3
4
5
6
7
8
9
10
11
12
13
14
15
16
if (this.preview_ctx) {
let img = new Image();
img.src = this.m_canvas.toDataURL();
let that = this;
img.onload = function () {
//图片加载完成后,执行此方法
that.preview_ctx.clearRect(0, 0, that.preview_canvas.width, that.preview_canvas.height);
that.preview_ctx.drawImage(
this,
0,
0,
that.preview_canvas.width,
that.preview_canvas.height
);
};
}

图片旋转

1
2
3
4
5
6
7
8
9
10
11
12
13
14
15
16
17
18
19
20
21
22
23
24
25
26
27
28
29
30
31
32
33
34
35
36
37
38
//旋转方法
function rotateImage (imagedata, d, W, H) {
let direction = d || "r";
let imgDt0 = imagedata
let imgDt1 = new ImageData(H, W)
let imgDt2 = new ImageData(H, W)
let dt0 = imgDt0.data
let dt1 = imgDt1.data
let dt2 = imgDt2.data

// 2. Transpose
let r = r1 = 0 // index of red pixel in old and new ImageData, respectively
for (let y = 0, lenH = H; y < lenH; y++) {
for (let x = 0, lenW = W; x < lenW; x++) {
r = (x + lenW * y) * 4
r1 = (y + lenH * x) * 4
dt1[r1 + 0] = dt0[r + 0]
dt1[r1 + 1] = dt0[r + 1]
dt1[r1 + 2] = dt0[r + 2]
dt1[r1 + 3] = dt0[r + 3]
}
}

// 3. Reverse width / height
for (let y = 0, lenH = W; y < lenH; y++) {
for (let x = 0, lenW = H; x < lenW; x++) {
r = (x + lenW * y) * 4
r1 = direction === 'l' ?
(x + lenW * (lenH - 1 - y)) * 4 :
((lenW - 1 - x) + lenW * y) * 4
dt2[r1 + 0] = dt1[r + 0]
dt2[r1 + 1] = dt1[r + 1]
dt2[r1 + 2] = dt1[r + 2]
dt2[r1 + 3] = dt1[r + 3]
}
}
return imgDt2;
}

返回的ImageData对象中存储着canvas对象真实的像素数据,

它包含以下几个只读属性:

  • width
  • height

    图片高度,单位是像素

  • data

    Uint8ClampedArray类型的一维数组,包含着RGBA格式的整型数据,范围在0至255之间(包括255)。

图片数据

1
2
3
4
5
6
var oCanvas = document.querySelector(".origin_image");
var oCanvasCtx = oCanvas.getContext("2d");
//获取图片数据
oCanvasCtx.getImageData(0, 0, oWidth, oHeight);
//设置图片数据
oCanvasCtx.putImageData(lastData, 0, 0, 0, 0, oWidth, oHeight);

注意

放置图片数据之前要设置画布的宽高

示例:

1
2
3
4
5
6
7
oWidth = imageData.width;
oHeight = imageData.height;
oCanvas.style.width = oWidth * zoom + "px";
oCanvas.style.height = oHeight * zoom + "px";
oCanvas.width = oWidth;
oCanvas.height = oHeight;
oCanvasCtx.putImageData(imageData, 0, 0, 0, 0, oWidth, oHeight);

图片绘制工具类

1
2
3
4
5
6
7
8
9
10
11
12
13
14
15
16
17
18
19
20
21
22
23
24
25
26
27
28
29
30
31
32
33
34
35
36
37
38
39
40
41
42
43
44
45
46
47
48
49
50
51
52
53
54
55
56
57
58
59
60
61
62
63
64
65
66
67
68
69
70
71
oCanvas.onmousedown = function (e) { //canvas上按下鼠标事件
lastData = oCanvasCtx.getImageData(0, 0, oWidth, oHeight)
var ox = e.offsetX;
var oy = e.offsetY;
var draw = new Draw(oCanvasCtx, {
color: "#f00",
lineWidth: 4,
style: "stroke",
});
if (drawType === "pen") {
oCanvasCtx.beginPath();
oCanvasCtx.moveTo(ox / zoom, oy / zoom);
}
oCanvas.onmousemove = function (e) { //移动事件
var mx = e.offsetX;
var my = e.offsetY;
oCanvasCtx.putImageData(lastData, 0, 0, 0, 0, oWidth, oHeight);
draw[drawType](ox / zoom, oy / zoom, mx / zoom, my / zoom);
};
document.onmouseup = function () {
try {
imgHisList.push(oCanvasCtx.getImageData(0, 0, oWidth, oHeight)); //获取画布中的数据
} catch (error) {

}
oCanvas.onmousemove = null;
document.onmouseup = null;
}
};

class Draw {
constructor(origin_image_ctx, option) {
this.origin_image_ctx = origin_image_ctx;
this.color = option.color;
this.lineWidth = option.lineWidth;
this.style = option.style;
}
init () { //初始化
this.origin_image_ctx.strokeStyle = this.color;
this.origin_image_ctx.fillStyle = this.color;
this.origin_image_ctx.lineWidth = this.lineWidth;
}

pen (ox, oy, mx, my) {
this.init();
this.origin_image_ctx.lineTo(mx, my);
this.origin_image_ctx.stroke();
}

rect (ox, oy, mx, my) {
this.init();
this.origin_image_ctx.beginPath();
this.origin_image_ctx.rect(ox, oy, mx - ox, my - oy);
this.origin_image_ctx[this.style]();

}
line (ox, oy, mx, my) {
this.init();
this.origin_image_ctx.beginPath();
this.origin_image_ctx.moveTo(ox, oy);
this.origin_image_ctx.lineTo(mx, my);
this.origin_image_ctx.stroke();
}
circle (ox, oy, mx, my) { //圆
this.init();
this.origin_image_ctx.beginPath();
var r = Math.sqrt(Math.pow(mx - ox, 2) + Math.pow(my - oy, 2));
this.origin_image_ctx.arc(ox, oy, r, 0, 2 * Math.PI);
this.origin_image_ctx[this.style]();
}
}

注意

鼠标事件获取的位置是相对于DOM的,在绘制的时候要注意。

在做图片缩放的时候

定位的坐标要除以缩放的比例。