前言
vue.js有著名的全家桶系列,包含了vue-router,vuex, vue-resource,再加上构建工具vue-cli,就是一个完整的vue项目的核心构成。
具体的作用
nodejs 就是为了安装其它的
webpack 作用如下图
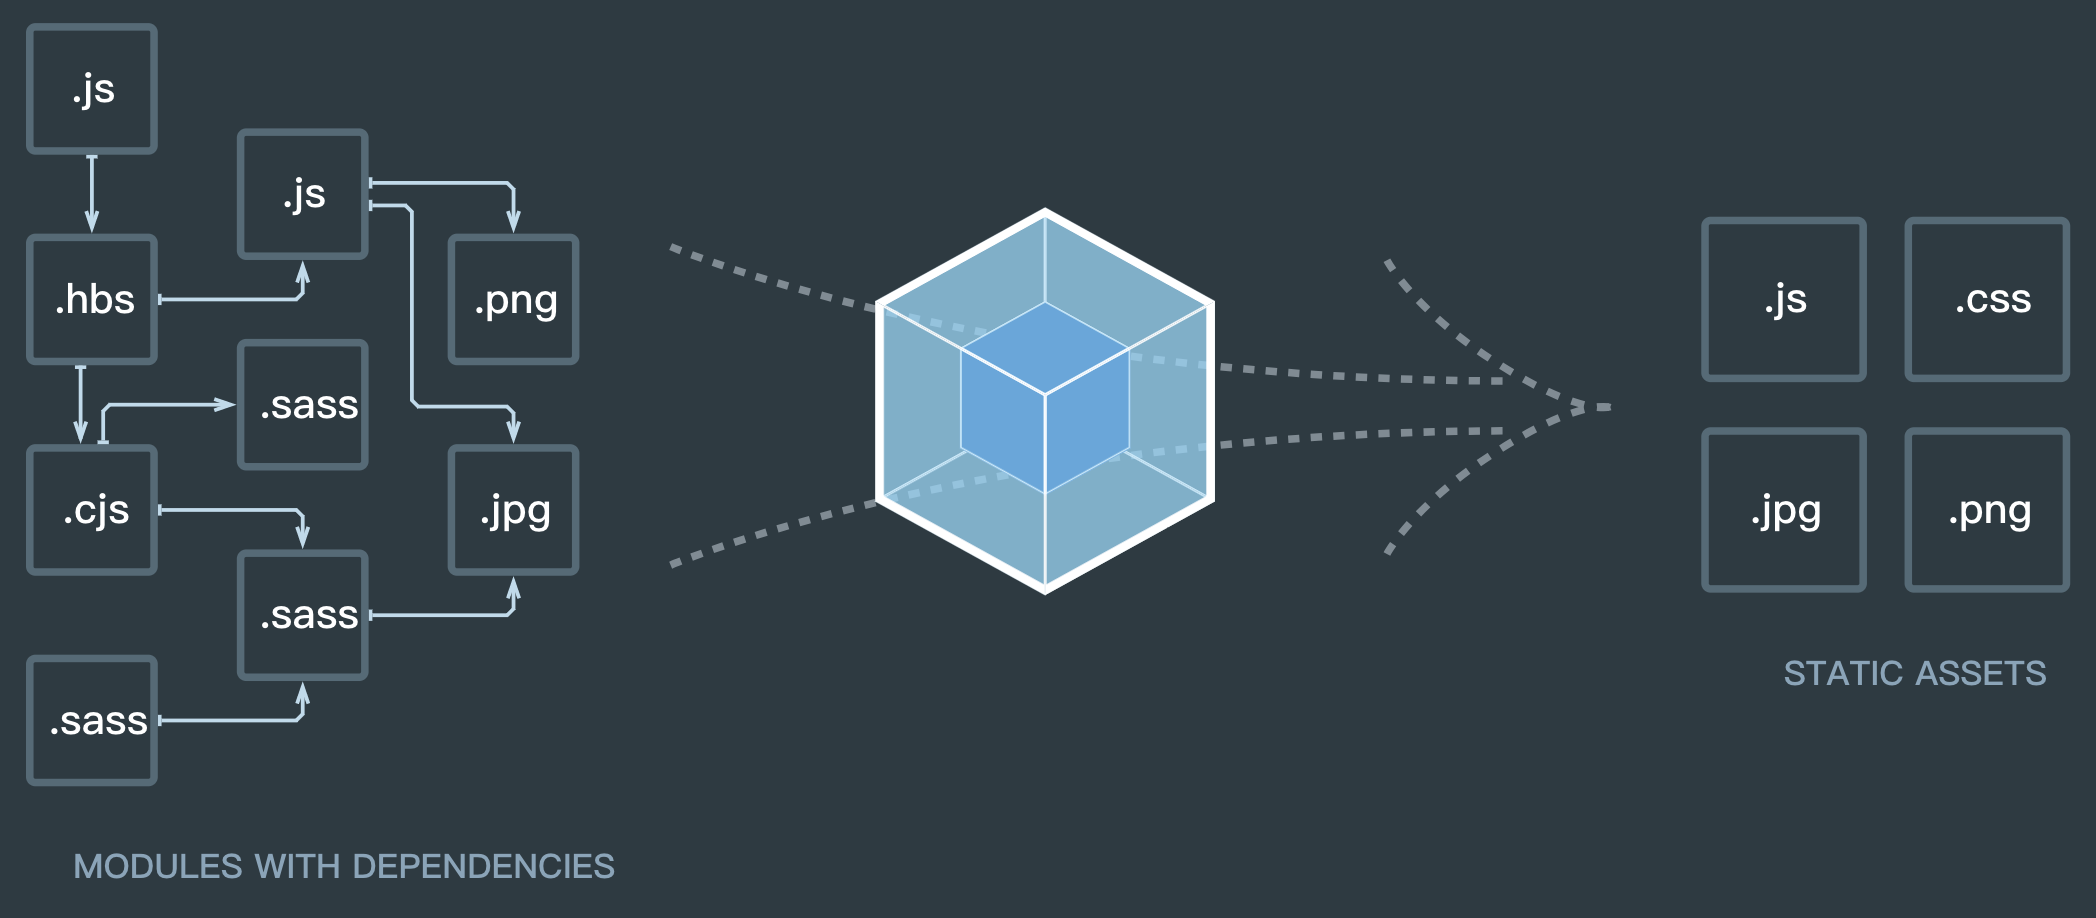
vue-cli 这个构建工具大大降低了webpack的使用难度,支持热更新,有webpack-dev-server的支持,相当于启动了一个请求服务器,给你搭建了一个测试环境,只关注开发就OK
Node.js
下载安装就行了下载网址
或者
用brew安装 先安装brew
1
| /usr/bin/ruby -e "$(curl -fsSL https://raw.githubusercontent.com/Homebrew/install/master/install)"
|
替换及重置Homebrew默认源
1
2
3
4
5
6
7
| //替换brew.git:
cd "$(brew --repo)"
git remote set-url origin https://mirrors.ustc.edu.cn/brew.git
//替换homebrew-core.git:
cd "$(brew --repo)/Library/Taps/homebrew/homebrew-core"
git remote set-url origin https://mirrors.ustc.edu.cn/homebrew-core.git
|
安装Node.js
macOS 10.14 报错 chown: /usr/local: Operation not permitted解决方法 卸载重新安装
1
| /usr/bin/ruby -e "$(curl -fsSL https://raw.githubusercontent.com/Homebrew/install/master/uninstall)"
|
重新安装
1
| /usr/bin/ruby -e "$(curl -fsSL https://raw.githubusercontent.com/Homebrew/install/master/install)"
|
查看node版本
查看NPM版本
安装后就可以用npm命令了
cnpm就是npm的国内淘宝镜像 所有npm的命令 直接换成cnpm就行了
1
| sudo npm install -g cnpm --registry=https://registry.npm.taobao.org
|
也可以直接指定node.js的镜像地址 就不用使用cnpm也能使用淘宝镜像
1
2
3
4
| //设置镜像地址
npm config set registry https://registry.npm.taobao.org
//验证是否设置成功
npm config get registry
|
查看已安装的包
--depth 0 是只显示第一层级的包 如果是1的话就会显示两个层级
安装Vue Cli
官方:https://cli.vuejs.org/zh/
卸载旧版本
1
2
3
| npm uninstall vue-cli -g
yarn global remove vue-cli
|
安装新版本
1
2
3
| npm install -g @vue/cli
yarn global add @vue/cli
|
检查其版本是否正确 (3.x)
Python
https://www.python.org/downloads/
有的库需要使用到Python
查看版本
创建项目
使用控制台创建
使用图形化界面创建
运行项目
运行项目后 在浏览器的控制台报错
Invalid Host/Origin header
解决方法:
在项目的根目录新建一个vue.config.js文件
1
2
3
4
5
| module.exports = {
devServer: {
disableHostCheck: true,
}
}
|
用户的配置文件会和默认的配置文件合并 所以不用担心系统默认配置要再配置一遍
添加VueX和Vue-router
package.json
1
2
3
4
5
6
7
8
9
10
| {
"dependencies": {
"vue-router": "^3.5.1",
"vuex": "^3.6.2"
},
"devDependencies": {
"@vue/cli-plugin-router": "~5.0.0",
"@vue/cli-plugin-vuex": "~5.0.0",
},
}
|
注意
cli-plugin相关的插件版本要一致。
给一个完整的方便对比
1
2
3
4
5
6
7
8
9
10
11
12
13
14
15
16
17
18
19
20
21
22
23
24
25
26
27
28
29
30
31
32
33
| {
"name": "test",
"version": "0.1.0",
"private": true,
"scripts": {
"serve": "vue-cli-service serve",
"build": "vue-cli-service build",
"lint": "vue-cli-service lint"
},
"dependencies": {
"core-js": "^3.8.3",
"vue": "^2.6.14",
"vue-router": "^3.5.1",
"vuex": "^3.6.2"
},
"devDependencies": {
"@babel/core": "^7.12.16",
"@babel/eslint-parser": "^7.12.16",
"@vue/cli-plugin-babel": "~5.0.0",
"@vue/cli-plugin-eslint": "~5.0.0",
"@vue/cli-plugin-router": "~5.0.0",
"@vue/cli-plugin-vuex": "~5.0.0",
"@vue/cli-service": "~5.0.0",
"eslint": "^7.32.0",
"eslint-config-prettier": "^8.3.0",
"eslint-plugin-prettier": "^4.0.0",
"eslint-plugin-vue": "^8.0.3",
"less": "^4.0.0",
"less-loader": "^8.0.0",
"prettier": "^2.4.1",
"vue-template-compiler": "^2.6.14"
}
}
|
添加路由设置
/src/router/index.js
1
2
3
4
5
6
7
8
9
10
11
12
13
14
15
16
17
18
19
20
21
22
23
24
25
26
27
28
29
30
| import Vue from "vue";
import VueRouter from "vue-router";
import Card from "../views/Card";
Vue.use(VueRouter);
const routes = [
{
path: "/",
name: "index",
redirect: "/editor",
},
{
path: "/card",
name: "card",
component: Card,
},
{
path: "/editor",
name: "editor",
component: () =>
import( "../views/Editor.vue"),
},
];
const router = new VueRouter({
routes,
});
export default router;
|
添加VueX配置
/src/store/index.js
1
2
3
4
5
6
7
8
9
10
11
12
| import Vue from "vue";
import Vuex from "vuex";
Vue.use(Vuex);
export default new Vuex.Store({
state: {},
getters: {},
mutations: {},
actions: {},
modules: {},
});
|
App.vue
1
2
3
4
5
6
7
8
9
10
11
12
13
14
15
16
17
18
19
20
21
22
23
24
25
26
27
28
29
30
31
32
| <template>
<div id="app">
<nav>
<router-link to="/">Home</router-link> |
<router-link to="/about">About</router-link>
</nav>
<router-view/>
</div>
</template>
<style lang="less">
#app {
font-family: Avenir, Helvetica, Arial, sans-serif;
-webkit-font-smoothing: antialiased;
-moz-osx-font-smoothing: grayscale;
text-align: center;
color: #2c3e50;
}
nav {
padding: 30px;
a {
font-weight: bold;
color: #2c3e50;
&.router-link-exact-active {
color: #42b983;
}
}
}
</style>
|
main.js中添加
1
2
3
4
5
6
7
8
9
10
11
12
| import Vue from "vue";
import App from "./App.vue";
import router from "./router";
import store from "./store";
Vue.config.productionTip = false
new Vue({
router,
store,
render: (h) => h(App),
}).$mount("#app");
|
打包配置
修改打包位置
1
2
3
4
| module.exports = {
publicPath: "./",
outputDir: "dist_supermarket",
};
|
打包不生成map文件
项目根目录创建vue.config.js
1
2
3
| module.exports = {
productionSourceMap: process.env.NODE_ENV !== "production",
};
|
文件带时间戳
1
2
3
4
5
6
7
8
9
10
11
| const Timestamp = new Date().getTime();
module.exports = {
productionSourceMap: process.env.NODE_ENV !== "production",
configureWebpack: {
output: {
filename: `js/[name].${Timestamp}.js`,
chunkFilename: `js/[name].${Timestamp}.js`,
},
},
};
|
打包后页面空白
Vue Cli3已经没有了webpack.config.js文件。取而代之的是创建一个vue.config.js文件。
vue.config.js
解决build后直接访问html白板的问题
1
2
3
4
|
module.exports = {
publicPath: "./",
};
|
官网是这样介绍的https://cli.vuejs.org/zh/config/#configurewebpack
webpack拷贝插件
copy-webpack-plugin
1
2
| npm install --save-dev ffmpeg-static
npm install --save-dev copy-webpack-plugin
|
简单示例
1
2
3
4
5
6
7
8
9
10
11
12
13
14
15
16
17
18
19
20
21
22
23
24
25
26
27
28
29
30
31
32
33
34
35
| const path = require("path");
const CopyWebpackPlugin = require("copy-webpack-plugin");
module.exports = {
publicPath: process.env.NODE_ENV === "production" ? "./" : "/",
outputDir: "webapp",
assetsDir: "assets",
filenameHashing: false,
lintOnSave: true,
productionSourceMap: false,
configureWebpack: config => {
const plugins = [];
// 打包不同平台的 ffmpeg 到 app
const ffmpegBasePath = "node_modules/ffmpeg-static/bin/"; // ffmpeg-static
const { platform } = process;
const ffmpegPathMap = {
darwin: "darwin/x64/ffmpeg",
win32: "win32/ia32/ffmpeg.exe",
win64: "win32/x64/ffmpeg.exe",
linux32: "linux/ia32/ffmpeg",
linux64: "linux/x64/ffmpeg"
};
const ffmpegPath = ffmpegBasePath + ffmpegPathMap[platform];
plugins.push(
new CopyWebpackPlugin([
{
from: path.join(__dirname, ffmpegPath),
to: path.join(__dirname, "core"),
ignore: [".*"]
}
])
);
config.plugins = [...config.plugins, ...plugins];
}
};
|
跨域代理配置
在项目的根目录新建一个vue.config.js文件
1
2
3
4
5
6
7
8
9
10
11
12
13
14
15
| module.exports = {
devServer: {
disableHostCheck: true,
proxy: {
'/psvmc': {
target: 'http://www.psvmc.cn',
changeOrigin: true,
pathRewrite: {
'^/psvmc': ''
}
}
}
}
};
|
假如我们请求这样写
1
2
3
4
5
| this.axios
.get('/psvmc/userlist.json')
.then(function (data) {
console.info(data);
})
|
就能在本地请求到http://www.psvmc.cn/userlist.json了
注意
打包后直接访问接口是无法访问的,这就要求服务器上做Nginx反代。
ESLint配置
项目配置
vue.config.js
1
2
3
4
5
6
| const { defineConfig } = require("@vue/cli-service");
module.exports = defineConfig({
transpileDependencies: true,
publicPath: "./",
lintOnSave: false,
});
|
说明
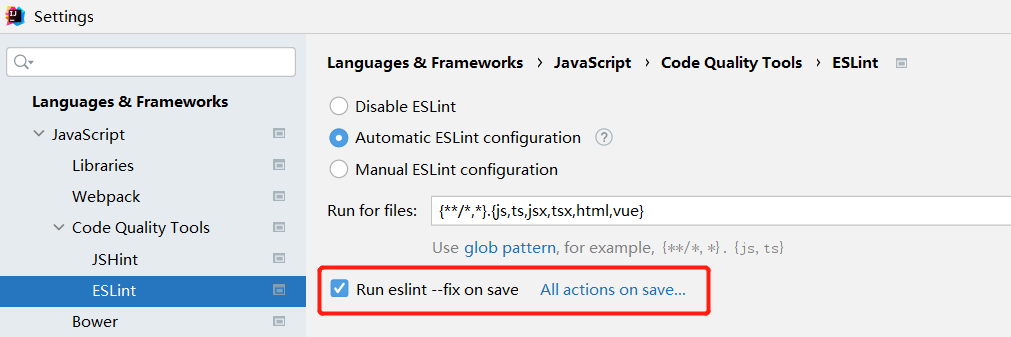
transpileDependencies: true 表示所有的依赖(包括 node_modules 中的代码)都将被 Babel 转译。publicPath: "./"解决有时页面中引用找不到的问题。lintOnSave: false 保存时不进行eslint检测,这里使用IDEA的eslint格式化。
IDEA保存时eslint
IDEA的设置中可以勾选如下的操作,这样保存时会自动修复。
ESLint配置
.eslintrc.js配置
1
2
3
4
5
6
7
8
9
10
11
12
13
14
15
16
17
18
19
20
21
22
23
24
25
26
27
28
29
| module.exports = {
root: true,
env: {
node: true,
},
extends: [
"plugin:vue/essential",
"eslint:recommended",
"plugin:prettier/recommended",
],
parserOptions: {
parser: "@babel/eslint-parser",
},
rules: {
"no-console": process.env.NODE_ENV === "production" ? "warn" : "off",
"no-debugger": process.env.NODE_ENV === "production" ? "warn" : "off",
indent: [0, 2],
"no-spaced-func": 2,
"no-const-assign": 2,
"space-before-function-paren": [0, "always"],
"eol-last": 0,
camelcase: 0,
"no-undef": 0,
"no-alert": 0,
"arrow-parens": 0,
"vue/multi-word-component-names": 0,
},
};
|
规则
0 或 'off': 关闭规则。1 或 'warn': 打开规则,并且作为一个警告,字体颜色为黄色(并不会导致检查不通过)。2 或 'error':打开规则,并且作为一个错误 ,色体颜色为红色(退出码为1,检查不通过)。
或者
package.json 中配置
1
2
3
4
5
6
7
8
9
10
11
12
13
14
15
16
| {
"eslintConfig": {
"root": true,
"env": {
"node": true
},
"extends": [
"plugin:vue/essential",
"eslint:recommended"
],
"parserOptions": {
"parser": "@babel/eslint-parser"
},
"rules": {}
},
}
|
但是同时只能配置一处,两处都配置会有问题。
@不能跳转
JS中
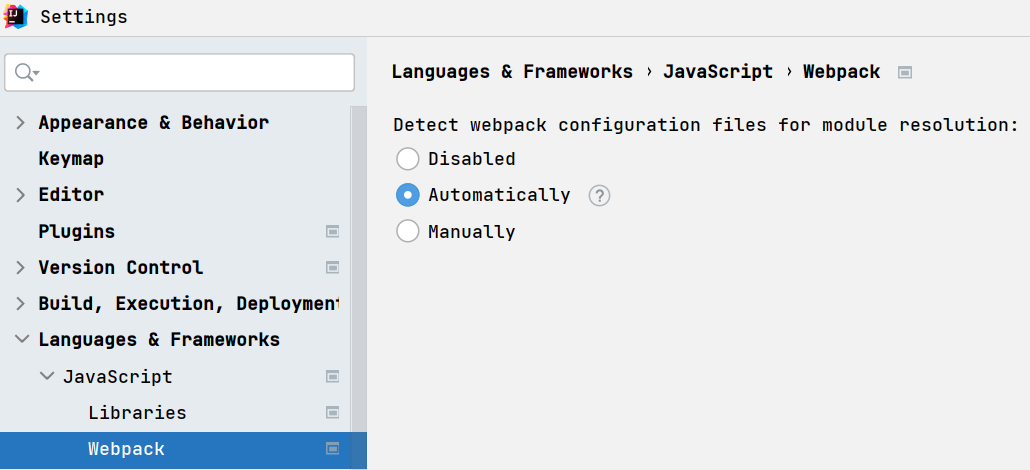
JS引用中@不能点击跳转
(1) File=>Settings=>Webpack=>选择Automatically选项。
(2) 项目根目录添加jsconfig.json文件
1
2
3
4
5
6
7
8
9
10
11
12
13
| {
"compilerOptions": {
"baseUrl": ".",
"paths": {
"@/*": [
"./src/*"
]
}
},
"include": [
"./src/**/*"
]
}
|
新版本的Vue Cli创建项目会自动生成该文件
内容如下
1
2
3
4
5
6
7
8
9
10
11
12
13
14
15
16
17
18
19
| {
"compilerOptions": {
"target": "es5",
"module": "esnext",
"baseUrl": "./",
"moduleResolution": "node",
"paths": {
"@/*": [
"src/*"
]
},
"lib": [
"esnext",
"dom",
"dom.iterable",
"scripthost"
]
}
}
|
CSS中
1
2
3
| <style scoped lang="less">
@import "~@/assets/less/card.less";
</style>
|
注意CSS中要用~@,而不是@。
Git忽略文件
.gitignore
1
2
3
4
5
6
7
8
9
10
11
12
13
14
| .DS_Store
node_modules/
/dist/
npm-debug.log*
yarn-debug.log*
yarn-error.log*
.idea
.vscode
*.suo
*.ntvs*
*.njsproj
*.sln
|
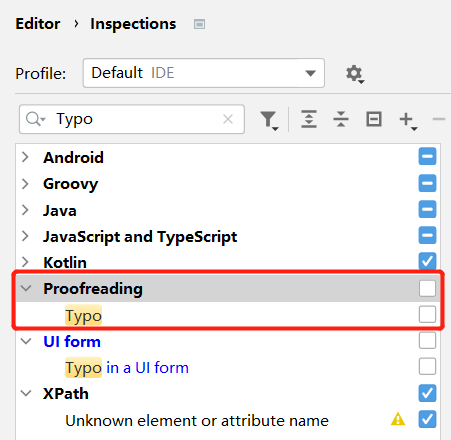
关闭拼写检查
搜索Typo找到如下配置 取消勾选即可。
其他库
Axios
https://www.psvmc.cn/article/2019-01-08-vue-axios-upload.html
Cookies
因为项目原因才用的Cookie 推荐使用localStorage
用VueX来缓存登录用户的时候,如果页面刷新后,VueX的缓存也会清空 ,所以我们还得用Cookie来保存
安装
1
| npm install vue-cookies --save
|
配置
1
2
3
4
5
6
7
8
9
10
11
12
13
14
15
16
17
18
19
20
21
| import Vue from "vue";
import VueCookies from 'vue-cookies'
Vue.use(VueCookies);
Vue.prototype.$mycookie = {
addcookie: function (key, value) {
var host = window.location.host;
if (host.indexOf("xhkjedu") !== -1) {
window.$cookies.set(key, value, '7d', '/', '.xhkjedu.com', false);
} else {
window.$cookies.set(key, value, '7d', '/');
}
},
delcookie: function (key) {
window.$cookies.remove(key);
},
getcookie: function (key) {
return window.$cookies.get(key);
}
};
|
使用
1
| this.$mycookie.addcookie("loginuser",JSON.stringify(data.obj));
|
我这里封装是为了设置开发和上线后的域不同,所以封装了一下