常用的几个网站 华为镜像站
https://mirrors.huaweicloud.com/home
阿里镜像站
https://developer.aliyun.com/mirror/
https://developer.aliyun.com/mvn/guide
腾讯镜像站
https://mirrors.cloud.tencent.com/
Yum镜像 (1) 备份
1 mv /etc/yum.repos.d/CentOS-Base.repo /etc/yum.repos.d/CentOS-Base.repo.backup
(2) 查看系统版本
(3) 下载
下载新的CentOS-Base.repo 到/etc/yum.repos.d/
CentOS 7
1 wget -O /etc/yum.repos.d/CentOS-Base.repo http://mirrors.aliyun.com/repo/Centos-7.repo
CentOS 6
1 wget -O /etc/yum.repos.d/CentOS-Base.repo http://mirrors.aliyun.com/repo/Centos-6.repo
CentOS 5
1 wget -O /etc/yum.repos.d/CentOS-Base.repo http://mirrors.aliyun.com/repo/Centos-5.repo
(4) 生成缓存
报错
Could not resolve host: mirrorlist.centos.org; Unknown error
解决方法
1
2
3
sudo sed -i s/mirror.centos.org/vault.centos.org/g /etc/yum.repos.d/*.reposudo sed -i s/^#.*baseurl=http/baseurl=https/g /etc/yum.repos.d/*.reposudo sed -i s/^mirrorlist=http/#mirrorlist=https/g /etc/yum.repos.d/*.repo
说明
将所有 .repo 文件中出现的 mirror.centos.org 替换成 vault.centos.org。
取消 .repo 文件中以 # 开头的、包含 baseurl=http 的行的注释,并将其替换为 baseurl=https。
将所有 .repo 文件中以 mirrorlist=http 开头的行替换为以 #mirrorlist=https 开头(即注释掉这一行)。
或者使用一键切换源脚本
1 bash <(curl -sSL https://linuxmirrors.cn/main.sh)
Homebrew镜像 安装Brew
1 /bin/bash -c "$(curl -fsSL https://raw.githubusercontent.com/Homebrew/install/HEAD/install.sh) "
旧版本更新到新版
使用替换默认源 替换 Homebrew
1 git -C "$(brew --repo) " remote set-url origin https://mirrors.ustc.edu.cn/brew.git
替换 Homebrew Core
1 git -C "$(brew --repo homebrew/core) " remote set-url origin https://mirrors.ustc.edu.cn/homebrew-core.git
替换 Homebrew Cask
1 git -C "$(brew --repo homebrew/cask) " remote set-url origin https://mirrors.ustc.edu.cn/homebrew-cask.git
替换 Homebrew-bottles
对于 bash 用户:
1
2
echo 'export HOMEBREW_BOTTLE_DOMAIN=https://mirrors.ustc.edu.cn/homebrew-bottles' >> ~/.bash_profilesource ~/.bash_profile
对于 zsh 用户:
1
2
echo 'export HOMEBREW_BOTTLE_DOMAIN=https://mirrors.ustc.edu.cn/homebrew-bottles' >> ~/.zshrcsource ~/.zshrc
换回官方源 第一步:重置brew.git
1
2
cd "$(brew --repo) " git remote set-url origin https://github.com/Homebrew/brew.git
第二步:重置homebrew-core.git
1
2
3
cd "$(brew --repo) /Library/Taps/homebrew/homebrew-core" git remote set-url origin https://github.com/Homebrew/homebrew-core.git brew update
第三步:注释掉bash配置文件里的有关Homebrew Bottles即可恢复官方源。 重启bash或让bash重读配置文件。
APT镜像 1.先备份原始软件源
1 sudo cp /etc/apt/sources.list /etc/apt/sources.list.backup
2.编辑source.list文件
1 sudo vim /etc/apt/sources.list
3.修改软件源为国内镜像(任选其一)
清华大学镜像
1
2
3
4
5
6
7
8
9
10
deb http://mirrors.tuna.tsinghua.edu.cn/ubuntu/ xenial main restricted deb http://mirrors.tuna.tsinghua.edu.cn/ubuntu/ xenial-updates main restricted deb http://mirrors.tuna.tsinghua.edu.cn/ubuntu/ xenial universe deb http://mirrors.tuna.tsinghua.edu.cn/ubuntu/ xenial-updates universe deb http://mirrors.tuna.tsinghua.edu.cn/ubuntu/ xenial multiverse deb http://mirrors.tuna.tsinghua.edu.cn/ubuntu/ xenial-updates multiverse deb http://mirrors.tuna.tsinghua.edu.cn/ubuntu/ xenial-backports main restricted universe multiverse deb http://mirrors.tuna.tsinghua.edu.cn/ubuntu/ xenial-security main restricted deb http://mirrors.tuna.tsinghua.edu.cn/ubuntu/ xenial-security universe deb http://mirrors.tuna.tsinghua.edu.cn/ubuntu/ xenial-security multiverse
中科大镜像
1
2
3
4
5
6
7
8
9
10
deb http://mirrors.ustc.edu.cn/ubuntu/ xenial main restricted universe multiverse deb http://mirrors.ustc.edu.cn/ubuntu/ xenial-security main restricted universe multiverse deb http://mirrors.ustc.edu.cn/ubuntu/ xenial-updates main restricted universe multiverse deb http://mirrors.ustc.edu.cn/ubuntu/ xenial-proposed main restricted universe multiverse deb http://mirrors.ustc.edu.cn/ubuntu/ xenial-backports main restricted universe multiverse deb-src http://mirrors.ustc.edu.cn/ubuntu/ xenial main restricted universe multiverse deb-src http://mirrors.ustc.edu.cn/ubuntu/ xenial-security main restricted universe multiverse deb-src http://mirrors.ustc.edu.cn/ubuntu/ xenial-updates main restricted universe multiverse deb-src http://mirrors.ustc.edu.cn/ubuntu/ xenial-proposed main restricted universe multiverse deb-src http://mirrors.ustc.edu.cn/ubuntu/ xenial-backports main restricted universe multiverse
更新软件源
参考
清华大学Ubuntu镜像使用帮助 中科大Ubuntu源使用帮助
Android SDK镜像 方式一 修改 hosts 文件 在使用 Android SDK Manager 的时候,主要会连接到两个地址 dl.google.com 和 dl-ssl.google.com,
可以发现这两个地址都是无法正常访问的,如何解决呢?
我们可以通过修改 hosts 文件,将上面的地址定向到能正常访问的 Google 服务器。
我们可以使用站长工具的超级 ping
打开地址:http://ping.chinaz.com/,分别测试 dl.google.com 和 dl-ssl.google.com 的IP地址,
将获取到的IP写入以下文件
方式二 使用国内镜像源 mirrors.neusoft.edu.cn:80 //东软信息学院
Gradle镜像 https://developer.aliyun.com/mvn/guide
Android项目我们常用Gradle来下载依赖
找到对应的地方修改即可,修改后重新构建。
Gradle下载慢
https://mirrors.cloud.tencent.com/
gradle-8.0-bin.zip
放在类似这样的路径下
C:\Users\Administrator.gradle\wrapper\dists\gradle-8.0-bin\ca5e32bp14vu59qr306oxotwh
gradle-8.0-src.zip
Groovy 找到项目下的build.gradle文件
1
2
3
4
5
6
7
8
9
10
11
12
13
14
15
16
17
18
19
20
21
buildscript { repositories { // 修改的地方 maven { url 'https://maven.aliyun.com/repository/central' } maven { url 'https://maven.aliyun.com/repository/public' } maven { url 'https://maven.aliyun.com/repository/gradle-plugin' } maven { url 'https://maven.aliyun.com/repository/apache-snapshots' } google() } } allprojects { repositories { // 修改的地方 maven { url 'https://maven.aliyun.com/repository/central' } maven { url 'https://maven.aliyun.com/repository/public' } maven { url 'https://maven.aliyun.com/repository/gradle-plugin' } maven { url 'https://maven.aliyun.com/repository/apache-snapshots' } google() } }
新版本
1
2
3
4
5
6
7
8
9
10
11
12
13
14
15
16
17
18
19
20
21
22
pluginManagement { repositories { maven { url 'https://maven.aliyun.com/repository/central' } maven { url 'https://maven.aliyun.com/repository/public' } maven { url 'https://maven.aliyun.com/repository/gradle-plugin' } maven { url 'https://maven.aliyun.com/repository/apache-snapshots' } google() mavenCentral() gradlePluginPortal() } } dependencyResolutionManagement { repositoriesMode.set (RepositoriesMode.FAIL_ON_PROJECT_REPOS) repositories { maven { url 'https://maven.aliyun.com/repository/central' } maven { url 'https://maven.aliyun.com/repository/public' } maven { url 'https://maven.aliyun.com/repository/gradle-plugin' } maven { url 'https://maven.aliyun.com/repository/apache-snapshots' } google() mavenCentral() } }
KTS settings.gradle.kts
1
2
3
4
5
6
7
8
9
10
11
12
13
14
15
16
17
18
19
20
21
22
23
24
pluginManagement { repositories { maven("https://maven.aliyun.com/repository/central" ); maven("https://maven.aliyun.com/repository/public" ); maven ("https://maven.aliyun.com/repository/gradle-plugin" ) maven ("https://maven.aliyun.com/repository/apache-snapshots" ) google() gradlePluginPortal() } } dependencyResolutionManagement { repositoriesMode.set (RepositoriesMode.FAIL_ON_PROJECT_REPOS) repositories { maven("https://maven.aliyun.com/repository/central" ); maven("https://maven.aliyun.com/repository/public" ); maven("https://maven.aliyun.com/repository/gradle-plugin" ) maven("https://maven.aliyun.com/repository/apache-snapshots" ) maven("http://download.flutter.io" ) { // 信任http协议 isAllowInsecureProtocol = true } google() } }
支持Flutter
1 2 3 4 maven("http://download.flutter.io" ) { // 信任http协议 isAllowInsecureProtocol = true }
Maven Maven镜像 可用镜像 阿里云的镜像站(首推,新站,速度暴快)
1 2 3 4 5 6 <mirror > <id > aliyunmaven</id > <mirrorOf > *</mirrorOf > <name > 阿里云公共仓库</name > <url > https://maven.aliyun.com/repository/public</url > </mirror >
leancloud
1 2 3 4 5 6 <mirror > <id > nexus-leancloud</id > <name > Nexus leancloud</name > <url > http://mvn.leancloud.cn/nexus/content/repositories/public</url > <mirrorOf > central</mirrorOf > </mirror >
JBoss的仓库
1 2 3 4 5 6 <mirror > <id > jboss-public-repository-group</id > <mirrorOf > central</mirrorOf > <name > JBoss Public Repository Group</name > <url > http://repository.jboss.org/nexus/content/groups/public</url > </mirror >
使用方式 如果是自己安装的Maven
修改~/.m2文件夹下的settings.xml文件
如果使用的IDEA内置的Maven
IDEA根目录\plugins\maven\lib\maven3\conf\settings.xml
在<mirrors>标签下加入上述内容即可。如下:
1
2
3
4
5
6
7
8
9
10
11
12
13
14
15
16
17
18
19
20
21
<?xml version="1.0" encoding="UTF-8" ?> <settings xmlns ="http://maven.apache.org/SETTINGS/1.2.0" xmlns:xsi ="http://www.w3.org/2001/XMLSchema-instance" xsi:schemaLocation ="http://maven.apache.org/SETTINGS/1.2.0 http://maven.apache.org/xsd/settings-1.2.0.xsd" > <mirrors > <mirror > <id > aliyunmaven</id > <mirrorOf > *</mirrorOf > <name > 阿里云公共仓库</name > <url > https://maven.aliyun.com/repository/public</url > </mirror > <mirror > <id > repo1</id > <mirrorOf > central</mirrorOf > <name > Human Readable Name for this Mirror.</name > <url > http://repo1.maven.org/maven2/</url > </mirror > </mirrors > </settings >
如果想修改仓库位置,添加配置
1 <localRepository > D:\Tools\.m2\repository</localRepository >
Maven仓库 在
1 2 3 4 <project > <repositories > </repositories > </project >
中添加
阿里云
1 2 3 4 5 6 7 8 9 10 11 12 <repository > <id > maven-ali</id > <url > https://maven.aliyun.com/nexus/content/groups/public/</url > <releases > <enabled > true</enabled > </releases > <snapshots > <enabled > true</enabled > <updatePolicy > always</updatePolicy > <checksumPolicy > fail</checksumPolicy > </snapshots > </repository >
sonatype
1 2 3 4 5 6 7 8 9 10 11 <repository > <id > oss-sonatype-snapshots</id > <name > OSS Sonatype Snapshots Repository</name > <url > https://oss.sonatype.org/content/repositories/snapshots</url > <releases > <enabled > false</enabled > </releases > <snapshots > <enabled > true</enabled > </snapshots > </repository >
sun
1 2 3 4 5 6 7 8 9 10 11 <repository > <id > sun</id > <name > sun</name > <url > https://repository.jboss.org/nexus/content/groups/public-jboss/</url > <releases > <enabled > false</enabled > </releases > <snapshots > <enabled > true</enabled > </snapshots > </repository >
alfresco
1 2 3 4 5 6 7 8 9 10 11 <repository > <id > alfresco.public</id > <name > Alfresco Public Repository</name > <url > https://maven.alfresco.com/nexus/content/groups/public</url > <releases > <enabled > true</enabled > </releases > <snapshots > <enabled > false</enabled > </snapshots > </repository >
spring
1 2 3 4 5 6 <repository > <id > springsource-repo</id > <name > SpringSource Repository</name > <url > http://repo.springsource.org/release</url > </repository >
Ruby镜像 RubyGems 镜像
1
2
3
4
5
6
7
8
9
gem sources -l gem sources --add http://gems.ruby-china.com/ --remove https://rubygems.org/ gem sources -l *** CURRENT SOURCES *** http://gems.ruby-china.com/ gem install rails
如果你使用 Gemfile 和 Bundler (例如:Rails 项目)
1 bundle config mirror.https://rubygems.org http://gems.ruby-china.com
这样你不用改你的 Gemfile 的 source。
Flutter国内镜像 1 2 3 4 git clone -b beta https://github.com/flutter/flutter.git export PUB_HOSTED_URL=https://pub.flutter-io.cn //国内用户需要设置export FLUTTER_STORAGE_BASE_URL=https://storage.flutter-io.cn //国内用户需要设置export PATH=`pwd `/flutter/bin:$PATH
Flutter依赖镜像 修改Flutter的配置 该文件在Flutter安装目录/packages/flutter_tools/gradle/flutter.gradle
1 2 3 4 5 6 7 8 9 10 11 12 13 14 buildscript { repositories { //修改的地方 //google() //jcenter() maven { url 'https://maven.aliyun.com/repository/google' } maven { url 'https://maven.aliyun.com/repository/jcenter' } maven { url 'https://maven.aliyun.com/nexus/content/groups/public' } maven { url 'http://download.flutter.io' } } dependencies { classpath 'com.android.tools.build:gradle:3.2.1' } }
修改项目下配置 该文件在项目中android/build.gradle
1 2 3 4 5 6 7 8 9 10 11 12 13 14 15 16 17 18 19 20 21 22 23 buildscript { repositories { // 修改的地方 // google() // jcenter() maven { url 'https://maven.aliyun.com/repository/google' } maven { url 'https://maven.aliyun.com/repository/jcenter' } maven { url 'https://maven.aliyun.com/nexus/content/groups/public' } maven { url 'http://download.flutter.io' } } } allprojects { repositories { // 修改的地方 // google() // jcenter() maven { url 'https://maven.aliyun.com/repository/google' } maven { url 'https://maven.aliyun.com/repository/jcenter' } maven { url 'https://maven.aliyun.com/nexus/content/groups/public' } maven { url 'http://download.flutter.io' } } }
NPM镜像 推荐配置 1 2 3 npm config set registry https://registry.npmmirror.com/ npm cache clean -f npm config list
其中npm config提供的参数:
registry 是设置依赖的镜像disturl是设置Node的镜像sass_binary_site是sass的镜像electron_mirror是electron的镜像python_mirror是python的镜像
新版本除了registry,其他都没法用命令设置了
我们可以编辑文件
添加
1 2 3 4 5 registry=https://registry.npmmirror.com/ disturl=http://npmmirror.com/mirrors/node/ electron_mirror=http://npmmirror.com/mirrors/electron/ python_mirror=http://npmmirror.com/mirrors/python/ sass_binary_site=http://npmmirror.com/mirrors/node-sass/
华为镜像 华为开源镜像站同时也提供了工具类加速镜像:
1 2 npm config set registry https://mirrors.huaweicloud.com/repository/npm/ npm cache clean -f
※ 设置nodejs 工具的镜像地址
1 npm config set disturl https://repo.huaweicloud.com/nodejs
※ 设置Electron 和Python 的镜像地址
1 2 npm config set electron_mirror https://repo.huaweicloud.com/electron/ npm config set python_mirror https://repo.huaweicloud.com/python
※ 设置浏览器引擎驱动镜像地址
1 2 3 npm config set phantomjs_cdnurl https://repo.huaweicloud.com/phantomjs npm config set chromedriver_cdnurl https://repo.huaweicloud.com/chromedriver npm config set operadriver_cdnurl https://repo.huaweicloud.com/operadriver
※ 设置Node-Sass 的镜像地址
1 npm config set sass_binary_site https://repo.huaweicloud.com/node-sass
安装报错,版本不匹配
Node Sass could not find a binding for your current environment: Windows 64-bit with Node.js 12.x
更换版本即可"node-sass": "^4.12.0",
更换后
在项目目录下,分别执行一下两个命令:
再执行
node-sass版本依赖关系
https://www.npmjs.com/package/node-sass
NodeJS
Supported node-sass version
Node Module
Node 19
8.0+
111
Node 18
8.0+
108
Node 17
7.0+, <8.0
102
Node 16
6.0+
93
Node 15
5.0+, <7.0
88
Node 14
4.14+
83
Node 13
4.13+, <5.0
79
Node 12
4.12+, <8.0
72
Node 11
4.10+, <5.0
67
Node 10
4.9+, <6.0
64
淘宝镜像 1 2 3 4 5 6 7 8 9 10 11 12 npm config set registry https://registry.npm.taobao.org/ npm config set disturl https://npm.taobao.org/mirrors/node/ npm config set sass_binary_site https://npm.taobao.org/mirrors/node-sass/ npm config set electron_mirror https://npm.taobao.org/mirrors/electron/ npm config set python_mirror https://npm.taobao.org/mirrors/python/ npm config set sharp_dist_base_url https://npm.taobao.org/mirrors/sharp-libvips/ npm config set puppeteer_download_host https://npm.taobao.org/mirrors/ npm config set phantomjs_cdnurl https://npm.taobao.org/mirrors/phantomjs/ npm config set sentrycli_cdnurl https://npm.taobao.org/mirrors/sentry-cli/ npm config set sqlite3_binary_site https://npm.taobao.org/mirrors/sqlite3/
Electron镜像 查看配置文件的位置
可以查看到本机的userconfig在哪,即.npmrc文件在哪
比如我的
1 userconfig C:\Users\Jian\.npmrc
打开该文件 添加
1 2 registry=https://registry.npmmirror.com electron_mirror="https://npm.taobao.org/mirrors/electron/"
仅适用于中国区客户
MacOS
1 2 3 4 5 6 7 export ELECTRON_MIRROR="https://npm.taobao.org/mirrors/electron/" export ELECTRON_CUSTOM_DIR="7.1.14" export SASS_BINARY_SITE="https://npm.taobao.org/mirrors/node-sass/" export ELECTRON_BUILDER_BINARIES_MIRROR="https://npm.taobao.org/mirrors/electron-builder-binaries/" npm install --registry=https://registry.npm.taobao.org
Windows
1 2 3 4 5 6 7 set ELECTRON_MIRROR=https://npm.taobao.org/mirrors/electron/set ELECTRON_CUSTOM_DIR=7.1.14set ELECTRON_BUILDER_BINARIES_MIRROR=https://npm.taobao.org/mirrors/electron-builder-binaries/set SASS_BINARY_SITE=https://npm.taobao.org/mirrors/node-sass/npm install --registry=https://registry.npmmirror.com
Docker镜像 Yum中Docker镜像
1 2 3 4 5 6 7 8 9 10 11 12 13 14 15 16 17 18 19 yum remove docker docker-common docker-selinux docker-engine yum install -y yum-utils device-mapper-persistent-data lvm2 yum-config-manager --add-repo https://download.docker.com/linux/centos/docker-ce.repo yum-config-manager --add-repo http://mirrors.aliyun.com/docker-ce/linux/centos/docker-ce.repo yum install docker-ce docker-ce-cli containerd.io systemctl start docker systemctl enable docker docker logs kms docker logs -f kms
镜像配置 针对Docker客户端版本大于 1.10.0 的用户
创建或修改 /etc/docker/daemon.json 文件
1 vi /etc/docker/daemon.json
添加或修改
1 2 3 { "registry-mirrors" : [ "https://docker.1ms.run" ] }
重启Docker
1 2 systemctl daemon-reload systemctl restart docker.service
阿里云镜像搜索地址
https://cr.console.aliyun.com/
毫秒镜像 https://1ms.run/
默认安装的Docker版本太低,需要我们使用上面的一键安装脚本安装。
全局配置
1 curl -sSLO https://static.1ms.run/1ms-helper.bin && chmod +x 1ms-helper.bin && ./1ms-helper.bin config:mirror
先安装依赖
1 sudo yum reinstall ca-certificates
登录
1 curl -sSLO https://static.1ms.run/1ms-helper.bin && chmod +x 1ms-helper.bin && ./1ms-helper.bin config:account
安装
1 docker pull python:3.8.10
临时使用
1 docker pull docker.1ms.run/python:3.8.10
SBT镜像 SBT的仓库配置文件位置为:~/.sbt/repositories ,您可以点击此处直接下载配置文件。您也可以在~/.sbt/目录下新建 repositories 文件,添加如下内容:
1 2 3 4 [repositories] local huaweicloud-ivy: https://repo.huaweicloud.com/repository/ivy/, [organization]/[module]/(scala[scalaVersion]/)(sbt[sbtVersion]/)[revision]/[type ]s/artifact.[ext],allowInsecureProtocol huaweicloud-maven: https://repo.huaweicloud.com/repository/maven/,allowInsecureProtocol
在**<sbt安装目录>/conf/sbtconfig.txt**文件中添加如下内容:
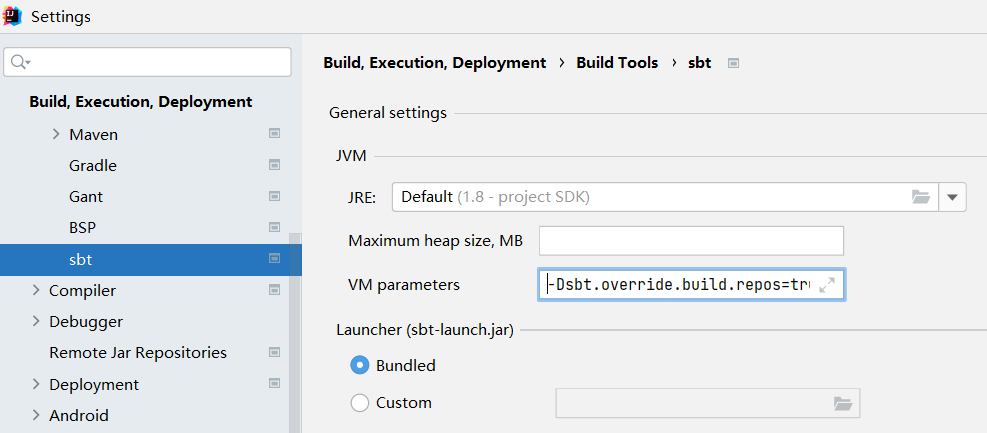
1 -Dsbt.override.build.repos=true
如果是使用IDEA
在VM parameters中添加配置
Python镜像 常用地址
华为:https://mirrors.huaweicloud.com/repository/pypi/simple
清华:https://pypi.tuna.tsinghua.edu.cn/simple
阿里云:http://mirrors.aliyun.com/pypi/simple/
中国科技大学 https://pypi.mirrors.ustc.edu.cn/simple/
注意:
新版ubuntu要求使用https源,要注意。
永久修改 Linux下 修改 ~/.pip/pip.conf(没有就创建一个文件夹及文件。文件夹要加.,表示是隐藏文件夹)
Windows下 直接在User目录中创建一个pip目录,再新建文件pip.ini。如C:\Users\Administrator\pip\pip.ini
打开用户目录
创建pip文件夹
创建pip.ini文件
内容 内容如下:
清华大学镜像
1 2 3 4 [global] index-url = https://pypi.tuna.tsinghua.edu.cn/simple[install] trusted-host = pypi.tuna.tsinghua.edu.cn
华为云镜像
1 2 3 4 [global] index-url = https://mirrors.huaweicloud.com/repository/pypi/simpletrusted-host = mirrors.huaweicloud.comtimeout = 120
注意
不建议用阿里云的镜像,限速限的厉害。
验证是否生效
临时使用 可以在使用pip的时候加参数-i https://mirrors.huaweicloud.com/repository/pypi/simple
1 pip install --trusted-host mirrors.huaweicloud.com -i https://mirrors.huaweicloud.com/repository/pypi/simple deepface
Go镜像 https://goproxy.io/zh/
临时生效 Bash (Linux or macOS)
1 2 3 4 # 配置 GOPROXY 环境变量 export GOPROXY=https://proxy.golang.com.cn,direct # 还可以设置不走 proxy 的私有仓库或组,多个用逗号相隔(可选) export GOPRIVATE=git.mycompany.com,github.com/my/private
PowerShell (Windows)
1 2 3 4 # 配置 GOPROXY 环境变量 $ env :GOPROXY = "https://proxy.golang.com.cn,direct" # 还可以设置不走 proxy 的私有仓库或组,多个用逗号相隔(可选) $ env :GOPRIVATE = "git.mycompany.com,github.com/my/private"
设置完上面几个环境变量后,您的 go 命令将从公共代理镜像中快速拉取您所需的依赖代码了。或者,还可以根据文档 进行设置使其长期生效。
使配置长久生效 (推荐) 上面的配置步骤只会当次终端内生效,如何长久生效呢,这样就不用每次都去配置环境变量了。
Mac/Linux
1 2 3 4 5 # 设置你的 bash 环境变量 echo "export GOPROXY=https://proxy.golang.com.cn,direct" >> ~/.profile && source ~/.profile # 如果你的终端是 zsh,使用以下命令 echo "export GOPROXY=https://proxy.golang.com.cn,direct" >> ~/.zshrc && source ~/.zshrc
Windows
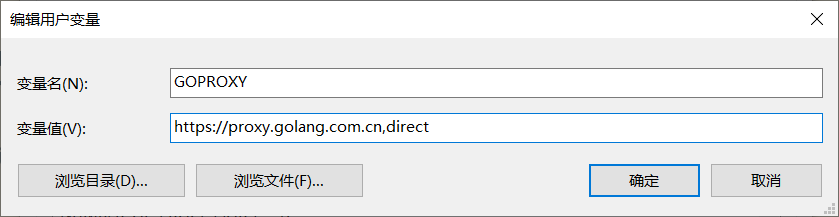
右键 我的电脑 -> 属性 -> 高级系统设置 -> 环境变量
在[你的用户名]的用户变量 中点击 新建 按钮
在 变量名 输入框并新增 GOPROXY
在对应的 变量值 输入框中新增 https://proxy.golang.com.cn,direct
最后点击 确定 按钮保存设置
如图
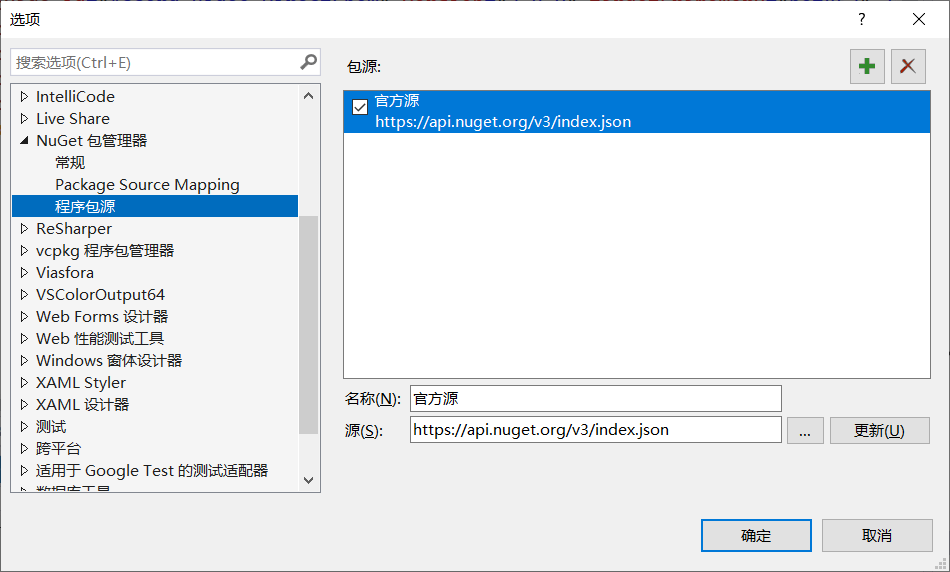
NuGet源 源地址
https://api.nuget.org/v3/index.json
设置位置